Home

Recent Posts

A Guide to Choosing the Best Fifth Wheel Hitch


best fifth wheel hitch

Searching for the best fifth-wheel hitch may be a challenge if you don’t know what you’re looking for. You have to understand first what it is, what it does, and what to look for in a good product. You also have to learn about some of its types so you can align it to your needs and preferences. In this article, we will be discussing all you have to know about the fifth wheel hitches.

If you are having a rough time deciding which one to buy, we are here for you. After you read this article, we’ll be providing you with valuable information so you can make a more relevant decision. We will be featuring the top five choices for the best fifth-wheel hitch available in the market right now. With our recommendations, you will be able to narrow down your choices.


What is a Fifth Wheel Hitch?

Before we proceed with the discussions, let’s talk about what a fifth-wheel hitch is and what its benefits are. A fifth-wheel hitch is a device supporting the weight of a semi-trailer while being transported by a pickup truck. It’s very important to have the hitch properly installed. It’s because the heaviness of the trailer will press down between the rear axle and the cab of the truck.

It’s vital that you know the overall weight of your trailer first. That would include all your furniture and gear inside the trailer. Buying a hitch that will not support the weight of your trailer is not only useless but also very dangerous. Your decision to purchase the best fifth-wheel hitch should be based on this. Lastly, the fifth-wheel hitch serves as the connection between your trailer and your truck.

There are lots of benefits a fifth-wheel hitch can provide, and we will discuss some of them here. It will offer you a significant way to support any type of trailer. It is also very convenient since you can detach the hitch anytime you want. You can also use it if you wish to utilize your trailer for other purposes.

Your trailer will be kept safe from damage if you purchase the best hitch available. If you have the best, it is guaranteed that the hitch will come with fewer weight limitations. This will ultimately work to your advantage as you can carry a lot more for a longer period of time.


Types of Fifth-Wheel Hitch

In this section, we will be discussing some of the most popular types of fifth-wheel hitches. You have to take this into consideration, as you need to know which one you need before making the purchase.

AD

  • 2-way Pivot Head: It is a regular fifth-wheel hitch that works in two ways. It permits the truck to drive against an incline prior to the trailer reaching a grade change.
  • 4-way Pivot Head: It is a fifth-wheel hitch that allows you to pivot side to side. This type of hitch will make traveling easier, even on uneven surfaces.
  • Gooseneck Hitch: It is a hitch that provides you the ability to haul gooseneck trailers. You can install this to the truck’s frame by using the existing setup, which you can also remove later.
  • Fifth Wheel Hitch with Universal Rails: As the name suggests, it can be installed on any trailer. This is very easy to install, as you won’t have to drill holes into the truck’s frame.
  • Fifth Wheel Hitch with Custom Rails: This hitch comes with a personalized set of rails. Also, as the name suggests, it is highly customizable and already has existing drilled holes.
  • Single Jaw: This type offers one grab jaw that you can easily connect to the fifth wheel hitch by using rails.
  • Double Jaw: The double-jaw hitch can also double the power it can offer. It has also been proven that it can help you with your hitch needs because of its powerfully designed mechanism.

Essential Factors to Consider in Choosing the Best Fifth Wheel Hitch

Before we conclude, we are going to discuss the essential factors you have to consider in choosing the best. You have to be informed of what makes a good fifth-wheel hitch. With this list, you will be able to make a better decision in buying the best fifth-wheel hitch.

  • Installation: You have to make sure that your trailer and your truck match, as it will allow easier installation. There are units that you can easily install without any help from others. In addition, look for products that come with a kit, so you won’t have to worry about buying individual parts.
  • Exterior: Most fifth-wheel hitches are made of fiberglass that ensures glossy shine and color. You also have to make sure that it can carry the required weight of your trailer.
  • Ease of Use: You have to choose one that will be very convenient to use. Most units provide you ease of use, as you can connect and disconnect it according to your needs.
  • Price: Expensive ones may or may not guarantee that the product is high quality. You have to correlate their features to their prices so you can evaluate your options better.
  • Weight Capacity: It is very dangerous to drive a trailer supported by an incorrect hitch. You have to ensure that your hitch can accommodate the overall weight of your trailer.

Top Five Choices for the Best Fifth Wheel Hitch

Product (Amazon Links)Weight Rating  

CURT 16130 Q20 Fifth Wheel Hitch

20,000 lbs

Review

CURT 16180 A25 5th Wheel Hitch, 25,000 lbs, Black

25,000 lbs

Review

B&W Trailer Hitches RVK3400 Companion Slider 5th Wheel Hitch

20,000 lbs

Review

Reese 30128 Pro Series 15K Fifth Wheel Hitch

15,000 lbs

Review

Andersen Hitches 3200 | Ultimate 5th Wheel Connection | Rail Version | 5th Wheel Hitch | Weighs Only 40 Pounds!

20,000 lbs 

Review

After learning what a fifth-wheel hitch is, we can now move on to the most exciting part of the article. We are now going to discuss the top five recommendations for the best fifth wheel available in the market. This is the most critical part, as your decision will come from the list presented below. Just make sure you review their features, pros and cons, so you will have a more informed decision.


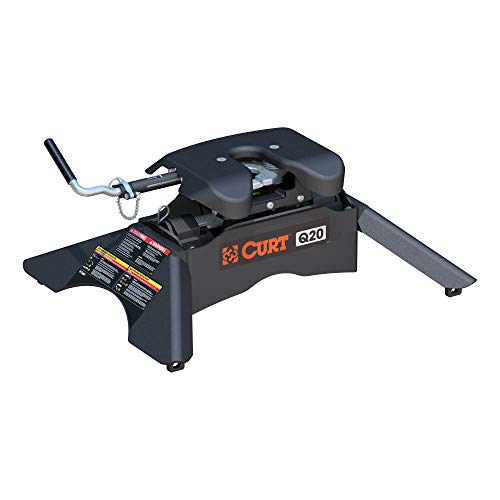
1. CURT 16130 Q20 Fifth Wheel Hitch

AD

The Curt Fifth Wheel Hitch is strategically engineered to tow your trailer as noiselessly as possible. It is designed with a spherical axial bearing and has a one of a kind pivoting mechanism. This permits the hitch head and coupling point to lean into the required direction, thus allowing a smoother ride. In addition, to provide continuous lubrication, the hitch head includes three-grease fittings.

A great feature of this product is that the rubber stoppers are thick enough to act as a cushion as it moves. The Curt Q20 can accommodate 20,000 pounds of weight and is compatible with various mounting options. Another thing to note about this product is that it’s short-throw, lockable and its operation is single-handle. Lastly, the jaws provide 360 degrees contact to prevent noise.

Pros:

  • Can carry weight up to 20,000 pounds
  • Single-handle operation and is lockable
  • Tows your vehicle quietly
  • Hitch head has three grease fittings for continuous lubrication

Cons:

  • Some users commented about the safety while using this hitch
  • May be difficult to install according to some reviews

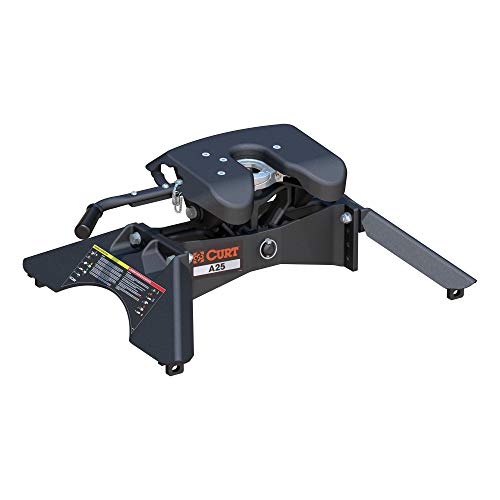
2. CURT 16180 A25 5th Wheel Hitch, 25,000 lbs, Black

AD

The Pro-Series 30056 Fifth Wheel Hitch has a four-way pivoting head with a 5-degree tilted side for easy hook-up. It also features a rounded slide bar jaw mechanism, which is designed for automatic latching. Not only that, the product already comes with a mounting kit for convenience. The Pro-Series Hitch is very easy to install and has a three-year limited warranty.

This product has very similar features with its competitors. While it is very easy to install, it’s also very easy to unhook. It can accommodate the weight of 15,000 pounds and item weight is only 75.5 pounds. Another benefit of this product is that the slide bars are designed with strength and its rails are made of standard quality.

Pros:

  • Features 4-way pivoting head for easy attaching
  • Has a rounded slide bar jaw mechanism for automatic self-latching
  • Comes with a mounting kit
  • Can carry weight up to 15,000 pounds

Cons:

  • Slide bars can make noise compared to the jaws
  • Average quality

3. B&W Trailer Hitches RVK3400 Companion Slider 5th Wheel Hitch

AD

The B&W RVK3400 Fifth Wheel Hitch is a general mount for the center of your pickup truck. This feature is made by the company in order to accommodate almost everybody’s needs. Not only that, the fifth wheel hitch can carry weight up to 20,000 pounds and item weight is 207 pounds. What’s unique about this hitch is that the mounting system is under-bed.

Once you meet the weight requirements, the hitch’s slider will permit you to maneuver even in narrow spaces. Having this means you have one fewer thing to worry about. For a fifth wheel hitch, it’s guaranteed that you’ll never regret buying it. If you want the best one, this might be your choice.

Pros:

  • Can accommodate weight up to 20,000 pounds
  • Features under-bed mounting system
  • Slider will allow you to maneuver in tight spaces

Cons:

  • May take up space if you are to install it in a truck bed

4. Reese 30128 Pro Series 15K Fifth Wheel Hitch

AD

The Reese 30128 Fifth Wheel Hitch is designed to haul trailers with the use of a long bed pickup truck. It is rated to carry weight up to 15,000 pounds, along with 3,750 of tongue weight. Like the other models, it has a 4-way pivoting head system that allows easy attaching even on uneven surfaces. Not only that, the height of the head can be adjusted from 13 inches to 17 inches.

One great feature of this product is that it comes in a complete kit. By that way, you will not have to worry anymore about buying separate parts. To add, the kit also includes a 30035 10-bolt mounting kit. This product is highly recommended for very simple and easy setup and you can also use it for long drives. Lastly, it is guaranteed that this hitch is a great.

Pros:

  • Can accommodate weight up to 15,000 pounds
  • Features a four-way pivoting head mechanism
  • Comes in a kit with complete parts

Cons:

  • Can be tricky to use
  • Some users had issues regarding dents upon delivery of their purchase

5. Andersen Hitches 3200 | Ultimate 5th Wheel Connection | Rail Version | 5th Wheel Hitch | Weighs Only 40 Pounds!

AD

The Anderson 3200 Fifth Wheel Hitch guarantees the fastest installation time and it only requires one person. It only weights 40 pounds but can accommodate weight up to 20,000 pounds with 4500-tongue weight. It can provide you a smoother drive as it can swivel in every direction that any hitch out there. To add, it also features a ball-funnel that allows easy hookup and removal.

A benefit of having this type of hitch is that it allows you to connect and disconnect your trailer with ease. It is also suited for Andersen’s remote release cable assembly. It also can be installed to short, standard and long bed trucks without requiring any additional parts or adapters. Another great feature of this product is that it also guarantees you a smoother and noiseless drive.

Pros:

  • Easy to install and requires only one person to do the job
  • Can carry weight up to 20,000 pounds
  • Offers more swivel in almost every direction
  • Easy to connect and disconnect

Cons:

  • Some users had issues with the pin box hitting the sides of the bed.

Conclusion

We discussed the things you have to know about the fifth wheel hitch. We hope we helped you make your decision. It may seem tricky at first, especially if you have no idea what you’re looking for. To get the best fifth-wheel hitch, you have to review the discussions above. It will be of great help to narrow down your choices for easier decision-making. The best way to do this is to check with your manufacturer first before buying one.

How To Buff Your Car Properly?


How to Buff a Car

Do you feel it’s high time you gave a touch-up to your car in spite of the care you give daily? Has your car become dull in appearance and lost its charm? Don’t worry; that’s exactly when the process of buffing your car comes into play.

The exterior finish of the cars will be lost over time as it is exposed to detrimental environmental elements like acid rains or other contaminants. The constant exposure to sun and other pollutants will cause the car’s paint to corrode and fade with time. In the long run, it loses its luster and glory.

For those who are new to the term ‘Buffing,’ it’s slightly different from the term Polishing. To give you an idea, your car’s paint is covered with a hardened surface called a clear coat, and this prevents the paint from becoming damaged due to continuous exposure to contaminants and UV rays of the sun.

When the surface becomes dull, Buffing can be done to remove a thin layer of paint from the surface of your car, exposing a fresher layer of paint from beneath. This makes the surface shiny again. Buffing, in fact, will help to restore the clear coat for cars and will help you reinstate the original luster and thus improve the overall appearance of your car.

Apart from the fact that buffing will make your car look all new again, there are further advantages it will give a long-lasting finish to the car, and it will help to remove minor blemishes and scratches if they are not deep. Buffing of your cars should be done every 2 to 3 months to yield better results.

Now we will go into the details; let’s gather the required materials before starting the process of buffing:


1. Manual Buffing

Materials required: Bucket of warm water, buffing compound, polishing pads, car wash soap, and Microfiber cloth.

manual buffing

Photo Credit: https://carsavvier.com/zen-buffing-car/

  • Wash your car: Rinse off loose dirt on the entire surface of your car using a hose or a pressure washer. Take a bucket of water and add car washing soap, then start wiping off the stuck-on particles from the top of the car to the bottom by using a soft car wash sponge or a car wash mitt.
  • Dry your car carefully: After your car is washed thoroughly, dry it by wiping it with a dry microfiber cloth. The cleaner should be carefully removed from all over the surface.
  • Manual buffing: Apply the buffing compound carefully to a small area of your car, smear it properly onto the surface of the car, and then buff your paint with the compound in small circles with moderate to heavy pressure.
  • Dry and wipe: Apply the compound gently all over your car and allow it to dry. Once the compound is dry, wipe it off using a clean, dry cloth.

Remember that a low-quality buffer can make your car’s paint appear cloudy. Always go for high-quality buffers. One of the best car buffers available is Meguiar’s M205 mirror glaze ultra finishing polish. You can redo buffing if you are not happy with the gloss obtained after buffing once.

There is an element of risk associated with manual buffing as it is labor intensive and time-consuming, and the result also depends on many factors. It depends on your efficiency and the experience you have in buffing. But manual buffing will help you save the cost.


2. Power Buffing

Materials required: Bucket of warm water, buffing compound, power buffer, polishing pads, car wash soap, and Microfiber cloth. After washing and rinsing your car to remove the dust particles and contaminants, the following steps can be followed:

power buffing

Photo Credit: http://www.supercheapauto.com.au/articles/car-cleaning/tips-on-using-an-electric-buffer/175

  • Apply the polishing compound: The selection of the polishing compound is very crucial, and this plays a vital role in getting the best results. The polishing compound suitable for your car models should be selected. Apply the polishing compound directly onto the surface of your car carefully.
  • Power buffing: Power buffers can be used to buff your cars to get that glossy finish. Assemble the power buffer by putting a buffing pad on the power buffer. The cloth should be designated for buffing, and ideally, the pad should be five to six inches in diameter size. Apply the buffing compound to the pad. The buffing compound will act as a lubricant and will prevent the foam of the pad and the paint of your car from damage.
  • Apply and smear compound: Apply the buffing compound onto the surface of the surface of the panel and check carefully whether the complete area is covered. Choose one area at a time to avoid missing any area to get an even finish. Smear the compound using the buffing pad. Place the buffing pad in such a way that you maintain complete contact with the paint.
  • Turn on the buffer: Switch on the buffer and move it from side to side. Sweep it over the surface to cover the whole panel. Work using moderate pressure over the whole surface of your car.
  • Wipe: Wipe down gently using a microfiber cloth.

Repeat the step if you are not happy with the obtained finish. Remember, if you work on a particular area for a long using a power buffer, it can result in overheating and subsequent damage to the paint and clear coat in that area. Always keep the polisher in motion while it is turned on.

The high-speed buffer can be used to eliminate the blemishes and scratches completely, and this also brings in great shine. But remember, improper usage of high-speed buffers will affect the appearance to a great extent, and it will leave scratches and swirls on the surface of your car.

Random orbital buffers can be used in case you require a greater finish with much less effort. But it might not last for long.

Polishing or rubbing compounds are used to add sheen to the surface and to have an even coloring. It enhances the glow and adds depth and clarity to the finish. You can rub the polishing compound lightly using a wet microfiber cloth and remove it using another piece of microfiber cloth.

Power Buffing

Wax can also be applied over the polishing compound to protect the clear coat from contaminants and ultraviolet rays. Be careful when choosing wax as some of them cannot be applied with high speed, which can damage your paint.

Use the right combination of buffing compound, buffing pad, and speed of the power buffer to get the best results out of buffing. Inspect your job at regular intervals to spot any blemishes on the surface of your car or whether an area is missing.

By following these instructions, you will find it very simple to do buffing. Get help from experts while selecting the buffers, polishing agents, and waxing agents for your cars. It’s always good to get guidance from an expert about which would be suitable for your car model.

The power buffer should always be held near your shoulder, and you must avoid using high speeds and high pressure when buffing. If you are a novice, manual buffing is not advised at all; you can choose manual buffing when money is a problem.

Try to approach a professional initially and observe him buffing, and slowly and gradually try to do it on your own. Try these simple steps next time and share your comments.

How To Use Clear Your Car Paint Like An Expert?


How to Clean Car Paint Properly

Do It Yourself (DIY)

When it comes to your car, you have a sentimental attachment to it. Therefore, you’ll like your car to look new and fresh from the showroom. The original paint provided by the manufacturer provides protection and decoration to your car.

However, your car is always exposed to an external environment that may cause discoloration, peeling, cracking, and marring of the paint, so you have to clean, treat, and condition the paint of your car properly and regularly. You can do it yourself if you know how to clean your car paint.


Frequency of Cleaning

It depends upon the manner in which you drive your car and how long it is exposed to the UV rays of the sun. Usually, the dirt and pollen get embedded in the painting coat of your car. So, cleaning it weekly will be your best option to keep it ever shining and glazing. You do not have to hire the service of an expert. Nobody can know the age of your car.

You need to take the following steps sequentially to make it look like an expert’s job.

clear your car paint

Photo Credit: https://www.youtube.com/watch?v=iP6GAU2mSvU

Step 1: Preparation

Select a cool place where direct sunlight does not fall. Be sure that the paint is cool to the touch. Before washing, spray enough water on it so as to remove any solid particles or contaminants to avoid scratching.

Step 2: Washing

The basic objective of washing is to remove the top layer of dirt or dust embedded over the clear coat. Prepare yourself with the appropriate tools and materials. These may include a washing mitt or a soft piece of cotton, about five gallons of water, and automotive cleaning products that are pH-balanced and non-detergent. You may also use a clay bar. Such cleansers will not strip off the layer of wax or put over the paint coat but act as a protection against the glaze and shining.

Step 3: Ensure Proper Drying

Perfect drying prevents water spots that may be caused by the deposit of the pesky minerals. You have the option of drying with sheepskin chamois pure cotton cloth or paint-safe drying towels. If you use microfiber or polyester drying devices, they may put scratches over the paint surface. You may use drying towels specially designed for the purpose.

Step 4: Rewashing

After drying, if you still find some contaminating particles, you may use the clay bar, as it can pull off the obstinate contaminated particles from the surface of your car. You can get the clay bar in a kit. Spray the still unlearned area and slowly glide the clay over the clay over the surface of your car paint. For removing heavy tar deposits, use a specialty solvent.

Step 5: Old Oxidized Paint

Old Oxidized Paint

Your car surface may still look dull if the paint is oxidized. In that case, you may apply the polish to remove the least of the paint. For a persisting condition, you may apply cleansers and may use rubbing compounds for the worst condition, which may remove a higher amount of paint surface.

Step 6: Waxing

A coat of wax protects the paint of your car. You may use a carnauba wax or paint sealant. Wax gives a better shine and protects the paint surface for eight to twelve weeks. The car sealant provides slightly less glaze but lasts for more than six months.


How to Touch Up Your Car?

While you are driving your car, a small solid particle of debris jumps up and strikes the car’s surface. This may cause chipping or scratches on your car surface that may be too small, equivalent to a pencil eraser. It does not need a professional painting. You can do it yourself by giving touch ups. Therefore, it is essential for you to know, how to touch up your car. The following stepwise process will ease out your job:

clear your car paint

Photo Credit: http://centerlinewraps.com/paint_protection

Step 1: Buying Matching Paint Color

You cannot exactly differentiate the color shades of paints. You have to refer to the paint code number to select the matching color. You can get this code from the firewall or bulkhead; it is a piece of sheet metal that separates the engine from passengers sitting inside. Open your hood to find it. Also buy primer, along with the matching paint

Step 2: Arresting the Rust

If you find a rusted, chipped area, gently apply a small amount of the rust arrestor over the chipped area. Therefore, the rust cannot spread underneath your touch area.

Step 3: Washing

Wash only the affected area where you are going to put your touch up.

Step 4 Pretreatment of the Chip

Pretreatment of the Chip

Remove the wax from the affected area by applying wax remover. If you find loose paint, remove the same by using a nick sander. For proper sticking of the primer, once again, sand the area with 220 grit sandpaper. Finally, wash the affected area with water to remove the wax and any debris that might have been left over.

Step 5: Application of Primer

If the metal is bare, the paint will not adhere to it. If the chip is deep, squeeze a dab of primer onto the affected area. You can also spread the primer by using a tiny brush. Then allow it to dry perfectly.

Step 6: Test the Paint

To be very sure that the color of the touch-up paint perfectly matches the color of your car paint, apply the paint on an unexposed area, such as the lip below the car door, and compare it.

Step 7: Painting the Primed Area

clear your car paint

Photo Credit: http://reikian.com/gallery/automotive-clear-coat-spray-paint.html

After shaking the paint bottle well, take some in a shallow dish. Apply two or three layers of the touch-up paint so that the spot looks elevated. Leave it for 24 hours before you restart the process.

Step 8: Finishing off the Surface

Restart the work by slowly sanding the area with sandpaper of 1000 grit, followed by sand papers of 2000 grit and 3000 grit. The elevated portion of the spot should be smoothed to become even and exactly cope with its adjoining areas. Finally, polish and wax the entire area of your car.

It is a little complicated to understand clear coats for the car. Some believe that it does not need waxing. In fact, it is painted without pigment. And it is also known as the 2nd stage paint. The pigmented paint is known as 1st stage paint. Light penetrates the clear coat and is reflected from the pigmented paint lying underneath.

Finishing off the Surface

It backlights if there is any imperfection of the clear coat. If there is any minor scratch or swirl on the surface of the clear coat, the backlight becomes more virtually obvious.

The clear coat protects the lower coat from UV rays and harmful chemicals, dirt, acid rain, bee pollen, and bird droppings. It is a protective layer to color coat and provides additional depth and glaze to it.

To test if your car is “Clear Coat Safe” or not, take some polishing compound on a clean rag and rub the car surface with pressure. If the color of car paint comes on it, your car is not clear-cut safe. You need to adopt the same cleaning, washing, and waxing method to maintain a safe, clear coat.

How To Use Car Battery Charger Effectively?


How to Use a Car Battery Charger

Your car battery is the ‘life-giver’ of your car. It starts the ignition of your car engine and runs other electrical equipment like lights, A/C, etc. It needs to be in fully charged condition. Usually, your car battery is charged by the alternator when it runs. But for different reasons, the charge came down and needs to be connected to a charger for recharging. It is, therefore, essential for you to know how to use car battery charger.

As a general rule of thumb, you may go step by step while charging your battery. Only then will the process be most effective, and your battery will be fully prepared to provide the required power to your car.


Step 1: Know Your Battery Specification

If your car battery is the one that came with your car from the showroom, you can refer to the Owner’s Manual provided by the car company. You can then know about the voltage required for charging. Although most car batteries are 12 Volt, the charging voltage may vary with the temperature and the quantum of charge it presently has. You can also get useful guidance from the manual.

Step 2: Know Your Battery Charger

Know Your Battery Charger

Battery chargers have different specifications and recharging processes. Go through the manual of the battery charger and familiarize yourself with its different functionalities and components such as dial, button, the reading, and so on.

Step 3: Working Location

You can take up the work either with the battery still in its compartment in the car or in an open and ventilated area. You know that the battery generates hydrogen gas from its cells. It is essential that you keep away volatile substances like flammable materials, gasoline, lighters, flames, cigarettes, and other quickly ignitable substances.

Step 4: Use Protective Gears

Remember that battery charging is hazardous work. Therefore, protect yourself well by using gloves, glasses, helmets, and boots. There is a chance that the hydrogen generated may cause an explosion of the battery in case of failure of the venting mechanism. If the hydrogen contacts atmospheric oxygen, even a static electricity may cause ignition.

Step 5: Disconnecting Power Accessories

Disconnect or turn off all the accessories that draw power from the battery.

use car battery charge

Photo Credit: http://www.hilka.co.uk/support_zoom.asp?s=83500012

Step 6: Location of battery

Different cars have different locations inside a car. You may find it either under the hood of your car, under the rear seat or even on the side of your car.

Step 7: Connecting the Charger

One post of your battery is grounded to the chassis of your car. A+ mark on your battery indicates the positive post of your battery. The positive clamp off you charger is red. Connect this to the positive post. Connect the black clamp to the negative (-) post. Also, mark the diameters of the battery posts. You will find the positive post thicker than the other one.

Step 8 Setting the Charger

Set the ampere and voltage that are required for the battery. If you have sufficient time, use the trickle charging method. In that case, you have to set the charger at lower amperage, and the charging will be more effective. If you are in a hurry, you can set the charge at higher amperage.

Step 9: Plugging into Charge

use car battery charge

Photo Credit: http://www.ebay.co.uk/gds/How-to-Use-a-Battery-Car-Charger-/10000000181849742/g.html

After plugging in the charger, allow it to do its work. You may either set a particular timing for charging, or the charger may shut off automatically after completing its job. Never trample the cord while the charging is in the process.

Step 10: Disconnecting

After the charging is over, turn off the charger and unplug it from the socket. Disconnect the cables in the reverse order of connecting. While removing the clamp, first remove the negative terminal, then the positive one. Your car battery is now ready to function.


Hazards of a Frozen Car Battery

Just as your car battery dies due to different reasons, it may also freeze if it is exposed to running in a chilling cold environment consistently. The gas from charging expands and may explode with violent force and may spray acid shrapnel to a considerable distance. The gas gets trapped by the ice and cannot vent out. As a result, the battery case may get weakened. Therefore, it is essential for you to know how to deal with frozen battery balance.


Reason for Freezing

If your battery has a lower pH, it will have a lower freezing point. AGM batteries use low pH. If the temperature lowers enough, the content inside may freeze. Usually, batteries are protected from freezing up to -50 degrees F. when the nit is charged to 12.6 to 12.8 volts. Another reason attributable to freezing is that if the sulfuric acid and distilled water inside are not properly mixed, the distilled water can be frozen.


Allow the Battery to Thaw

use car battery charge

Photo Credit: https://bestcarbatterychargersdotcom.wordpress.com/

The best option for you is ‘never to jump-start recharge a frozen battery. First, inspect the case, and if you find cracks in the battery case, it can no longer be repaired. Take the same to the retailer and ask for a replacement if the warranty period is still valid. If the case is not damaged, keep it in a safe and warmer place. It will thaw down, not its own. Don’t interfere with a quicker action.

If you find your battery, fully thawed, install it on your car and try with the dashboard lights and other electrical accessories. If they do not function, take the battery to a battery professional. It can start, even if not fully charged. Get it charged fully. Do not use more than 10 Amps while recharging.


The Need to Balance Car Tire

You can imagine how troublesome it will be to walk if the weights of both of your shoes are not the same. The same rule of physics applies for maintaining the balance between all the four tires of your car. If the tires are not balanced, your car will wobble or hop when accelerated to a higher speed.

The imbalance of car tires refers to the unequal distribution of mass within the aggregate of a car tire and the center wheel, including the rim. You can also experience the wobbling of your steering wheel while driving. Moreover, your car suspension may be excited with the increase in speed.


How to Balance Car Tires?

Static balance is measured by a static balance machine by placing the tire on its vertical axle on a static spindle pool. The portion which has the greatest mass will deface more and indicate the magnitude of imbalance. Finding the angle of detection can know the angular location of the imbalance.

By using the Dynamic balance, you can know the forces generated by the asymmetric distribution of mass on the rotation of a car.

If the tires of your cars are not balanced, it may cause static vibration, higher fuel consumption, uneven tread wear and risky driving. Ensure that the rims on which your car tires are mounted are good for the road and there is no crack on their side walls. They should have the tread depth of at least 4/32 or 50 degrees.

How To Make Oil Filter Wrench In A Quick, Easy Manner?


How To Make Oil Filter Wrench

Do you want to detach your car’s oil filter by yourself? Have you ever had the thought of making an oil filter wrench by yourself? Oil filters are an essential part of your car’s engine system. Their function is more akin to the human lungs.

If we talk about the blood of the car, then it is the best diesel engine oil. Add oil in the AC compressor or lubricating oil for the maintenance of your car’s body parts, and oil filters aid in purifying all types of oils, which are used in your car.


What is an Oil Filter Wrench?

An oil filter wrench is a piece of equipment that is used to detach the spin-on oil filters, which are most commonly used in the automobile industry. The spin-on filters are the oil containers, which have a cylindrical shape and smooth surface. Hence, the grip of the oil filter wrench must be efficient to make the process of removing the oil filter easier.

These filters eliminate the impurities from all types of oils, which are used for various purposes, such as engine oil, lubricating oil, or transmission oil.


Types of Oil-Filter Wrench

oil filter wrench

Photo Credit: https://www.clublexus.com/forums/is-2nd-gen-2006-2013/201983-how-to-change-your-oil-2.html

There are many types of oil filter wrenches available in the automotive industry. However, by material used in grip, the oil filter wrenches can be classified as below:

1. Chain-type oil filter wrench

The chain-type oil filter wrench is most commonly used for the removal of spin on filters. The chain loop is used as a grip, and it is put on the filter. The grip of this wrench is excellent since it has better tractive teeth, which clenches the oil canister tightly without slipping. The chain starts covering the filter as you start turning the anti-bar clockwise.

When using a socket wrench, the excessive tension produced by the chain is more than by turning the bar. Hence, the canister material can be clenched efficiently without any slipping.

2. Metal band type oil filter wrench

Metal band type oil filter wrench comprises two loops, which are fixed at any end of the handle. It is used to tighten up the bands surrounding the oil filter. It also rotates the filter from its rigid place. Without any shadow of a doubt, the anti-clockwise twisting motion of the handle is good enough to produce adequate tension for the removal of the oil filter.

3. Plastic or metallic cup type oil filter wrench

The profile of a plastic or metallic cup-type oil filter is more akin to the socket. The grip of any wrench is highly affected by the knurling given at the bottom of the filter. Hence, the cup, which is fixed at either filter’s end, is directly linked with the knurling.

The socket extension is used to remove the filter. The luxurious cars such a BMW and Volkswagen cars entail such type of oil filter wrenches.

4. Claw type oil filter wrench

A claw-type oil filter wrench comprises three metal legs or claws and a ratchet driver. When you put the wrench on the filter and turn up the driver anti-clockwise, the metallic prongs start detaching the oil filter.

These types of wrenches are used when the filters are fixed into the narrow spaces. Moreover, it is also handy for the removal of tight filters.


How to Make an Oil Filter Wrench?

There are numerous ways to make an oil filter wrench. Well, if you want to make a wrench that can be used for multi-purpose jobs, then the given procedure is apt according to your needs. Follow the below steps by using the required equipment, which is mentioned as below:

  • Seat belt material
  • Square tubing
  • Socket extensions
  • Drill bit
  • Driller
  • Sewing awl
  • Lighter or fire starter
  • Socket wrench
  • Welding machine
  • Paint

Below is the procedure for making a strap-type oil filter wrench:

oil filter wrench

Photo Credit: https://www.youtube.com/watch?v=k2nDh93-Yog

1. Take a seat belt material and square tubing

The seat belt material is quite flexible and compatible during the tightening and losing process of the oil filter. Its good elasticity and durability makes it an apt option for the strap-type oil filter wrench. Hence, take a seat belt strap of 24 inches. Moreover, choose ½ inch square tubing, which elongates up to 6 inches.

2. Make a cut on either side of the tubing

To slide down the seat belt strap, you have to make a cut on either side of the tubing. Make a mark at a distance of two and a half inches. Start cutting the side of the tubing from the middle point of either edge up to the mark using a circular saw. Clean out the left metal at the end of the cut using a drill bit.

3. Drill a hole on the cutting edge of the tubing

Drill a hole on the other side of the cutting edge of the tubing to get the screwdriver in using the driller. The screwdriver acts as a handle for turning the oil filter wrench. Make sure the hole should be made in a suitable size of the screwdriver.

4. Make a few loops of belt

Melt the frayed ends of the belt together using a lighter or a fire starter. Take up the belt and fold it in a way that both ends overlap each other. Before sliding the belt into the cutting portion, make a few loops so that the belt cannot pull out during the turning of a wrench since the loops enable some bulk.

5. Stich the loops

oil filter wrench

Photo Credit: https://www.youtube.com/watch?v=QPVs03aZjmc

Now, stitch the loops using a sew-awl. Hence, the belt strap will clench the tubing tightly so that the concern of pull out of strap will be avoided during the job.

6. Cut the socket extension into two pieces

If you want to make a multi-tasking oil filter wrench, the idea of welding two fragments of socket extension is relevant. Cut your socket extension in two pieces. The upper portion of the socket extension is welded into the tubing on the opposite side of the stitched strap portion. The lower portion is welded at the right angle of the upper portion on the upright side of the tubing.

7. Fix the socket wrench at the end of tubing

Fix your socket wrench with the welded upper portion at the end of the tubing. Hence, the upper welded portion of a socket extension is used for the turning of the wrench, whereas the lower welded portion is used to take out the plug of the oil paint. You can also dress up the homemade oil filter wrench using different colors of paint on the tubing.

There are many types of oil filter wrenches which are used for the different types of filters. According to the toughness level of the removal of the oil filter, you should pick an apt filter wrench. However, you can also choose another option called the DIY technique for the making of an oil filter wrench.

First and foremost, take the material of the grip into consideration during the making of the filter wrench. The seat belt strap is used as a grip material in the above procedure. All in all, follow the above procedure and feel privileged by detaching your own car’s filter by yourself.

Best Lumbar Support for Car: A Must-Read Guide for Buyers


Best Lumbar Support for Car

Driving can be enjoyable and therapeutic for many people, especially if you are hitting the road with family and friends. In the same way, it can also be exhausting, especially if you have to do it for a long time. You will easily get fatigued, and discomfort will come along your way. Soon enough, you will complain of body pain. With this, it is important to have the best lumbar support for the car.

Lumbar supports are essential for improving your posture and alleviating back pain. There are many products that are available in the market, including full-sized seats, as well as pillows that are designed specifically to support the back. Which one should you choose? If you are clueless about what makes the best choice, keep on reading the rest of this post, and we will help you come up with the right decision.


What Is Lumbar Support?

Simply put, lumbar supports are products that are used to provide the support that is needed by the lower back. They are commonly used in office chairs, but for this specific post, we are talking about the ones that are used in vehicles. From the best racing car seats to a regular car, this is needed to make sure that stress will be less for the lower back. It is meant to correct your posture, hence lessening the likelihood of suffering from back pain.

Many of the standard seats in cars have poor design. There is no wonder why there are people who opt to choose to have them customized or replaced. If you want a more practical solution, just buy lumbar supports. It will help you sit straight and minimize discomfort.

The top benefit of using lumbar support is that it will make you feel more comfortable on the road. Beyond such, however, it can offer other advantages as well. Fatigue levels will be significantly lower. Also, this means that you can be more focused when driving, which will be vital for safety. It will increase your reaction time in case of an unfortunate situation. Such can also be beneficial in terms of giving you a clearer vision of the road.

It is important to note, however, that lumbar support is not just for the driver. The passenger seat will also benefit from having one, especially during long trips.


Types of Lumbar Support for Car

When you are looking for the best lumbar support for car, you will be confronted with different types, including those that will be listed below.

  • Ergonomic Chair: In this case, you have to replace the chair that comes with your car. This is the best if you want your car seat to offer customized comfort. You can choose the material and design that is best suited to your needs.
  • Cushion or Padding: This is a budget-friendly alternative when it comes to lumbar support for cars. It works like a traditional seat cover, and there are areas that are raised or cushioned to provide the support that your back needs.
  • Pillow: If you are looking for the cheapest way to have lumbar support in your car, using a special type of pillow is a good idea. It should be designed or curved in such a way that it will provide a natural arch to keep your back comfortable.

Essential Factors to Consider

In this section, we will have a look at some of the most important factors that you should take into account to increase the likelihood of making the right decision.

  • Ease of Use: It is important to make sure that it is user-friendly. The most complicated would be the ones that are designed as car seats. Pillows and cushions, on the other hand, will be excellent because they are effortless to use.
  • Material: It is important to make sure that it is made using the right materials. It must be able to withstand wear and tear even after long-term use. Most importantly, it should be comfortable. It must offer excellent air circulation so that you won’t feel hot as you drive. In line with the material used, you should also take a look at the filling of the lumbar support. Among others, memory foam is highly recommended because it can offer the customized fit and comfort needed for your back.
  • Compatibility: You also have to check if the lumbar support is compatible with your car. The configuration should be appropriate. Otherwise, you will just end up wasting money. Back pillows are popular because they often offer universal compatibility.
  • Comfort: This is perhaps the most important when choosing lumbar support for a car. You have to make sure that it is not too soft or too firm. It should also offer proper air circulation to keep you cool throughout your drive. If it is not comfortable, it will be useless.
  • Shape: The overall design or shape of the lumbar support must deliver optimal comfort. In most instances, it is wedge-shaped. The top part is usually wide, and it goes narrower as the bottom is reached.
  • Reviews: Still undecided about which one to buy? The best thing to do is to read reviews from other people. You will benefit from their opinions, making it easier to narrow down the possibilities. You can use their experiences and feedback to help you come up with the right choice.

Top Choices for the Best Lumbar Support for Car

Product (Amazon Links) Brand  

Sweet Relief Lumbar Cushion Pillow

Sweet Relief TM

Review

LoveHome Car Lumbar Support Back Cushion and Car Neck Pillow Kit

LoveHome

Review

McCarty’s Sacro-Ease Deluxe Model Lumbar Seat Support with Extra Padding

McCarty’s

Review

If you are still looking for the best, allow us to help you. Below are five of the products that you might want to consider, as well as their outstanding features.


1. Sweet Relief Lumbar Cushion Pillow

AD

One of the best things about this product is its memory foam construction, providing you with optimal comfort while inside the car. It is not too firm and not too soft, providing just the right amount of support that is needed by your back.

The memory foam is combined with a mesh backing, which is also commendable because of the comfort that it can provide. It allows air to circulate properly. Also, it is a good thing that even if it is immediately used upon taking it out from the packaging, there will be no chemical smell.

Lastly, and perhaps most importantly, you can have peace of mind in using this product. The manufacturer is offering a Lifetime Replacement Guarantee, which is an assurance of the lumbar support’s superior quality. If you are unhappy in any way, just let the manufacturer know, and they will issue an unconditional refund.

Pros:

  • Mesh provides excellent air circulation
  • Pillow comes with excellent filling for optimal comfort
  • Made using high-quality memory foam

Cons:

  • Large and bulky
  • Straps are quite flimsy

2. LoveHome Car Lumbar Support Back Cushion and Car Neck Pillow Kit

AD

Among others, one thing that we loved the most about this lumbar support for cars is the fact that it also supports the upper back. This is basically because it comes with a kit that includes an equally comfortable neck pillow.

The filling that is used in this lumbar support is also worth highlighting. It is made from malleable memory foam. This means that its shape will be customized based on the pressure that is applied by your back, making it deliver personalized comfort. The same material can also be found in the neck pillow.

The mesh cover is also a plus, especially when it comes to breathability. One thing that makes it even better is the fact that it is removable and can be machine-washed, making it effortless to be hygienic and maintain it in its peak condition.

Pros:

  • Innovative material effectively reduces back pain
  • Breathable cover
  • Comes with support for the neck

Cons:

  • Can be prone to shrinking in the long run
  • Can have a strong chemical odor

5. McCarty’s Sacro-Ease Deluxe Model Lumbar Seat Support with Extra Padding

AD

Compared to standard Sacro-Ease from the manufacturer, this product comes with an additional one inch of padding. This makes it thicker and able to deliver more support for the back. Consequently, this also makes it more comfortable as it can provide relief on the pressure points.

This lumbar support comes with an adjustable steel frame. There are some people who might not like the frame because they can sometimes feel it on their back. The good thing about the frame, however, is that it can be bent and adjusted depending on the angle that you find to be most comfortable.

The non-skid bottom of this product may seem like a small thing, but in reality, it can do a lot. There are some lumbar supports that are prone to sliding, especially when you move a lot. The good thing about this product is that the bottom is non-skid, allowing it to stay in place while you are seated.

Pros:

  • Foldable and portable
  • Thick enough to provide sufficient cushioning for the back
  • It can add firmness to your car seat

Cons:

  • Has a metal that can cause discomfort
  • May not work for all types of car seats

Conclusion

The best lumbar support for the car is essential not only for the driver but also for the passenger. This will make a lot of difference when it comes to your comfort, especially for long trips. It will provide the support that your lower back needs. It will also be effective in lessening fatigue, enhancing concentration, and making you safer, among other benefits. If you are having a hard time choosing which one to buy, go back to the five options that we have mentioned above.

Isn’t this the product that you are looking for? If there are other products that you need, click here.