Home

Recent Posts

Best RV Antenna: Get TV Reception While On The Road


Best RV Antenna

Camping out in your RV with family and friends is always fun to do. However, there are RV enthusiasts who choose to have the conveniences and comfort of home while out on a vacation. You might want to catch the latest episodes of your favorite TV shows or catch a big game. To do these things, you have to get yourself an RV antenna. You can buy one that is designed to receive signals from local TV stations in your area.

In this article, we’re going to discuss the things you need to learn before you buy an RV antenna. We also have a rundown of the top four picks for the best RV antenna. We will provide you with each product’s key features, pros, and cons to help you come up with a better decision.

Product (Amazon Links)Brand

Winegard SK-SWM3 DIRECTV TRAV’LER RV Satellite System

Winegard

Review

DISH VQ4450 Tailgater Bundle

Dish

Review

Magnadyne RVTV-W2 Omni-Directional Amplified TV/AM​​/FM Antenna

Magnadyne 

Review

Winegard RZ-6000 Rayzar Z1 RV TV Antenna

Winegard

Review

What Is An RV Antenna?

An RV antenna is a streamlined and powerful receiver specifically created and designed for use on recreational vehicles. You can mount these antennas onto the roof of your RV so you can maximize the reception. Some can be folded down but can be extended up to several feet to get rid of any signal obstructions. An RV antenna features a durable housing that protects the antenna from ultraviolet rays and other external elements.

One thing to take note is that the driver must not be distracted by the show. An RV antenna can also be mounted indoors and can be attached to any RV window. These are thinner, take little space and installation is easy. A good RV antenna should give you plenty of shows to view during short and long camping trips.


Top Picks for the Best RV Antenna

Below are the four best products that you might want to take into consideration.

1. Winegard SK-SWM3 DIRECTV TRAVELER RV Satellite System

AD

The Winegard RV Satellite System is the only RV antenna that is compatible with DIRECTV high-definition programming. It has the capability of receiving programming coming from more than one satellite at a time. This will be very beneficial for RVs with more than one television. It is also very easy to operate using one button on/off. In addition, this is also great to use with DVRs.

Main Product Features:

  • Product Dimensions: 46 x 27 x 13.8 inches
  • Item Weight: 53 pounds
  • DVR capabilities
  • Roof installation is required
  • Manufacturer offers warranty on parts

Pros:

  • Easy to use and install
  • Receives DIRECTV HD programming including the Genie
  • Durable

Cons:

  • A little heavy
  • Requires roof installation

2. DISH VQ4450 Tailgater Bundle

AD

With the DISH Tailgater bundle, you can enjoy HDTV wherever you go. It consists of a portable satellite TV antenna and the DISH Wally HD satellite receiver. This RV antenna is designed for use of outdoor and sporting enthusiasts. The DISH RV antenna has an automatic aiming antenna and is very easy to operate. In addition, it has WiFi capabilities that let you enjoy audio and video streaming.

Main Product Features:

  • Number of Receiver Outputs: 2
  • HD and SD capable
  • Product Dimensions: 17 x 13.5 x 18.8 inches
  • Item Weight: 8 pounds
  • Batteries: 4 AA batteries included

Pros:

Cons:

  • May not endure harsh weather
  • A lot of users complained about its low quality

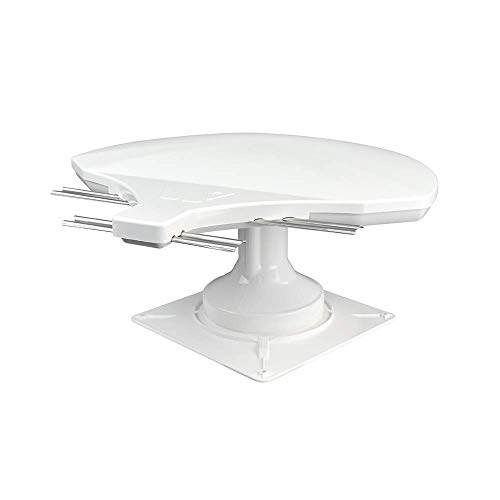
3. Magnadyne RVTV-W2 Omni-Directional Amplified TV/AM/FM Antenna

AD

The Magnadyne RV Antenna can receive signals from all directions. It can pull in all the TV shows you love and is free for life. This also has a sturdy mount that is wind-resistant. It is very easy to install with the help of the accessories included in the package. You just have to unwrap the bundle, plug it in, and scan the channels.

Main Product Features:

  • Item weight: 4.5 pounds
  • Product Dimensions: 12 x 8 inches
  • Power Supply: 12 Volts 
  • Shape: Round
  • Weatherproof and UV-protected

Pros:

  • Easy to use and install
  • Comes with a built-in amplifier
  • Free HD programs for life
  • Features outstanding wind resistance

Cons:

  • May not pick up channels in remote areas
  • May not get good reception

4. Winegard RZ-6000 Rayzar Z1 RV TV Antenna

AD

The Winegard RV Antenna picks up 4K UHD signals and can pick up VHF and UHF. When you don’t want to pay for satellite, this is the perfect solution. It supports VHF and UHF frequencies. Housing is made of waterproof and durable materials that can withstand rain and wind. It features a signal that is amplified for your RV.

Main Product Features:

  • Product Dimensions: 16.25 x 14.7 x 8.4 inches
  • Item Weight: 2.5 pounds
  • Frequencies supported: VHF, UHF
  • Minimal footprint

Pros:

  • Durable
  • Housing is UV and water-resistant
  • Lightweight
  • Amplified

Cons:

  • Might not get long-range signals 
  • Other antennas may have better signal

What are the Different Types of RV Antennas?

Before buying an RV antenna, it is vital that you familiarize yourself with the different types and how one is better than the other.

  • Outdoor RV Antenna: This will be more effective in picking up local stations in your area. Just make sure that you can lower it, especially when driving. You don’t want your antenna to be caught in a tree on your way to your campsite. Once you get to your destination, you can just extend the antenna back up to get better reception.
  • Indoor RV Antenna: This has less range compared to the outdoor RV antenna. One great advantage of having one is that it can stay in its place permanently. You won’t have to adjust it or take it out to the roof every time you need to use it. In addition, angling to a specific direction is not necessary if you have an indoor RV antenna.

What are the Benefits of Having the Best RV Antenna?

If you are an RV enthusiast and you have a TV that isn’t used to watch your local shows, you might be missing a lot. Some of you might think that this is not a necessity but in reality, its benefits can outweigh the expense. With this, below are some of the reasons to get the best RV antenna.

AD

1. You can enjoy the convenience of home even while on the road.

Even if you are away from home, you can enjoy your favorite shows if you have an RV antenna. You won’t have to miss an episode of the shows you love. Some models offer WIFI capabilities and it lets you connect to the Internet even while on the move. You may read blogs, watch a big game, or even stream videos while at the campsite.

2. You can receive local TV shows in HD.

You won’t need any subscriptions if you want to watch local TV shows. The great thing about having an RV antenna is that you can get them for free. One-time payment for an antenna lets you enjoy your shows free for life. In addition, it also offers HD versions of local channels.


How to Choose the Best RV Antenna

With a lot of options available in the market right now, which one is the best buy? Allow us to make decision-making a lot easier for you. Below are some of the important things you need to take into consideration before buying one.

  • Signal Reception: You might want to question the distance of the transmitter to the RV antenna, as well as its location. Once you figure them out, you can decide on where to place your RV antenna. Ultimately, this will help you decide if you want to get an outdoor or an indoor-type RV antenna.
  • Installation: The best way to install an RV antenna is to keep it away from obstructions. It should also be positioned to face broadcasting towers. You have the option to choose the one that you can easily manipulate with regard to getting a better TV reception.
  • Material: Most RV antennas are made from aluminum and plastic. These materials make your RV antenna easy to break, especially when you leave it outside. If you have the budget to replace it right away after it breaks, you may get an outdoor antenna. This is where the advantage of having an indoor RV antenna comes.
  • HDTV Antenna: Having a high-definition RV antenna is necessary if you want to watch HD programs. In order to save money, you must first check if the TV is compatible with HDTV RV antennas. Almost all TV stations now offer HD signals to ensure that you don’t miss an episode.
  • Mounting Locations: RV antennas can be mounted on several locations, including the RV’s roof, hood channel, bumper, and mirror bars. Each one of them has its own advantages and disadvantages, so you have to be sure that the one you buy is easy to manipulate.
  • WIFI Capability: Some models now offer WIFI capabilities that let you enjoy the use of the Internet even while on the road. This will be very beneficial, especially if you want to have streaming subscriptions such as NETFLIX and AMAZON streaming services.
  • Price: Another thing to consider is the RV antenna’s price. Cheaper ones might make you think they are of lower quality than the other expensive models. This might not be true at all times. You just have to review each product’s features, pros, and cons so you can apply its price before making the final decision.
  • Item Weight: This might also be a factor if you want a lightweight RV antenna. The only downside of this is that it may not endure strong winds. You have to choose one that can withstand harsh weather and is durable.

Conclusion

By this time, we hope that it’s a lot easier for you to make a decision in choosing the best RV antenna. If you were having a hard time choosing, just review each product’s key features, pros, and cons to narrow down your options. If you know the features you want in your RV antenna, then it should be easy for you.

BDo you need more products to hook up your RV with? Click here to learn more about the options available in the market right now.

How To Install A Weight Distribution Hitch?


A weight distribution hitch is important when we are trying to move goods from one place to the other using a Towing vehicle and trailer. Towing vehicle will normally be the powered vehicle, which is used to pull the trailer and trailers are the unpowered vehicles.

When you are coupling the towing vehicle and the trailers, which are loaded together, it is very important that the weight is equally distributed. If the trailers sway too much due to uneven load, the driving control can be lost. To prevent this from happening, it is very important that we have the best weight distribution hitch in place for coupling them.

Weight distribution systems are advisable when the weight of the trailer is 50% more than the weight of the towing vehicle. There are a lot of advantages of using a weight distribution hitch. It ensures a smooth and level ride with maximum towing efficiency.

When the weight distribution system is not there, the weight of the trailer is more or less transferred to the axle at the back of the towing vehicle, and the vehicle will tilt towards the front portion. The front axle of the vehicle will not have much weight on it, which will result in lowering the performance of the steering and reducing stopping power.

Let’s get into the details of how we install a weight distribution system. The best fifth wheel hitch can be used to establish a connection between the towing vehicle and trailers. This guide will help you with the general instructions for the installation of the weight distribution system. In order to get specific details matching your vehicle, the manufacturer’s instruction can be referred.


1. Adjust the Level of the Trailer

Before the trailer is connected to the towing vehicle, it should be leveled in such a way that it becomes more or less parallel to the ground when loaded. Take the measurement from the ground to a particular panel of the trailer both in the front and the rear portion. If there is any level difference, you can use a tongue jack to change the level of the front portion, to level it parallel to the ground.

install weight distribution hitch

Photo Credit: http://www.trucktrend.com/news/1602-five-things-you-need-to-know-about-a-weight-distributing-hitch/

The next step is to take the measurement to understand the level difference in the front and rear wheel opening height of the tow vehicle and trailer height from the front and back portion. Also, take the measurement from the ground to the top of the coupler.


2. Installation

In most cases, the weight distribution system can be directly mounted on the receiver of the hitch. The first step is to install the shank, which should be plugged into the receiver and can be turned upward or downward to fit it properly and to adjust the level.

Next, mounting the Ball head assembly onto the shank should be done, and this provides the platform for the hitch ball and spring bars. From here, the trailer and the towing vehicle can be re-harnessed.

The hitch ball should be well attached to the hitch head using an appropriate tool. Hitch head and the shank should be fitted using the nuts and bolts tightly. The height of the hitch head should be adjusted in such a way that the level of the ball is a bit higher.

The hitch head angle can be changed according to the level. Then the torsion bar or spring bar should be fitted into the hitch head, and the end should be towards the direction of the trailer. The end should be slightly lowered to the direction of the ground. Remember to tighten all the nuts and bolts wherever required using the right tools.


3. Fasten and Connect

Fasten and Connect

Photo Credit: http://www.trucktrend.com/how-to/parts-accessories/1308-huskys-centerline-weight-distribution-hitch/

The hitch ball should be placed exactly under the coupler. The trailer tongue should be adjusted in the level in such a way that the couple rests on the ball without much weight on it and locks the coupler latch tightly. Adjust the level of the trailer using a tongue jack and level it properly. The spring bars should then be inserted into the hitch head, and the other end should be towards the trailer. Lift up the chain and hook it into the saddles. Use the necessary brackets to tighten the saddle points.

Depending on the level, insert the desired link onto the saddle and fit in the remaining clips. Arrange the position and the level in such a way that spring bars are almost parallel to the trailer tongue. Attach both the spring bars, snap up the chains, and the trailer tongue should be lowered to have the weight completely on the hitch. Remember, the tongue jack should not rest on the ground.

Take the measurements again to see whether the levels of the trailer vehicle and tow vehicle are almost in a straight line. If, on the first try, you are not able to level it, try adjusting the levels to make it parallel. The level of the hitch head can be adjusted based on the level difference between the front and rear portions of the trailer.

After the installation is complete, there are two different points that you need to focus on: the change in the height of the wheel rim of both your trailer and the tow vehicle. It should be measured before starting the installation and after completing the installation. This is to ensure that the weight distribution system allocates equal weight to the whole system.

The second important thing is the angle of the bars. It should be either parallel or slightly downwards towards the ground level. This can be accomplished by slightly tilting the head assembly or adjusting the number of chain links.

The weight distributions should be carefully chosen based on the nature of your trailer, the towing vehicle, and the load that you are trying to transmit. The fifth wheel hitch serves as the strong connection between both. A good hitch means a well-established connection, and you can be free of any worries while towing. This is found to be more effective while applying sudden brakes.


4. Choose the Right Weight Distribution System

Choose the Right Weight Distribution System

Photo Credit: https://www.autoaccessoriesgarage.com/Towing-Hitches/Blue-Ox-SwayPro-Weight-Distribution-Hitch

To choose the apt weight distribution system, you need to be well aware of the gross trailer weight and the tongue weight. Gross trailer weight (GTW) is the weight of your trailer after loading it completely. To be effective, the rating of your weight distribution system should be either equivalent to or greater than the Gross trailer weight.

The tongue weight refers to the sum of the trailer tongue weight and the load of the cargo vehicle. The rating of the weight distribution system should not be higher or much lower than the tongue weight. Both will result in making the weight distribution uneven.

Try the installation steps mentioned above the next time you try to transfer load using your towing vehicle. Share your feedback after trying.

Best RV Air Conditioner: Keeping You Cool and Comfortable


Best RV Air Conditioner

It’s summer. You are about to hit the road with your own motorhome. A lot of you might have hesitations, thinking that you will suffer from discomfort. Yes, you might end up not being able to have a good night’s sleep, but this is only the case if you do not prepare for it. With this, while you will need a lot of stuff, such as a comfortable mattress, you will also need the best RV air conditioner.

If you are looking for an air conditioner that comes in a compact size but has plenty of power, keep on reading the rest of this guide. We will let you know some of the most important factors to consider. We will also briefly tackle the top five options that are available in the market.

Product (Amazon Links)Size 

Dometic Polar White Air Conditioner

15,000 BTU

Review

Airxcell Mach 15+ A/C Unit

15,000 BTU

Review

Advent ACM135 Air Conditioner

13,500 BTU

Review

Advent ACM150 Air Conditioner

15,000 BTU 

Review

Airxcel Mach Polar Cub 

9,200 BTU

Review

What is an RV Air Conditioner?

As the name implies, it is an air conditioner that is made specifically for RVs. It is an excellent addition for your motorhome, especially if you plan to go on a trip or camp during the hot months. These air conditioners have small size, yet they can deliver plenty of power to make sure that you will stay cool and comfortable.

AD

For the RV air conditioner to run, there is a need to have AC power. It is usually a 120-volt socket, although the voltage can vary. It is connected to a power source, usually an external generator. The latter will provide the energy that is necessary for the air conditioner to run.

Among others, one of its most important parts is the compressor. The latter is basically the one that condenses the vapor and heats it. It will transfer to the condenser and the heat will be moved out of the fan. It cools the vapor and makes it evaporate. The process repeats and it results in effectively regulating the temperature inside the RV.


Top Pick for the Best RV Air Conditioner

If you are clueless about what product will make the best choice, below are five of the products that you should include in your list.

1. Dometic Polar White Air Conditioner

AD

Still, this is on the top of our list. With a high cooling efficiency, you will be happy with the fact that it provides cooling in an instant. This is even made better by the fact that it comes with a compact profile. Despite its space-saving design, you can be confident that it does not run short in terms of the power that it can provide. It comes with a heavy-duty motor, which is also known for its whisper-quiet operation. Plus, you might also love the fact that it is already inclusive of everything that you will need for its installation, such as its mounting brackets.

Main Product Features:

  • Nominal Capacity: 15,000 BTU/hour
  • Electrical Rating: 115 volts
  • Weight: 74 pounds
  • Warranty: 2 years

Pros:

  • Installation is effortless
  • Retrofitting is not required
  • Works quietly

Cons:

  • Packaging offers minimum protection

2. Airxcell Mach 15+ A/C Unit

AD

Among others, one thing that gives this an edge over many of its competitors is the presence of 1/3 HP fan. The latter is the highest that is currently used in the RV conditioners you can find in the market. There is also a special blower wheel, which allows it to effortlessly distribute cool air inside the RV. The tubing, which is made from copper, is also exceptional, especially because it is long-lasting. Plus, it is designed with a drain pan to prevent corrosion. Lastly, it is made in such a way that it will start easily regardless of the conditions in the external environment.

Main Product Features:

  • Nominal Capacity: 15,000 BTU
  • Cooling Efficiency: 325 CFM
  • Electrical Rating: 115 VAC
  • Weight: 90 pounds 

Pros:

  • Comes with clear instructions
  • Plug-and-play functionality
  • Sleek profile

Cons:

  • Can be easily bent
  • May encounter install issues

3. Advent ACM135 Air Conditioner

AD

This may not be as popular as the products that we have previously mentioned, but it can be impressive in terms of the performance that it can deliver. It has exceptional cooling efficiency, making sure that you will stay cool while on the road or in a campsite in your motorhome. The PVC exterior shroud is a good feature, which shields the internal components of the AC, providing it with sort of a protective barrier.

Main Product Features:

  • Nominal Capacity: 13,500 BTU
  • Wattage: 3,000 watts
  • Voltage: 120 volts
  • Weight: 92 pounds

Pros:

  • Easy installation
  • Space-saving design
  • Excellent cooling efficiency

Cons:

  • May not have much product support
  • May not last long

4. Advent ACM150 Air Conditioner

AD

This is made by the same manufacturer as the product that has been briefly reviewed above. It has 15,000 BTU, which is good enough for most motorhomes. There is a high-quality shroud, which can either be black or white. With the latter, you can be sure that the inside is protected from the external elements. This also minimizes the noise that is produced by the unit as it cools. The best thing about this unit is perhaps its simplicity, which will allow you to accomplish its installation in a jiffy.

Main Product Features:

  • Nominal Capacity: 15,000 BTU
  • Wattage: 2,800 watts
  • Voltage: 110 volts
  • Weight: 85 pounds

Pros:

  • Compact profile
  • Easy to install
  • Cools quickly

Cons:

  • Not as popular as others

5. Airxcel Mach Polar Cub

AD

This is another ideal companion in your RV when the summer months start. Even if the weather outside is scorching, as long as you stay in your RV, this air conditioner will help in keeping you cool. This also means that you will be able to sleep comfortably even if you do not have a luxurious bedroom. When it comes to its installation, you will also not have any problem. All that you have to do is to place it in the roof vent, hook it to the power supply, and start enjoying the cold air that it will produce.

Main Product Features:

  • Nominal Capacity: 9,200 BTU
  • Cubic feet per minute: 300
  • Weight: 87 pounds

Pros:

  • Compact design
  • Easy to install
  • Durable

Cons:

  • Minimal cooling capacity
  • Too small for many RVs

Different Types of RV Air Conditioner

It is also important to note that not all RV air conditioners work in the same way. They also have varying designs and can deliver different levels of effectiveness. Generally speaking, the following are some of the options that you will be confronted with:

  • Ducted RV Air Conditioner: The aerodynamic body of this type also has the same parts as its counterpart, but the difference is that the control unit is not inside the ceiling. Because of this, they are usually slimmer, and hence, you can have more headroom in the RV. This is usually more complicated in terms of installation.
  • Non-Ducted RV Air Conditioner: If you are looking for simplicity, this should be at the top of your list of choices. Its installation will be possible through the creation of a hole in the roof of your RV. Many of them can be readily installed on the existing vents. It is packaged in an aerodynamic body, which already includes the blower, condenser, and compressor.

RV air conditioners can also be categorized based on where they will be installed:

  • Rooftop RV Air Conditioner: This is perhaps the better option between the two. It is excellent in terms of maximizing the space that is available in the RV. Because most roofs already have a vent or provision for an AC, its installation can also be easy.
  • Under-Bench RV Air Conditioner: It is an air conditioner that is installed in a compartment or under a bench. This means that it will require a larger space compared to its counterpart. It is a good thing that it won’t block the entry of natural light. Also, it won’t reduce the clearance or height inside.

Benefits of an RV Air Conditioner

The following are some of the benefits that might convince you that it is indeed an investment that is necessary for your motorhome:

  • Comfort: If there is only one reason why you need to install an air conditioner in your RV, it would be the fact that it is vital for your comfort. This will make you feel cold even when the weather outside is hot. This also means that you can sleep comfortably even when you are devoid of the luxuries that you used to have in your bedroom at home.
  • Keep the Air Clean: Depending on the quality of the product that will be chosen, it can also be excellent in terms of improving indoor air quality. Since the windows are closed, there is a lesser tendency for dust to get inside, which will be good for preventing allergies.
  • Can Withstand Vibration: A lot of you might think of using the same air conditioning that you have at home. After all, it is cheaper. However, this is not a good idea. An RV air conditioner is a better choice because they are made in such a way that it can handle vibrations on the road.
  • Space-efficient: Adding an air conditioner to your RV is also a good thing because it won’t consume too much space. This is as opposed to having the traditional portable air conditioner or dehumidifier with wheels.

Choosing the Best RV Air Conditioner

As you try to narrow down the options that are available in the market, it is important to consider the following factors, which will make it easier to tell which one stands out above all others:

  • Cooling Efficiency: This is one of the most important technical specifications. The higher the number, the more powerful the product is. Take note, however, that the more powerful ones can also be more expensive.
  • Size of the RV: You do not necessarily need to have an AC that has high efficiency. At the end of the day, this will all depend on the space of the RV that you have. Determine its size to easily decide on which one is best for your needs. Obviously, a smaller RV will be more than enough with a less powerful unit.
  • Size of the Air Conditioner: If the air conditioner is too bulky, it will minimize the space that is available in the RV, especially the headroom. Make sure to find a product that is fitted for the available space that you have.
  • Ease of Installation: In most instances, you do not have to rely on the expertise of the pros to install the RV air conditioner. Make sure that the manufacturer offers comprehensive instructions plus all the parts that are needed to complete the assembly in a snap.
  • Ease of Cleaning: With long-term use, it is inevitable that the unit will show signs of deterioration. With this, to extend its functional lifespan, make sure that it is regularly cleaned and maintained. It should be designed in such a manner that doing the latter will be a breeze.
  • Power Consumption: To function, the air conditioner needs a source of power, which is usually a portable generator. Unfortunately, this is the most power-hungry appliance that you can have in your RV. With this, before buying, think of its wattage, which will be indicative of the power that it will consume.
  • Warranty: What if the product breaks? It will be good if it comes with extensive warranty coverage. This means that the manufacturer can offer free repair and replacement of the defective parts as long as you have followed their terms and conditions.

Conclusion

So, what is the best RV conditioner that is available in the market today? If you ask me, I would say that Dometic Polar White Air Conditioner stands out from all others. It has impressive cooling efficiency while also making sure that the installation will be a snap to accomplish.

Are you looking for other products that you can use in your RV? Click here and learn more about some of the products that you might need.

How To Safely Jack Up Your Car In 10 Easy Steps?


How To Safely Jack Up Your Car In 10 Easy Steps

Have you ever tried to lift your beloved car up by yourself? Do you want to jack up your car by adopting simple and easy ways? If we talk about changing of flat tires alone or swapping the braking pads, all such types of motorized activities require lift up of the car. Well, you can simply raise your car up using limited tools such as jacks and stands.

All you need to do is to consider a few safety measures and instructions before heading for the jack-up process. For your ease, here is the piece of information regarding the process of lifting up your car without getting it damaged.

1. Prefer Hard Strata for the Parking of Your Car

There are many possibilities of the car slipping off during the uplifting through the jack. This may result in a big tragedy for you and others. If you want to avert the mishap of the car rolling, then park your car on the hard surface. It should be away from the vehicles and diversions. Moreover, the sturdy and flat surface will enable greater steadiness for the vehicles.

2. Use of Chocks for the Stability of Wheels of Your Car

Metal or rubber blocks are apt for supporting the rear wheels during the jack-up. These chocks enable greater resistance against rolling or slipping off. Set these chocks near each wheel, which should be oriented at the opposite edge of your car.

All in all, place the chocks in the opposite direction from where you aim to jack up your car. Also you can also use boulders, wasted bricks, concrete blocks, and wooden blocks instead of metal chocks.

3. Set Your Car into the Lowest Gear

jack up your car

Photo Credit: https://acurazine.com/how-tos/a/acura-tl-how-to-jack-up-your-car-425992

Before heading for the process, turn your hand brake or parking brake on. The transmission must be set in ‘P’ in the case of automatic transmission, whereas setting your car in the lowest gear in case of manual transmission.

4. Additional Safety Measures

If you find difficulty during the application of above suggestions then here are some essential safety measures which you should take into account while jacking up the car:

  • Jack up on soft, clayey soil: It is quite difficult to lift up the car in muddy soil. It happens because your car tires will subside in the soil. Are you wondering how to jack up in such a condition? The safest way to deal with these odds is to place a wooden plank on a surface before you start to jack up. This will help to hold the car’s tires on the surface.
  • Jack up on hilly areas: Parking of cars should be done near the curb of the hilly road. After turning the handbrake on, turn your car’s wheels into the curbs. It enables more excellent safety for other vehicles and prevents your car from slipping off or rolling.
  • Jack up in traffic zone: You should avoid parking your car on the shoulders of the roadway, especially for the jack up the process. However, you can park on the road in case of urgency using hazard lights. You can also use pylons and flares to draw attention towards your vehicle from the other moving vehicles.

5. Locate the Jack Point

The outer body of your car comes along with certain points from where the car should be lifted. If you do not use these points, then you may end up damaging your car. The self-weight of your car can be the reason for damage.

You should follow these steps which are explained below to lift your car safely:

  • Find those jack points in your car. They are mostly located at the back of the front wheels and front of the back wheels. However, you can simply find the points using the owner’s manual which enables convinced Gen regarding the locations of Jack points of your car.
  • There are several possibilities of the location of central jack points at the back of the front and rare bumpers.
  • If you are not aware of the locations of jack points, then discover the even metal space area parallel to the pinch weld. However, many times the jack points are marked on your car body. Hence, it is easy to locate the jack point in case of labeling of jack points.

6. Place the Jack underneath the Jack Point Location

jack up your car

Photo Credit: http://www.nairaland.com/3670104/6-steps-jack-up-car

Fix the jack below the jack point after discovering the location of it. You can simply slide the jack all around the place until its frame touches the body of the car.

Consider the right side of the jack before lifting up your car. Normally the jack comes with a label or indication for correct side. If it does not hold any indication for the correct side, then refer owner’s manual to head into the right direction.

7. Raise the Jack Up

The adoption of a suitable way to lift up the Jack certainly relies on the type of jack that you use. There are two types of jacks that are used for the car jack-up procedure.

  • Scissor Jack: This jack comprises two metal plates. These plates, whose shape resembles a diamond, are attached to the tool. The metal hole located on the either side of the jack is attached to the screw drive. Raise the jack using a rod that pulls the side surfaces out, which results in the jack-up of your car.
  • Hydraulic jack: It is aka floor jack. It appears more like a metallic section with a wider base more akin to the shape of the lever. Turn the bar upwards and downwards which aids into the pumping of Jack fluid to uplift the car.

8. Jack Up the Car from the Ground Level

Raise the attached jack up to the optimum height, which enables enough comfort to deal with the issue in your car. This lift-up process produces a few odd sounds. Hence, you should make sure that it does not get slipped off from the surface.

9. Use Jack Stands

jack up your car

Photo Credit: https://acurazine.com/how-tos/a/acura-tsx-how-to-jack-up-your-car-426579

If you make efforts to deal with the problems found beneath the car then use of best jack stands is necessary as a part of your safety. Elevate the jack stands up to the lower portion of your car. You can also pull down the jacks to raise the stands up to the surface.

10. Detach the Car Jacks and Jack Stands

Slowly bring your car down after resolving the problem found underneath the car. If you use the jack stands, then first detach them carefully. Lower the car progressively after removing the stands. In the case of a scissor jack, simply turn the rod in the opposite direction of the action which you perform during the installation of Jack.

Indeed, you just cannot raise the pounds of weight without considering the safety criteria. However, it is not a big deal to uplift your car since all you need to do is to follow the above procedure bit by bit. As mentioned above, you can simply jack up your car using limited automotive tools in any earth condition.

An Informative Guide to Choosing the Best Torque Wrench


Best Torque Wrench

Torque wrenches allow its user to measure torque required to fasten the nuts and bolts without over tightening them. This is the reason why you need the best torque wrench, making it an excellent addition to your tool box. If you don’t know what to buy, read this guide in order to come up with an informed decision. We’ll also be providing you the top five picks for the best ones, as well as their pros and cons.

Product (Amazon Links)Brand 

Neiko 03713A 3/8″ Drive Adjustable Click Torque Wrench

Neiko

Review

Gorilla Automotive Torque Wrench

Gorilla Automotive

Review

Precision Instr​​uments Silver 1/2″ Drive Split Beam Torque Wrench

Precision Instruments

Review

CDI 3/8-Inch Drive Adjustable Micrometer Torque Wrench

CDI

Review

Tekton 24335 1/2-Inch Drive Click Torque Wrench

Tekton 

Review

What is a Torque Wrench?

A torque wrench is a tool that permits its user to appropriately and accurately tighten a fastener to a specific torque. Some of you might think that it’s just a regular wrench but a closer look will tell you otherwise. Torque wrenches are bigger in size and you will realize that it can also be used to loosen hard bolts. However, it’s not what they are used for. Torque wrenches do the opposite; they tighten bolts to a particular level of tightness.

Simply put, torque refers to the tightening force. Using it too much may cause damage to the fastener and mating parts. Using it too little only gives the bolt an opportunity to shear off when the joint is not loaded. This may potentially result in dangerous and catastrophic failure. It is considered as a crucial safety item that you use to apply the correct amount of torque when necessary.

A torque wrench will let you tighten a fastener accurately to a torque level you specify. Normally, you only use one and you swap out sockets that match the bolt size. They also come in different types but the most abundant types are used in the automotive industry. Big jobs will require you the best torque wrench while smaller ones will be adequate for light jobs. It can be used on various vehicles such as cars, SUVs, vans, among others.


Top Five Picks for the Best Torque Wrench

In this section, we are going to discuss the top five picks for the best torque wrench available right now. We will provide you their key features, pros, and cons that can help come up with a better decision.

1. Neiko 03713A 3/8″ Drive Adjustable Click Torque Wrench

AD

The Neiko is an adjustable torque wrench that will give you precise and accurate torque levels. It is already pre-calibrated with +/- 4 percent accuracy and it will precisely measure torque between 5-80 foot-pound/6.8-108.5 Nm. It features a dual range pressure scale, which you can measure via foot-pound or Nm. To add, it offers audible click functionality and a one of a kind low torque setting.

The Neiko Torque Wrench is very simple and easy to use. Levels can be adjusted by aligning the rotating diamond-patterned grip to the target torque level in the shaft. The ten-level gradient in the grip permits micrometer adjustments and a knob will lock the tension in. Another great feature of the Neiko is the 3/8-inch drive head that is compatible with all 3/8-inch sockets. You will hear a click once you reach the preset level.

Material is made of steel that makes sure the device can endure the test of time and the toughest jobs. A chrome finish and a storage case will keep rust and corrosion away, making sure your torque wrench will last.

Pros:

  • Features reversible motion, lock and unlock adjustment
  • Durable and long lasting
  • Features precise calibration
  • Comes with a storage case

Cons:

  • May become defective after a few uses
  • The click sound may not be consistent

2. Gorilla Automotive Torque Wrench

AD

The Gorilla may be a lesser-known brand but makes up for the performance you’re looking for in a torque wrench. The manufacturer offers a wide range of lug wrench adaptors that enable aftermarket lug nuts use. They are made of chrome vanadium steel and feature a thin design that will surely fit the lugholes. The Gorilla torque wrench also comes with a storage case made of high impact plastic for rust resistance.

Another great feature of the Gorilla torque wrench is that it is adjustable, forward and reverse. You may use the dial torque selector you can find on the base of the handle to adjust torque levels. This wrench features a 5-inch extension bar that you can use for small sockets. It weight only 4 pounds and can be transported easily. Lastly, it is nicely designed, and will function effectively for your needs.

Pros:

  • Durable and long lasting
  • Comes with a storage case
  • Adjustable
  • Lightweight

Cons:

  • May become defective after a few uses
  • Difficult to operate for some

3. Precision Instruments Silver 1/2″ Drive Split Beam Torque Wrench

AD

The Precision Instruments brand is a well-known manufacturer of torque products. It has a nickel/chrome finish that makes sure you will be able to grip it perfectly with your hand. It does not need to be turned down after every use that makes it convenient. You will also be able to lock the torque setting on the adjustable wrenches for repetitive applications.

Another great feature of this torque wrench is the adjustable knob that removes spring tension. This would mean that the torque setting is quick and easy. It is also very easy to operate, as you only need fingertip force to adjust torque levels. To add, it features a split beam click that endures many of the troubles associated with micrometer-style wrenches.

Pros:

  • Can endure abusive environments
  • Convenient and easy to operate
  • Will be able to lock each setting
  • 27 inch long

Cons:

  • A little heavier than other models

4. CDI 3/8-Inch Drive Adjustable Micrometer Torque Wrench

AD

The CDI wrench features dual scale and calibrated dual direction, front and reverse. It has a lock that comes with a spring-loaded pull-down lock ring. Using this torque wrench will give you quick and accurate results. In addition, it is also very easy to set and has an easy-to-interpret laser-marked scale. It features quick-release buttons that allow socket retention as well as removal.

A great feature of the CDI torque wrench is the 3/8-inch drive adjustable micrometer handle. It offers a torque range from 10 to 100 foot-pounds. This may be considered a clone of the Snap on CDI, but it is meant for non-industrial jobs. It is lightweight compared to other brands, as it is only 2.2 pounds heavy. If you are looking for torque wrenches for medium application jobs, this might be perfect for you.

Pros:

  • Features an ergonomic soft grip
  • Easy to operate
  • Offers quick release buttons for convenience
  • Adjustable

Cons:

  • Not suitable for heavy industrial applications
  • Numbers may be hard to interpret even in good light

5. Tekton 24335 1/2-Inch Drive Click Torque Wrench

AD

Tekton is another well-known manufacturer of car accessories and the torque wrench they offer is one of best. This torque wrench won’t make you guess torque levels as it provides accurate results. It correctly tightens fasteners while properly securing it from damages. This adjustable torque wrench is also very simple and easy to use. It has a reversible head that drives fasteners in both directions.

To use this, you have to set the target value on the scale and you may begin tightening the fastener. Once the preset value is reached, it will produce a clicking sound that will alert you to stop exerting force. It is also designed to last long while providing consistent performance. It does not require batteries and material does not have wearable parts. In addition, this wrench is shipped already pre-calibrated and ready to use.

Lastly, the package comes with a ½ inch drive torque wrench, an instructions manual with conversion chart, and a case.

Pros:

  • Adjustable
  • Long lasting and durable
  • Easy to use
  • Material is all steel

Cons:

  • Might break easily if over tightened
  • May give inaccurate readings

Types of Torque Wrenches

There are six types of torque wrenches that you should be aware of. Not all are suitable for the job you’re going to apply it to so you have to review these carefully. This can also help in order to have a better decision in choosing the best torque wrench.

  • Electronic Torque Wrench: These are programmable torque levels can be set. A strain gauge that is attached to a rod will send a signal to a transducer. This would mean that the force of torque per unit could be determined. They come with a small chip containing a memory stick that saves settings, which you can view for later use.
  • Click Wrench: This can be considered a clone of the socket wrench but is more sophisticated. You may be able to preset the level of torque using a clutch. Once it reaches the target torque level, the clutch will slip to indicate the level. They have the capability of preventing over-reaching and over-stretching that leads to breaking.
  • Beam Wrench: This is a most simple and basic type of torque wrenches. It features a handle that is separate from the lever arm. The wrench can be bent slightly due to the elasticity of the lever arm. Once you apply torque, a moving scale will be able to give you a reading. It functions like a weighing scale that has a needle pointer that indicates the weight.
  • Plumber Wrench: This is specifically designed for couplings on soil pipes. It features a T-shaped handle that is similar to a ratchet wrench. One thing to note is that it is pre-calibrated to slip until the target torque level is reached.
  • Hydraulic Torque Wrench: This is designed to exert torque to a fastener. To use this, pressure is applied either to a bolt head or a nut. It also features a pre-calibrated torque that assists in tightening the bolt head or nut.
  • Deflecting Beam Wrench: This type applies torque to a deflecting beam instead of a coil spring. It provides high accuracy and safety especially if dealing with higher levels of torque pressure. It also comes with an audible click that lets you know that you already reached the target level.

Essential Factors to Consider when Choosing the Best Torque Wrench

Before we conclude, let’s discuss first what you need to look for in a torque wrench. This is the most important section as it will help you narrow down choices in choosing the best torque wrench.

AD

  • Size and Construction: The best torque wrench must have a solid and fine finish. Size can also be a critical consideration because you don’t need the big ones. However, for heavy applications, a larger wrench may be suitable.
  • Performance: Product specifications might not fully reveal how the device is working in real life. This might happen even though the brand discloses a number of technical details. One effective way to address this is to read user reviews and ratings before actually buying the torque wrench.
  • Features: A number of torque wrenches offer foot-pounds or Newton meters units of measurements. To add, most of them are now digitalized. You should choose a torque wrench that offer clear visibility. What’s the use if you cant read and interpret the readings easily?
  • Grip: Always look for the torque wrench that will be able to provide you an easy grip. This may come in handy especially if you hands are slippery because of oils and engine fluids. With this, a slippery torque wrench can become a very frustrating inconvenience.

Conclusion

Now that you have all the information you need, it’s now up to you to choose the best torque wrench. Decision-making may be tricky but with this guide, it should be an easier task. You just have to review each product’s features, pros, and cons to come up with a better decision. To add, check if the price makes great value for your money if you relate it to a specific model.

Are you also looking for other products to use on your vehicle? Click here to check some of the products that are available in the market right now.

What Is A Powertrain Control Module (PCM) In Cars?


(UPDATING) You would know the fact that your car is designed with hundreds of complex subsystems in it. This complex system should essentially be operated and controlled in an efficient manner to give you a smooth and comfortable drive. Have you ever wondered how the smooth functioning of the interlinked sub-systems happens? This is made possible by your car’s powertrain control module.

The PCM or Powertrain Control Module of your car is a critical automotive component or, rather, a combined control unit. Like the human brain, which controls and coordinates the different functions and activities of the human body, PCM acts as the brain of your car, and it controls and coordinates the functions of the different sub-systems of your car.

The PCM, in normal cases, consists of two sub-systems: Engine control Units (ECU) and Transmission control units (TCU). The function of the Engine Control Module or unit is to ensure the optimum Engine performance by controlling a set of actuators on the internal combustion engine of your car. The TCU or Transmission control module takes inputs from the engine sensors or TCU to change the gears for the optimum engine performance and fuel efficiency of your cars.

The PCM gets inputs from the sensors, which are spread around the car and give information related to Engine management and performance. The other subsystems controlled by PCM include the Fuel Injection, Fuel emission, Automatic transmission, Anti-lock brake systems, and so on.

As already stated earlier, since the Powertrain module controls the different subunits of your car, whenever there is an issue with a subsystem or auto car part, it is the responsibility of the PCM to alert the driver. The driver will understand the signal and will take necessary corrective action to rectify the problem.

Powertrain Control Module PCM

Photo Credit: https://en.wikipedia.org/wiki/Powertrain_control_module

Let’s take an example: If there is a problem with the transmission system of your car, because the transmission temperature of the system is high, the CPU will give the corresponding indication to you. Obviously, you will get the best transmission cooler suitable for your car model and use it to fix the issue.

The efficiency of your PCM is crucial to pick signals immediately from the subsystems in case of any issues and to alert the driver at the right time. It’s quite clear that if the brain does not function properly, all the sub-functions in the human body can be disrupted. If PCM does not function properly, you will not be able to construe faults or damages to your engine parts, and the different sub-systems will not be able to communicate properly with each other, and this can lead to serious damage to your cars.

However, everything in this world has an existence cycle! Your PCM can also be damaged due to different reasons. Once you get to know the causes of a bad PCM, It will be easy for you to prevent the damage. One of the reasons for a damaged PCM can be Wear and Tear, Corrosion, Thermal stress, etc. There are also chances of PCM getting exposed to corrosion by water.

The second reason for PCM damage can be due to short circuits and voltage overloads in the actuator circuits and solenoids in your car engine. In the case of short circuits, you can get the actuators repaired to fix the issue.


Symptoms of a Damaged PCM

Powertrain Control Module PCM

Photo Credit: http://blog.autointhebox.com/the-brain-of-a-car-engine-pcm-powertrain-control-module.html

When you get a “Check Engine” light, the first thing to do is to check the engine sub-systems. If all the systems are perfect, the next possibility can be a damaged PCM. Other than this, if you experience trouble while starting or running your car, Poor Engine performance, or stalling of your car engines, remember these can be signs of a bad PCM in your car.

Problems while starting your engine in the morning could be possibly due to a damaged PCM and, most probably, the engine control units. After the diagnosis of the other engine parts, if you are completely convinced that your PCM is damaged, the only fix is replacing your PCM either partially or completely.

In most cases, once the PMC is damaged, rather than completely replacing it, we can even go for identifying the damaged subset of your PCM and replacing just the damaged part. The remaining units can be reassembled, and the PCM can be reused. Sometimes it becomes quite difficult to understand the damaged subset for a complicated model PCM. In such a case, it is always advisable to get the help of an expert mechanic to fix it.

It is very important that you know your PCM model is suitable for your car from the Engine make and model of your car. If the PCM is not replaced with the right model, it will not function properly to give the best results.


Tips to Replace Your Damaged PCM

Powertrain Control Module PCM

Photo Credit: http://blog.autointhebox.com/the-brain-of-a-car-engine-pcm-powertrain-control-module.html

Locate the PCM of your car first; for some car models, it can be buried beneath other components. Disconnect your battery terminals first and then replace your new PCM. You can connect your battery terminals again after that.

For some car models, after disconnecting the battery terminal, the PCM needs to go through a relearning procedure. A small scan tool would be required to reprogram the PCM. For some models, it might take some time for the new PCM to get adjusted to the different subsystems and to have complete control over the sub-systems.

If the check engine lights are still on or you get a malfunction indicator after replacing your PCM, understand that there is something wrong. Don’t wait to take your car to a mechanic and get it checked.

The health of your PCM has a very important role in the overall health of your car. For your PCM to function effectively, it should be maintained in a proper manner. No signals or indicators should be overlooked. If you are not able to diagnose the problem don’t take chances, always consult an expert technician. Hope this article was informative, please share your comments.