Home

Recent Posts

Best Automotive Creepers: Buying Guide and Top Picks for 2017


Best Automotive Creepers

Out of the many things that you need in the garage, an automotive creeper is one that is often overlooked. Even if you are not a professional mechanic, you will surely benefit from having one. It will allow you to inspect and repair your vehicle easily. Comfort and safety are not things that you need to be worried about.

With too many options for the best automotive creepers, which one can provide the best bang for the buck? If you have no idea which one to purchase, we are here to help you out. In the rest of this post, we will not only tackle the essential purchase considerations but also have a rundown of five of the best products you might find to be interesting.

Product (Amazon Links)Brand 

Omega 91000 Black 40” Foldable Z Creeper

Omega

Review

Traxion 3-100-FFP Foldable Topside Creeper

Traxion

Review

Dale Adams Enterprises The Bone Rough Rider 7031 Mechanic’s Creeper

The Bone

Review

Whiteside Manufacturing USA Made Professional Creeper (MTL2UP)

Whiteside Manufacturing

Review

Performance Tool Wilmar W85005 Creeper with Adjustable Headrest

Performance Tool Wilmar

Review

Essential Factors to Consider When Buying

To start with, below are some of the things that need careful thought, making it easier for you to narrow down the possibilities and come up with the right choice.

1. Reviews from Other Users

In the case of buying other products for the garage, a good starting point would be feedback from other people. Luckily, there are other users who are generous enough to share their experiences. Pay attention to what they are saying about the quality of the creeper, especially with regard to how comfortable it is.

2. Warranty

AD

As always, it is better to choose a product with extensive warranty coverage. Most of the products available in the market will have a one-year warranty. It is better if the warranty is longer. This means that at any point within the warranty duration, if the product becomes defective, you can have it returned and they will shoulder the repair and replace the defective parts.

However, it is also important to note that not all types of problems will be covered by the warranty. You need to prove that the defect is not an outcome of your negligence. It is important to read the manufacturer’s terms and conditions to be eligible for the warranty.

3. Comfort

A lot of people complain about working on their vehicles because of discomfort. With the best automotive creeper, this should not be a cause of worry for you. To be assured of your comfort, see to it that it comes with a thick cushion. To add, it would be good if it came with a headrest. Even if you work for an extended period, these features will make sure that you are comfortable.

4. Adjustments

You should look for an automotive creeper that comes with an adjustable incline. This means that you will be able to higher or lower the position of the creeper depending on the clearance of the car. Some have headrests that can be inclined in multiple positions. Others, meanwhile, can be raised if you are working on a tall vehicle.

5. Wheels

It is also important for the automotive creeper to have high-quality and smooth-rolling casters. With the latter, it will be easy for you to work in different areas without the need to manually lift the creeper. See to it that aside from rolling smoothly, the wheels should also be lockable. This will allow you to keep it in a stable position.

6. Durability

We all want a product that will last for a long time, if not a lifetime. With this, consider how durable is the automotive creeper before deciding on which one should be purchased. Start with the evaluation of the materials that are used. For some, hard plastic is the best material. Cushions may be more comfortable, but the problem is that they can easily be deformed because of the weight that is applied to it.

7. Cleaning and Maintenance

An automotive creeper will last for a long time if you exert effort in its cleaning and maintenance. Therefore, you have to pick one that is made from materials that will be effortless for you to clean and maintain.

Again, hard plastic may be excellent when it comes to being easy to clean. If it is made from cushion, on the other hand, a great option is one that comes with a vinyl cover. The latter can be easily cleaned by simply wiping the surface. It is also good if the cover is stain-resistant.

8. Capacity

When it comes to the technical specifications of automotive creepers, one of the most critical is the load capacity. This refers to the maximum number of pounds or kilos that the automotive creeper will be able to support. If you are heavy, choose one that is suitable for your weight. Otherwise, your safety can be compromised, and the automotive creeper may not last long.

9. Design

You also have to consider the overall design of the automotive creeper. Remember, there is more than what meets the eye. It is not enough that it comes with appealing aesthetics. It should have an intelligent design; for instance, it must be supportive and should be right for your height. It will also be good if it comes with a one-piece design, which will make it more comfortable.


Top Picks for the Best Automotive Creepers

In this section, we will identify a few of the models that can provide excellent value for money, as well as their most notable features.

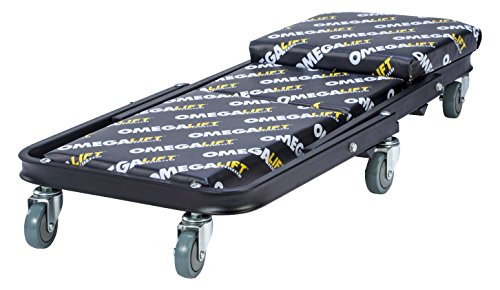
1. Omega 91000 Black 40” Foldable Z Creeper

AD

This automotive creeper has a capacity of 450 pounds, making it the perfect choice even for larger users. Aside from this, it is a well-loved model because it is versatile. You can easily have it converted from a creeper to a seat within seconds and without the need for any tool.

When it comes to your comfort, this will not fail to deliver a positive impression. The padding that is incorporated is the one that makes it comfortable. It is thick enough, making sure that you will be able to work comfortably, even for an extended period.

It is also a good choice because of the construction of the wheels, making the creeper excellent when it comes to mobility. Transferring it from one place to another does not need to be a complicated task. The full-bearing casters are also oil-resistant. It is also made from polyurethane aside from being long-lasting, it resists rough surfaces and it can roll smoothly.

Lastly, it comes with a heavy-duty frame. With the latter, you can have peace of mind about the durability of the creeper. Plus, the manufacturer is also offering the standard one-year warranty for this product.

Pros:

  • Space-efficient and foldable design
  • Solid construction
  • High-quality and easy to maneuver wheels
  • Easily converts from creeper to stool
  • Comfortable

Cons:

  • Some may find it to be too tall
  • Vague assembly instructions

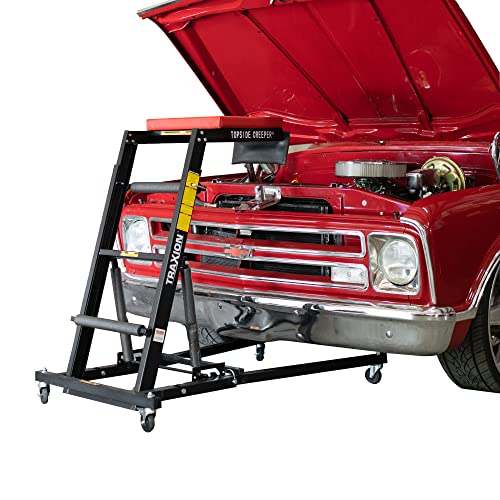
2. Traxion 3-100-FFP Foldable Topside Creeper

AD

You might be like this foldable topside creeper for its versatility. This is one of the best in the market because it is durable, making it useful even through the years.

Unlike most of the automotive creepers, this is not one that is designed for working under your vehicle. Rather, it is a topside creeper, which means that it makes it easy to work on hard to reach portions of your vehicle. This will especially be great if you will be working on a huge and tall truck.

It is also great in terms of space-efficiency. If you have a small garage, you do not need to think much about the amount of space that it will consume. Because of its fold-able design, you can store it without requiring a large space.

While it may be quite tricky to maneuver this creeper, it has excellent casters that are lockable. This will allow you to lock the position of the creeper so that you can safely accomplish any task.

Pros:

  • Easy to assemble
  • Sturdy construction
  • Works perfectly for tall vehicles
  • Spares the back from pain

Cons:

  • Difficult to move around

3. Dale Adams Enterprises The Bone Rough Rider 7031 Mechanic’s Creeper

AD

This automotive creeper is equipped with 5-inch diameter wheels, which are larger than many other models in the marketplace. The wheels are durable and moving it around the garage will not be a problem. The wheels are also great because they will roll well in different types of surfaces. Also, because the wheels are large, it will be able to roll smoothly even if there are tiny objects that it will be passing through.

The low height of the automotive creeper is also a plus. This means that there will be low clearance, which will make it easy for you to work even on low vehicles. To be specific, this automotive creeper comes with 1 ¾-inch clearance.

The polypropylene material that is used in the creeper is also a plus. It is molded, making it more comfortable. However, because of the lack of cushion, some people might find the surface to be too hard for their back and neck.

Lastly, the best thing about this product is perhaps the lifetime warranty on the wheels, which is way better than most of its competitors. This means that at any point, if the wheels are defective, the manufacturer will do what it takes to deliver your satisfaction. The body, on the other hand, has a warranty that lasts for one year.

Pros:

  • Durable construction
  • Wheels are easy to roll
  • Comfortable
  • Perfect even for vehicle with low clearance

Cons:

  • Not for people who are tall

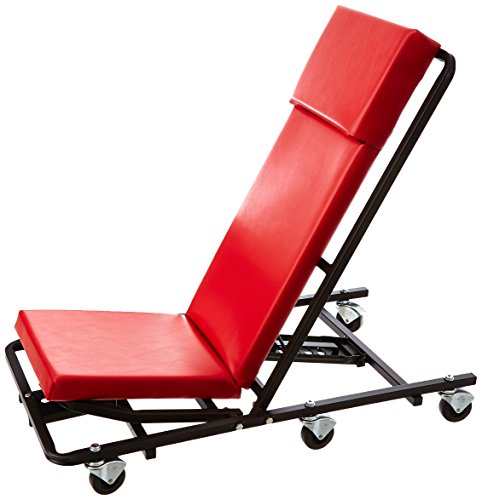
4. Whiteside Manufacturing USA Made Professional Creeper (MTL2UP)

AD

This is another automotive creeper that you might want to consider. Looking at its features, it seems like this is another option that can deliver a lot of promise.

Among others, one thing that I personally loved about this creeper is how versatile it is. You will have the complete freedom to adjust its incline depending on the position you are more comfortable with when working. Adjusting the position does not also require too much effort on your end.

In terms of comfort, you will love this creeper. It has a thick cushion, providing the support that your back needs. Plus, the cushion comes with a vinyl cover. With the latter, cleaning it will be effortless. simply wiping the surface will be enough.

Pros:

  • Position can be easily adjusted
  • Has thick and comfortable cushion
  • Sturdy construction

Cons:

  • Not as popular as other models

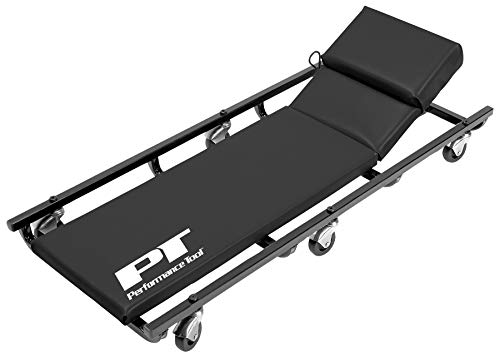
5. Performance Tool Wilmar W85005 Creeper with Adjustable Headrest

AD

It comes with a heavy-duty and powder-coated frame. This might not be the lightest in terms of weight, but because it is designed with wheels, moving this around the garage will not require too much effort.

Lastly, it can be adjusted in three different positions. You can personalize the incline of the automotive creeper depending on how low or high is the position that you need.

Pros:

  • Keeps the body cool and comfortable
  • Generous weight capacity

Cons:

  • The headrest can be difficult to adjust
  • Not for cars with low clearance

Conclusion

In sum, if there is only one product that I can personally recommend, it would be Omega 91000 Bl​​ack 40” Foldable Z Creeper. The latter comes with durable construction, making it last for many years. It is also comfortable, making it easy to work on your car. Given all of its positive points, there is no doubt that it can provide excellent value for your money.

Are you looking for other products that you can use in your garage or for your car? Click here and we will help you decide which ones are the best in the market.

Can Bug Spray Clean Dirty and Foggy Headlights?


Can Bug Spray Clean Dirty and Foggy Headlights

Many times, your vehicle’s headlights become foggy, which makes it difficult to drive it during the night. Bug spray, especially one containing DEET, is considered the best and cheapest method to clean those foggy headlights. Below I am displaying the step by step process to clean headlight with bug spray.

STEP 1: Buy a bug spray, especially the one containing the DEET. You can easily buy it from your nearest grocery store. One bottle would be enough to last for the entire lifetime of the car.

STEP 2: Spray the bug spray onto a towel or some tissues. Never use it directly on the headlights since it can cause the thin film on your headlights to erode and can even damage the paint of your car near the headlight and bumper.

STEP 3: Now scrub the foggy headlight with your paper towel until all the frost condensed over the headlight is gone. You might have to scrub with a bit of hard strokes if the frost is old and difficult to remove.

STEP 4: Now clean the headlight with a clean rag or paper towel to remove excess bug spray from it. This is a very important step. If you leave it like that, it might erode the thin film of plastic covering your headlight and may damage it with time. Also, it is advised to clean the area near the headlight to avoid leftover bug spray to erode the paint on those areas of the car.

Bug spray is a super-efficient and cheapest way to keep your headlight clean. Although it is not as good as professional cleaning, it can be considered as a quick fix for your frosty headlights.

There are few other remedies for your frosty headlights other than bug spray, which you can try:

clean headlights with bug spray

Photo Credit: https://in.pinterest.com/explore/foggy-headlights/?lp=true


1. Buy a Headlight Cleaning Kit

There are cheap versions of professional headlight cleaning kits readily available in the market. You can buy them for as low as $15. You can buy one and get a professional clean-up for your frosty headlight if you are aware of how to use this toolkit. This has better results than any other method, although it is not a permanent fix, and you might have to use it again in a few months.

2. Use Vinegar Solution

Vinegar solution seems to be the one-stop solution for your entire problem. And yes, they can clean up your frosty headlights, too. Make a concentrated mixture of vinegar and water in a bucket. Now remove the plastic shield of the headlight, dip it into the vinegar solution, and leave it for some time.

Take it out after around fifteen minutes. Scrub the headlight plastic to remove the frost. Now clean it with clean water and place it back once they are dry. This method is a bit time-consuming and labor-intensive since you should take out the headlight plastic and assemble it back.

3. Head to Your Kitchen Cabinet

Head to Your Kitchen Cabinet

Photo Credit: http://bestride.com/news/can-bug-spray-really-clean-your-foggy-headlights

You can very easily clean the headlights by gathering some ingredients from your kitchen cabinet. Just gather some toothpaste and baking soda and mix them in a bowl. Now, rub your headlights with this mixture for a few minutes. Clean the mixture with a clean, damp cloth. See, if the results are not satisfactory, then repeat the step.

Once the headlights are clean enough, rub some vegetable oil on your headlights with a paper towel and wipe them with a clean paper towel after that.

4. Install LED Headlights

One of the efficient solutions to frosty headlights is to install LED headlights. The LED headlights come with lot many benefits that normal headlights do not have severe problems related to frosty headlights. Some of them are listed below:

  • Investment in LED headlights is like an investment into driving more safely and efficiently, especially during the night.
  • LED headlights provide clear visibility since they do not spread all over; it is targeted in the area where you require the most visibility and hence give you a clean and bright white light for your driving.
  • LED lights last much longer than normal headlights and are much more durable. It might cost on the higher side of your pocket; however, they compensate that higher cost with their longevity.
  • LED lights also keep the driver awake with their neon-like brightness.

5. Check Your Headlight Settings

Sometimes everything is fine, but still, we could not get the required strength of headlight power as much as needed while night time is driving. Here are a few tricks to turn on headlights that you must check before taking your car to the mechanic.

Check Your Headlight Settings

Photo Credit: https://www.youtube.com/watch?v=2iUNiaYrzFQ

Check the headlight settings in your car. If required, you can search the settings online for your make. Turn the headlight to the highest beam and highest strength. There might be more than just one control to do this setting in your car. You may also take the advice of someone who is already driving the car to help you.

Also, nowadays, there are warning symbols enabled in modern cars, which tell you if something is not right. Watch out for them and discover what they indicate. This way, you can ensure the safety of people inside your car and of people traveling on the road.

Headlights are the lifeline of a driver, especially when he is driving at night. It not only ensures that he sees the road and upcoming objects clearly, but it also indicates the other people on the road of your presence.

Your horns might not work as effectively during the night as your headlights, as during the night, most of our senses are less receptive than our eyes. We are already struggling hard to see the things on the road; hence, most of our brain is used to receive what our eyes perceive rather than what is coming to it through our ears. Hence, having a clear vision for your car during the night is of utmost importance.

Certain car experts have also reported that you should not use bug spray to clean your car. We would like to hear from you if you have any other home-based tips and tricks to clean the car headlights. Also, if you want to share your story revealing the importance of clear vision at night while driving, please jot it down in our comments section.

13 Best Tools For Fixing Your Car At Home


13 Best Tools For Fixing Your Car At Home

needs a good bit of your attention when it does not have a major issue. Think of a situation when you are in a hurry to move out by car, and it does not start. The problem can well be fixed at home if you have the required tools to set it right. Below is the list of the best tools with which you need to be equipped to avoid any undesirable eventualities.

1. The Master Tool

Essential Automotive Tools

Photo Credit: https://smokeycampground.wordpress.com/tag/rv-tray-system/

The Car Owner Manual is the Master Tool that eases you out of using the other tools correctly. Most manuals contain tutorials for common jobs such as adjustment of the carburetor, changing headlights and brake lights or replacement of brake pads, and many others.

2. Assorted Sockets

Flexible Sockets

A set of sockets includes the standard metric sizes of 3/8”, ½”, and ¼” sizes of drivers as well as sockets. For meeting certain special situations, you can additionally keep thin-walled and extension. You can advantageously use locking extension bars for holding on the sockets. They come in sizes of 3”, 6” and 10.”

3. Wire Cutters & Pair of Pliers

wire cutter

Via: http://www.popularmechanics.com/cars/how-to/g2657/tools-to-get-you-started-working-on-your-own-car/

You may be required to undertake some electrical jobs such as wiring headlights, reconnecting the battery terminals, installing a unit of the stereo head, and much more. For meeting different kinds of jobs, you need to keep different sizes of wire cutters, pliers, and wire strippers. Always go in for the full range of these tools

4. Torque Wrench

torque wrench

Via: http://www.popularmechanics.com/cars/how-to/g2657/tools-to-get-you-started-working-on-your-own-car/

Applying more than the required torque to a nut may cause it to break and the bolt to shear off. You will be in a fix in such situations. Therefore, you should use a clicker type of wrench and make it easier to tighten to the required specifications. The specified torque is printed on the tool.

You just need to adjust the torque by turning the bottom handle and aligning it to the desired torque. To make things still easier, the wrench makes two clicking sounds after the job is done. For removing a lug nut, always use a torque wrench instead of an impact wrench or a breaker bar.

5. Pressure Testing Kit

It includes a vacuum pump and bleeder and can perform a number of tests and operations. You can test your vacuum-controlled motors and sensors. You can also detect a leaking vacuum line if you plug each one and then apply a vacuum.

If you want to bleed your vacuum yourself, then attach the vinyl tubing and the fluid transfer bottle to the pump. You can use the refill adapters to keep the master cylinder entirely filled. You can then suck out the fluid out of the bleeder screws. Use the pump for flushing out power-steering fluids

6. Ratchets

Instead of having the normal shorter ratchets, keep longer ratchets that can fit well below the hood. Keep a Gear Wrench that has a flexible head ratchet and is bent to reach tight places. The bent handle will make you keep a distance from the engine.

Have a set that comes with two spark plug sockets and a flexible extension. You can also keep a finger ratchet for unscrewing tight spots.

7. Screwdrivers

Screwdrivers

Via: http://www.popularmechanics.com/cars/how-to/g2657/tools-to-get-you-started-working-on-your-own-car/

The screwdrivers should have hexagonal bolsters. You need it when you need to apply more torque. The bolster is the meeting place of the handle and the shank. You should have stubbed screwdrivers for tight spaces and removed sensors. The Torx Screwdrivers have star heads and are used for sensors. Other categories are heavy-duty flathead and small flathead.

8. Screw Pitch Gauge

You can measure both the metric and British screw gauges. With this tool, you do not have to put the square peg into the round whole to unscrew a metric thread or British thread bolt. You can perfectly match the Teeth per Inch (TPI) with this gauge.

9. Hammer

Claw hammer

Via: https://en.wikipedia.org/wiki/Hammer

You need this for knocking a stuck rotor or other components of your car that have got stuck. Ball pen is the general type. You need to have a rubber mallet for beating a surface that is required to be kept nice and dent-free.

10. LED Flashlights and Head Lamp

You may need more light, even during daylight, to scope out bolts tightened at remote or covered locations. Headlights suit you most if you are working at night or in emergent situations. You will be eased at using both your hands while working, particularly if you are required to work underneath a car.

11. Multimeter

Multimeter

Via: http://www.popularmechanics.com/cars/how-to/g2657/tools-to-get-you-started-working-on-your-own-car/

Instead of going in for a cheaper one, go in for the one that can measure the amperage of your battery and other electrical connections.

12. Jack with Stands

Car Jack

You need an automotive jack to take the wheels off or to get underneath a car. To ensure the utmost safety, you must have jack stands because a jack is hydraulic, and there is every possibility of its failure.

13. Automotive Scan Tools

An automotive scan tool is the latest in the electronic tools. Besides interfacing, it diagnoses the controlling component of the vehicle and can reprogram the module. It is connected to the Data Link Connector (DLC) of the vehicle. It reads codes of diagnostic troubles or DTC. They have bi-directional controlling capabilities. The scan tool can display live data streams such as inputs and outputs.

There are a number of brands under which the automotive scan tools are sold in the market. These are Autel, Launch, Snap-on, OTC/SPX, Bosch, and Vetronix. There are some companies that manufacture different kinds of scan tools, covering code readers to highly advanced programming capabilities.

  • The Enhanced Scan Advisor-MD 1072: It has the capability of linking the chassis controllers and Power-train body on Toyota, GM Ford. If you have any fix in your vehicle, the Enhanced Scan Tool enables you to see the real-time parameters of your engine. It allows greater coverage of the brake component system and airbag. It can be used to read all the PCMs on the top Asian vehicles sold in the US. It features displaying of freeze frame. The unit comes with adapters, cables, and heads and is updatable by the internet.
  • Heavy Duty Scan Kit- MD 3417: In addition to reading and clearing the heavy duty codes, this model of scan tool can display live data and the speed of the engine. Moreover, it displays the pedal position of acceleration, ECU temperature, coolant temperature, intercooler temperature, alternator volts, battery volts air inlet temperature and ambient temperature. Class 4 covers 14, 00 lbs. and Class 8 covers over 33,000 for the trucks. The Heavy Duty is J1587, J1708 and J1939 CAN

The above is essential automotive tools that can take you a long way in fixing your car at home. You need to make the minimum investment in these tools for meeting any emergent trouble with your car.

You don’t know when your car will not comply with your instructions, because being mechanical in characteristics; it is subjected to uncertainty and unseen eventualities. But you can always overcome some issues if you have the knack, basic skill and preparedness to Do It Yourself (DIY). The scan tool is essential for you because it diagnoses and displays the problem points.

Keep Your Drive Safe! Complete Product Review For The 5 Best Brake Pads Available In The Market


Best Brake Pads

Your car or truck needs proper care and maintenance. You have to be very careful when you consider the parts that wear out regularly. Brake pads are among those parts that wear out frequently but are crucial for car safety. Brake pads are the most integral part of the car’s or truck’s braking system. Braking pads are required to produce friction against braking rotors, thus resulting in deceleration of the vehicle. Therefore, it should always be in top working condition.

Brakes (more precisely, brake shoes or brake pads) are a very crucial item when we have to consider your safety. There are lots of choices available for brake shoes or brake pads in the market. Therefore, it could be very difficult for you to choose the right one or the best brake pads for your car. In this guide, we have listed the top five brake pads available on the market. You can find the best one that meets your requirements and budget.

There are so many important automobile parts that make your vehicle work and race effectively. The car breaking system is very crucial for the safety of the driver and passengers in the car. You should always look for the best brake controllers or the best brake fluid that ensures proper maintenance and functioning of your car’s braking system.

Product (Amazon Links)Brand  

Akebono ACT914 ProACT Ultra-Premium Ceramic Brake Pad Set
AkebonoReview

ACDelco 17D785CH Professional Ceramic Front Disc Brake Pad Set
ACDelcoReview

Raybestos ATD923C Advanced Technology Ceramic Disc Brake Pad Set
RaybestosReview

Wagner ThermoQuiet QC1391 Ceramic Disc Pad Set With Installation Hardware, Rear
Wagner Review

Motorcraft BR-1414 Brake Pad
MotorcraftReview

What is a Brake Pad?

Brake pads are the most important part of your braking system. A brake pad provides the friction to stop or slow down your car. It has to undergo exceeding temperatures without losing its effectiveness and structure to create the proper friction level required to slow down a vehicle. It is attached to each side of the brake caliper. Brake pads clamp against the rotating discs and slow down the rotation motion of your vehicle’s wheel. This is a consumable component of a disk braking system. They are crafted out of different materials, including ceramic, organic, semi-metallic, and much more.

A branded new car always comes with a full braking system to ensure its effective performance. With time, the breaking system gets worn out, and it needs to be replaced. If you boost the horsepower of your car, you will have to upgrade the braking system to match the powerful engine. Brake pads always require replacement after a specific period. Brake pads are an important part of your car and should be installed or replaced timely.


The 5 Best Brake Pads Available In The Market

1. Akebono ACT914 ProACT Ultra-Premium Ceramic Brake Pad Set

AD

Sometimes your car makes annoying noise or shifts to apply brakes sideways. This is a clear indication that your brake pads are worn out and need to be replaced. You can buy the Akebono ACT914 ProACT Ultra-Premium Ceramic Brake Pad Set to experience a highly effective and safe braking system.

You can handle all sorts of situations on the road with the help of this brake pad. It works on a vehicle-optimized formula (Ceramic Formula) for superior brake system performance. This is a rotor-friendly item that ensures longer rotor life. It also offers extensively improved pad wear performance as compared to traditional brake pads.

Major Features:

  • Ultra quiet: It offers the ultimate solution for pedal pulsation and dust. It reduces noise, vibration, and harshness levels.
  • Superior initial effectiveness
  • Rotor friendly
  • Designed with Ceramic formula and vehicle-optimized friction formula
  • Superior performance and offer ultimate braking experience to motorist
  • An excellent upgrade for organic, semi-metallic and low-metallic brake pads
  • Suitable for almost all sorts of motorists
  • It offers more consistent stopping power over various driving situations, such as Panic Stop
  • It helps to minimize dusting

Pros:

  • Highly upgraded as compared to conventional brake pads
  • Smooth braking
  • Low dusting
  • Compatible with open or aluminum wheel designs
  • Increased durability
  • Unique ceramic formulation to reduce vibration, groaning or brake squealing
  • Rotor friendly

Cons:

  • These pads do not fit into a few of the most commonly used cars.

2. ACDelco 17D785CH Professional Ceramic Front Disc Brake Pad Set

AD

These brake pads are very popular among all sorts of motorists. They are suitable for most vehicles and offer effective braking systems. Semi-metallic, ceramic, and organic formulas offer reliability and safety for various vehicle applications. This is tested using SAE J2784 standards for noise, harshness, vibration, durability, and braking effectiveness.

It works on an organic formula that ensures safety and reliability for a wide range of vehicle applications. It comes with a stamped backing plate that protects brakes from premature wear.

Major Features:

  • It comes with chamfers, slots, and premium shims that help to minimize vibration, noise, and braking harshness.
  • It has a stamped backing plate that permits you to proper pad movement within brake pulsation, vibration, and noise.
  • Solid construction and designing formulas
  • Its universal design is perfect for various kinds of vehicles
  • Designed with an effective formula, it delivers instant stopping power without chirping or squealing
  • Made up of ceramic that ensures durability
  • You not need any curing or machining while installing them

Pros:

  • Easy to install
  • Excellent upgrade for conventional brake pad
  • Offers you a noise and vibration-free riding
  • Vibration-free
  • Provides exceptional performances
  • Comes with noise-dampening shims

Cons:

  • These brake pads start squeaking very badly on moderate or light stops after a month.

3. Raybestos ATD923C Advanced Technology Ceramic Disc Brake Pad Set

AD

These brake pads are designed to offer an excellent braking system. They are built of excellent quality formulations to minimize dust, noise, and brake fade while delivering increased braking power. It works on an advanced formula that helps minimize dust and noise.

It works on modern technology that helps to maximize the overall performance of the braking system. Nitrile polymer-coated clips and quite coated hardware help to maximize noise suppression. This is the best fit for older vehicles.

Major Features:

  • Advanced technology brake pad
  • Designed with highest quality ceramic/semi-metallic formulations
  • It features an integrally molded design for excellent strength
  • It features OE-compliant standards that ensure durability and strength
  • The basic slots, shims, and chamfers offer the reliability and safety you expect from an excellent set of brake pads.
  • Advanced friction formulation to maximize the performance of overall braking system
  • Abutment Clips (Nitrile-polymer coated ) to maximize noise suppression
  • Perfectly coated hardware helps reduce noise

Pros:

  • Corrosion-free
  • Easy to install
  • Safe, predictable, and consistent product
  • Good quality
  • Right fit for almost all vehicle
  • Comes with extra hardware

Cons:

  • It starts making noise after 7-8 months

4. Wagner ThermoQuiet QC1391 Ceramic Disc Pad Set With Installation Hardware, Rear

AD

This can be the best option that comes with solid construction. You can find an effective set of brake pads that help your vehicle balance on the road. This is among the most popular brake pads that come with lots of amazing features. These brake pads don’t expand easily and work effectively. These brake pads cannot lose gripping power even in extreme heat.

It has 15% more stopping power and 35% quieter than traditional or conventional brake pads. This is setting a new benchmark for Ceramic brake pad performance. It fits perfectly in vehicles and comes with all the extra metal parts that are required for the caliper.

Major Features:

  • It is formulated in a way similar to semi-metallic pads
  • It is designed excellently and works on advanced technology to withstand extreme heat
  • Nice fit
  • No noise
  • Works effectively
  • Perfect braking power
  • Suitable for one pair of wheels

Pros:

  • Work in wet or cold weather
  • Durable and cleaner

Cons:

  • Annoying noise when starts driving on cold brakes
  • People also find it difficult to install as per usual practice and instructions
  • It does not come with any noise stop or lubricant at all.

5. Motorcraft BR-1414 Brake Pad

AD

If you are looking for a complete kit with new shims, this can be the perfect choice to pick for your vehicle. This is specially designed for your requirements to ensure durability, performance, and optimum friction. This set of brake pad is tested to some standards for reduced dust and noise. This is well suited for various types of vehicles and is easy to install. This can be the excellent product. You can go for it.

Major Features:

  • Specially formulated so as to ensure optimum friction, which results in a great performance.
  • These pads produce reduced noise and dust and are durable too.
  • The material quality is as per the Friction Materials Standards Institute (FMSI) standards
  • It comes with hardware
  • You will get a complete kit with new shims

Pros:

  • Easy fit and direct installation
  • Great quality material
  • Fit good
  • The brake pad looks good
  • Stops good

Cons:

  • These pads are a bit noisier
  • These are not as durable as stated.

How to Choose the Best Brake Pad for Yourself?

There are many brake pad choices available in the market, claiming to offer the best performances. You may find it difficult to choose the best brake pads for your vehicle. We have mentioned some factors that you should look into before choosing any brake pad. The choice of brake pads depends on the purpose for which the vehicle is utilized.

AD

1. Commuting

Those car owners who just drive around town can go for OEM quality brake pads. These are Organic and Ceramic pads that offer smooth and quiet stops and let you enjoy driving. These brake pads are suitable for vehicles which are used in city commuting as there is not much heat produced in these conditions.

2. Towing

When you tow heavy loads on your vehicle, it generates extra heat. You should look for heavy duty brake pads that are resistant to that heat. You can choose semi-metallic brake pads as these are highly effective in such conditions.

3. Off-Road Trips

If you go for adventurous off-road trips, then you should get the best possible braking pads for your vehicles. Off-road trips are full of rough roads, steep inclines, muddy passages, etc. It is very important to have highly efficient braking pads in such conditions.

In such scenarios, semi-metallics are best suited as these are tough and heavy-duty pads. Besides, this one can also go for mid racing braking pads.

4. Street Performance

The vehicles used for street motorsports or performances are very powerful. Performers need an engine with great power, so they make various modifications to the engine to get a powerful engine. But, at the same time, it is also very important to have equally strong braking system as well. Semi-metallic, organic, or selected ceramic braking pads would be the most suited for such purposes.

5. Racing

As we all know that racing cars are equipped to be driven at top speeds for a longer duration, this causes great friction of tires, and as a result, great heat is generated. There is also a large amount of heat generated by the engine.

Therefore, one cannot use normal braking pads in these cars. The braking pads that are used in racing cars are heat resistant and, therefore, can withstand great heat. These braking pads are made of semi-metallic heavy duty materials.

It is very important to have a good quality brake pad installed to ensure safety. Brake pads are made up of various materials so that they can be used in various conditions. In a few cases, such as racing vehicles or those used for off-road trips, there is a large amount of heat generated. So, in such conditions, one should use the brake pads that are made of heat resistant materials. Out of the above-mentioned brake pads, we would recommend you to have Akebono ACT914 ProACT Ultra-Premium Ceramic Brake Pad Set installed in your vehicle. These brake pads are highly effective and durable.

How To Install Racing Seats To Improve Your Driving Abilities?


How To Install Racing Seats To Improve Your Driving Abilities

If you are driving at the usual speed, the seat provided by the manufacturer may be all right. But if you want to race your car, you must have experienced how important it is to have a secured seat. Besides improving your driving abilities, it keeps you safe and secure. Your right choice will be installing an aftermarket bracket, either with or without sliders. Here is how you can make it.

You need the following materials and equipment for the installation of your racing seat:

  • Brackets: You need seat brackets, specifically fabricated to match the seating dimensions of your car, one for the driver and the second for the passenger.
  • Slider: Although the installation of the slider is optional if installed, it eases reaching the pedal and steering at varying distances. You can slide forward or backward at your needs and convenience
  • Side Mount Brackets: Determine if your car seats have mounting holes for the bracket. If you find them on the sides of the seat, you need to install side mounting seats. If the holes are on the bottom, go in for the bottom mount seats.
  • Hardware for Installation: Pick up four sets and match nuts and bolts, each for the seat bracket, slider, and side mount bracket.5. Tools and Equipment: Choose the right kind of ratchet you need for your car. Keep in handy different sizes of flathead.

STEPS FOR INSTALLATION

STEPS FOR INSTALLATION

Photo Credit: https://www.rx8club.com/series-i-interior-audio-electronics-24/roll-bar-racing-seat-install-117063/page3/

1. Assemble New Seats

  • First, you have to attach the seat bracket and slider to the new aftermarket seats. Set the seat down on its side onto a soft surface. Find out the holes in the corners of the sliders and match them up with the seat. After inserting the bolts, tighten them up. You can skip this step if you are not opting for the slider.
  • Access the holes that match the seat bracket, and after they are lined up, insert the bolts through them.

2. Remove the Factory Seat

  • After removing the original seat, slide it forward and find the two bolts located at the back of the seat. Then, remove them by using a ratchet and set offf the socket.
  • After removing the front bolt, slide the seat back and then find the two front bolts. Remove them by using the socket and ratchet.
  • After unplugging all the seat connectors, tilt back the seat to look underneath the seat. Disconnect all the electrical connections.
  • After removing the seat from the car, remove the seat physically from your car.
  • After removing the set buckle, remove the bolt that holds it in place.

3. Install Your New Seat

  • Attach the new seat buckle to your factory seat car by using nuts and bolts.
  • Once again, maneuver the new seat and take care to see that it does not scratch your car.
  • Reconnect the electrical connections to your new seat. If any of these connections can not be connected, don’t plug them in.
  • For lining up the seat bracket, find out the four holes that hold the factory seat and line them up with those of the seat bracket of your new seat.
  • For bolting down the seat, put the original bolts in the reverse position of removal. Slide the seat back for installing the front bolts. After that, slide it a little forward for installing the rears. Don’t overtighten them.
  • Before finishing, put yourself on the seat in a sitting position and make sure that it is comfortable and easy for you. If you experience discomfort, pull the seat out and put it on other holes on the brackets and sliders.

GPS Tracking

GPS Tracking

Photo Credit: https://www.youtube.com/watch?v=RW-VNVUzY_A

You must have been aware of the various technical and commercial benefits of the latest and popular auto technology, called Geographical Positioning System or commonly known as GPS. Vehicle owners are finding it most beneficial because it gives different information about the tracked vehicles, just as something happens to the vehicles.

It is therefore called Real Time GPS Tracking System. If you install a GPS and take up a monthly subscription for a SIM Card, the card sends information about the vehicle, through the satellite.

If you are operating a fleet of cars or other vehicles, your best option will be to install GPS tracker. By accessing the real-time performance of your vehicle, your effectiveness of your vehicle management system will be amply improved. You can detect any undesirable activities such as fuel pilferage, stoppages, movement of the vehicle to unordered destinations.

At the same time, depending upon the information gathered through the GPS, you can provide an incentive to the drivers of the vehicles and thus improve their productivity. You can also track a lost vehicle. If your child is journeying without your company, you can track the movement of the car and can take corrective action in the event of any trouble.

Consistent cushioning is essential for comfort while traveling by car. Improper cushioning may bring a number of physical problems for you such as disc damage, hip pain, shoulder pain, neck strain and much more discomfort and pains caused by the mechanical effect of jerks and body movements, while your car is in motion. It is therefore essential that you select the best car seat cushion. Before opting for the one, you need to consider the following

  • Source of Pain: Car cushions mostly targeted at taking care of posterior or lumbar back and cervical spine. You should opt for the one that takes care of the pain; you usually experience while moving in your car. The shape of the cushion improves your sitting posture. If you experience pain in your legs, buttocks or lower back, go in for more than one type of car cushion.
  • Car Temperatures: Cushions with Gel will suit you live in the warmer climate, and if you are in a cool climate, foam and fabric seat cushions will suit you. You should take into consideration, the heat retention capability of the cushion. Memory foam is ideal for the comfort of your buttocks, spine, and thighs.
Car Cushions

Photo Credit: http://www.hotrod.com/articles/1302clt-corbeau-race-seat/


5 Best Car Cushions

In order to have a better racing in your car, you need to replace your factory seat with customized and fabricated seats. For tracking the movement, your car goes in for a GPS tracker. Choose the best car seat cushion for utmost comfort while driving your car.

How To Check Fuel Pump Pressure Correctly?


How To Check Fuel Pump Pressure Correctly

The consumption of four-wheelers and some heavy-duty vehicles has slowly gone up. It has become a part of our daily life, so just like the other appliances, we do have certain concerns about our vehicles. In those criteria, we must obviously check the fuel pump pressure in our vehicle.

Diagnosing the engine pressure in your car plays a major role in the engine’s performance. In case you are facing low fuel pressure, it leads you to all kinds of engine recital troubles such as low power, a hard start, very bad mileage, and poor emission.

Thus, checking the fuel pressure pump can give your car a good engine performance. Not all car owners are mechanics. Obviously, we need some assistance or a type of instructor to perform the fuel pump pressure test.

I am going to share with you some of the methods I came to know for testing the pressure of the fuel pump. At first, I found it difficult to progress, but later it became easy for me. It gave a good diagnosis of my car. Hence, my car’s performance was higher than creating problems. So, let us get started on how to check the fuel pump pressure.


How to Check the Fuel Pump Pressure Correctly?

check fuel pump pressure

Photo Credit: http://www.aa1car.com/library/fuel_pump.htm

I checked the fuel pump pressure in my car, with the following steps.

The first step I took is that I searched for the vacuum line that gets connected to the fuel pressure controller and eliminated it. The important note is that the vacuum line should be free from fuel in case any fuel is seen, then I am very sure that the regulator has failed.

If you have finished the inspection of fuel pressure regulator, then after that reconnect the vacuum line back to its original position and then, try to spot and eject the protective cap that allows the attachment of fuel pressure gauge hose.

Then next step that you should follow is, to take the fuel pressure testing apparatus from its packing case. It is not that we have to use a particular apparatus, all kinds of clip-on fuel pressure apparatus will work.

Once when you finished on fitting the fuel pressure gauge with the suitable adapter, fix the gauge line directly to the fuel examination port. If you cannot find any of the test port, then, you obviously need a fuel adapter. It should be connected to the fuel filter.

check fuel pump pressure

Photo Credit: https://www.2carpros.com/articles/how-to-check-fuel-system-pressure-and-regulator

When the process of connecting the fuel pressure gauge gets over, try to turn on the key of ignition to the ON location. As soon as you have turned ON the ignition, the pressure gauge should jump immediately between 45 psi to 58 psi. Most of the Direct Port Inject (DPI) systems, the TBI which is, Throttle Body Injection is between 13 psi to 17 psi.

It shows that the pump is working sideways with the system of the electrical portion. If you cannot find any fuel pressure, then you have to check the fuel pump, fuse, and relay in the Power Distribution Center.

After trying all these steps, still, you observe no fuel pump operation admission with the power feed wire of the fuel pump, there are some few numbers of ways to do this. To energize the fuel pump, a wiring scheme helps us to distinguish the color of the wire. To spot out the exact color of the wires, the best way to know about it is the service manual.

The moment you have distinguished the color of the wire that we need to test, it should be placed in the wiring harness closer to the fuel tank where the pump is situated. The testing light should be grounded and impale the wire’s exterior coating with the examination light point.

While testing, if the light turns on with its brightness and you can find no pressure, then the fuel pump gets collapsed. If you can observe that the test bulb doesn’t illuminate, then there is a problem in the pump control relay, or there is a shortage in the wiring circuit.

The pressure of the fuel should go down between 5 psi and 52 psi. Meanwhile, the engine is running. If you have any doubt regarding the working of the pressure regulator, just give a try on snapping the throttle. As soon as you snap the throttle, you can observe a hike of pressure to 5 psi. It indicates that the pressure regulator is working properly.

If no actions deliver from the pressure regulator, check the pressure line. If the pressure line seems okay, then the pressure regulator is not working properly. When there is an underload in the engine, the fuel system cannot deliver its full working capacity. It leads the psi to drop down slightly. Ultimately the pressure should stay at 52 psi.

check fuel pump pressure

Photo Credit: https://www.youtube.com/watch?v=_oXLUqE4Sf0

In case you can find a very low pressure even there is an under load, then obviously the fuel pump has failed, or there would be a clogged in the fuel filter. Once your testing gets over, you must place a towel at the base of examination port. It will be used to collect the overloading fuel from the gauge hose.

While utilizing the towel, just loosen the pressure hose. There will be a slight leakage of the fuel. Once you have removed the hose, there will be a no stop leakage of the fuel. Now, collect the fuel in the towel that you have placed at the base of test port.

Place the fitting dust cap back to its original position. By using the towel try to clean the fuel area to make the place free from fuel. Finally, inspect the all the areas for any fuel leaks. If you come across any fuel leaks, rectify those leaks and also clean fuel injectors.


Conclusion

Maintaining a car is more important than buying it. Take a proper concern over your car for a long life and better workload. Use the best fuel additive for cleaning fuel injectors so that in can decrease the carbon in the valves.