Home

Recent Posts

What Kind Of Oil Should I Use For My Car?


What Kind Of Oil Should I Use For My Car

When I get my oil changed, I usually go to a Jiffy Lube or a dealership service center. They almost always do a great job, and I just have to wait a short period for my car to get serviced. But I never think much about the specific type of oil I need.

The oil you should use for your car can be found in the driver’s manual, various places online, in auto stores, and in service centers. Using the correct oil is important for the maintenance of your car and for optimal performance.

The specific oil you need for your car can be different than that of other car models. If you are looking for oil to do an oil change on your car yourself, make sure you get the right type for your car and sometimes for the climate you live in as well. 

Have you thought about what happens when you turn the key on your car? How does the car get started in less than a second? Just like our body converts food into energy, the car engine converts fuel into energy. This process of converting gas into energy is called internal combustion.

Power is generated by the small but controlled explosions in your car’s engine cylinder. This power is used to keep your car moving. The Engine parts are constantly in motion during this generation of power.


Why Use Engine Oil?

It’s quite natural that the Engine parts are exposed to wear due to this rigorous movement. That’s exactly where the role of engine oil becomes so very critical.

Engine oils are extensively used as a lubricant to reduce friction between moving engine parts. When the engine parts are completely lubricated, they slow down the wear and tear of Engine parts and thus protect them. It is quite obvious that it’s very important to choose the best oil for my car to improve my engine performance.

Other advantages of using Engine oil are that it keeps the engine clean by avoiding settling sediments, and it helps increase the life of the engine by providing smooth movement of Engine parts. Again, the question will be how I can decide on the best diesel engine oil or the best petrol engine oil. Before discussing that, let’s discuss the different types of Engine oils available.


Types of Engine Oils

oil car

Next time you change the oil in your car, keep in mind that there are different types of engine oils available: Conventional, Synthetic, Synthetic Blend oil, and high Mileage oil. Let’s get to know the features of each type.

  • Conventional Oils: Conventional oil is derived from Petroleum, and it includes crude oil, natural gas, and condensates. This is less expensive than the other oils available. Conventional oil can be formulated in different viscosity grades and quality levels based on the need.
  • Synthetic Oils: Synthetic oil molecules are of uniform shape, have better properties, and are better in quality than conventional Oil. It has fewer impurities and has better performance in high and low temperatures. It does not evaporate easily and provides better performance.
  • Synthetic Blend Oils: Synthetic Blend oils are a mixture of mineral oil and synthetic oil, also called as Semi-Synthetic oils. The Properties of Synthetic blend oil is comparatively high at low temperature and gives higher resistance to oxidation. This kind of oil is highly recommended for heavy-load trucks and SUVs.
  • High-Mileage Oils: High Mileage oil is specially formulated for late-model vehicles or new-model vehicles with an odometer of up to 75,000 miles. These types of oils will extend the performance life of engines and will slow down the aging process of engine parts. Engine leaks and deposits are also reduced by using high Mileage oils.

Now that you have understood the different types of oils available, the next question is which type of oil you select for your car. There are some easy steps to figure it out.


Oil in Your Engine

engine-oil-for-your-car

The right oil for your car is selected by your car manufacturer. They know exactly what oil is best for your car model. Your car manuals will specify the recommended oil types that go well with your car model.

The oil should also be the correct viscosity, which may be based partially on the climate where you are located, whether you are in a cold or warm area. If you are not sure which oil you should use, search the internet, ask your car dealer service center, or a local automotive shop. They can usually help you find out.

It is very important that you choose the oil with the right thickness because using oil that is too thick or too thin will not give the necessary protection, and this will cause damage to your Engine. The car manual will also specify the alternative weight oil in case the recommended one is not available.

The automaker will list the different quality standards in the manual; SAE (Society of Automotive Engineers) and API (American Petroleum Institute). You need to choose the one that matches your manual by verifying the standards listed on the oil bottle.


Read the Label on the Oil Containers

Read Label in Oil Containers

The labels of oil containers specify the SL rating (service) and SAE (Society of Automotive Engineers) viscosity numbers. Next time you change the oil in your car, read the label to understand the compatibility with your car model and whether the oil has passed the tests listed for service as per the expected standards.


Viscosity Number

The next parameter to focus on while selecting the right oil is Viscosity. Viscosity refers to the thickness of the oil. Oils become thin when heated and thick when cooled. Since a certain amount of thickness is required to lubricate the engine parts, choosing the oil with the right viscosity is very critical.

oil for car
Photo Credit: http://www.popularmechanics.com/cars/how-to/a53/1266801/

To check the ideal oil viscosity for your car, check the manual to understand the recommendations. If you are unable to find the oil with the right viscosity, thinners can be added to modify the thickness, and we can make it suitable for your car engine model.

Additives are chemicals that are added to oils to change their properties. There are many additives available in the market that can be used to modify specific properties of Engine Oils. The common additives are Viscosity index improvers, Detergents, Dispersants, Friction modifiers, Anti-oxidants, and Anti-wear agents.

Remember, you should carefully choose the additives, and the mixing of additives should be done by or under the guidance of a professional. Excessive or low usage of additives will not give the required result. Furthermore, it can cause damage to the entire system.


Online Links

Many online links are available to help you choose the right oil for your cars. By entering the car Engine model and the make of the Engine, suitable suggestions will be given on the engine oils.

When I go to Amazon.com, it allows me to input my car’s make and model, so I can get the correct parts for my car.

Always search well before putting oil in your engine if unsure. You will be able to keep your car healthy for a very long time with regular oil changes and a regular maintenance schedule. 

Revised 2/20

Tips When Shopping for a Used Motorcycle


Buying a Used Motorcycle

While most of us drive cars, the USA is also home to millions and millions of registered motorcycles. They might not be a substitute for a car. They also might seem like a luxury to others, but those who own motorcycles will be quick to tell you how much joy they bring into their lives and are well worth the price.

When you are shopping for a used motorcycle, do research online to gather facts about the motorcycle type and fair prices for it. Do a physical inspection and a test drive. If you are still unsure about purchasing it, let a mechanic inspect it and give you a rundown of the pros and cons. 

Many people will head into a local showroom to purchase a motorcycle. But, just like with cars or trucks, buying used is a very popular way to enter into motorcycle ownership. However, before you go and buy your first used motorcycle, consider the following tips and ideas for shopping for a used motorcycle.


Perform Research (and Potentially Shop) Online

used motorcycle
An old motorcycle parked on the street of Bangkok

If you are new to the world of motorcycles, it is a good idea to spend a few hours (or more) performing some research about the type of motorcycle you want, the features you need, and how much you are comfortable paying. There are many great resources online covering everything from what gear to buy to places to buy parts and much more.

In addition to using the internet to research which bike to get and what a fair price is, you can also use the internet to actually buy your motorcycle. Of course, it is always a good idea for you (or a trusted mechanic) to inspect the bike, but that isn’t always possible without spending a ton in terms of travel.

As far as actually getting the motorcycle you buy online, you can travel to where it’s located and drive it back or can have an auto shipping company such as Executive Auto Shippers (https://executiveautoshippers.com/) ship it to you safely and reliably.


What to Look For?

Make sure to do a thought check of the engine and all the important parts of the bike that are involved with the safety and proper functioning of the bike. 


Know How Hard the Bike was Ridden

Know How Hard the Bike was Ridden
Via: https://www.bikerandbike.co.uk/motorcycling-burns-between-170-and-600-calories-per-hour/

While some people ride their motorcycles by the books and leave their bikes in great condition, others will absolutely ride their bikes into the ground with high speeds, burnouts, or extremely long trips. Of course, if you are buying a used bike for thousands of dollars, you want the bike to be in good shape.

You should observe the wheels to ensure they are in good shape and don’t have flat grooves, which could mean the driver was burning out frequently. Also, be sure to check for any scrapes or grooves that could be an indicator of a crash or simply not treating the bike right. Also, requesting a service or accident history on the bike is also a good idea. It could give you some solid insight.

If you don’t know what to look for or how to identify it, feel free to work with a trusted mechanic who knows about motorcycles to help assess the general condition of the bike.


Make Sure You Ride it (or One Like it)

Make Sure You Ride it
Via: https://www.youtube.com/watch?v=usMZQYDue9M

Especially if you are new to the world of motorcycles, you should never purchase a bike without first knowing how it rides. Every bike is different, so you should do your best to ride the actual bike you will be purchasing. If not, you should ride one that is very similar.

The last thing you want to do is spend a lot of money on a bike and find out it doesn’t ride or handle as you would expect. Sure, you can watch videos or read reviews, but there is no substitute for actually sitting in the seat and driving it yourself. This will get you used to the weight, the steering, the speed, where all the switches and odometers are, and more.


48 Hour Cool Off Period

You’ve done your research and inspected the bike, and you’re ready to buy. Wait! It’s a really good idea to give yourself a 1-3 day cool-off period before buying your bike. Yes, you might lose the bike to another purchaser, but it’s worth it.

Why? This time gives you the power to make the right choice for yourself. People spend thousands buying items that they just a few days later they regret. It happens to almost everyone. That’s why there are so many cool-off period laws now.  

During this time, you’ll find out more information about the bike, your feeling may change, and you can try to see things from a factual point of view. It puts you in charge of the decision instead of your feelings.

Hopefully, this article has given you some tips to successfully shop for a used motorcycle.


Additional Questions

  • How much does a mechanic charge to inspect a motorcycle?

Each mechanic will charge a different price, but it should be somewhere between $100-$200 to do a thorough inspection. They Should check all the mechanical components are working properly, do a test drive, and give you a report.  

  • What do I need to transport my motorcycle after purchase?

You’ll need a truck, a ramp, and some tie-downs to secure the motorcycle (Amazon Link). Check the load capacity of your truck and ramp, and check to make sure your tie-downs are heavy-duty and have proper anchor points.

Revised 2/20 

5 Quick Gifts For Car Lovers


For Car Lovers

Most people use a car to get around. The thrill that you get when you get behind the wheel is unmatched and can bring a smile to anybody’s face. We all love cars in different ways, but for some of us, this love is on another level, and this article will help you pick a gift for such people.

The five gifts that most car drivers will enjoy getting are a smartphone dash mount, a car model, a dash cam, a key tracker, and something personalized such as a key chain.

We have made a list of five gifts that are perfect for a car enthusiast. We have prepared this list after some research, and it includes a mix of items. Without much ado, let’s have a look.


1. SmartphoneDash Mount

AD

One of the most useful and significant accessories for a car these days is a smartphone dash mount. It is very rare for a person to have a car and not have a smartphone.

Get this smartphone dash mount for your friend and help him or her view their phone from one place without any trouble.

This can be a very helpful gift, plus these types of products are easy on the wallet, so you don’t have to worry too much about it.


2. A Car Model

AD

Most car enthusiasts have the urge to build their own car. They have a passion for customizing their cars according to their requirements and taking things to another level.

You can help your friend build their dream by gifting them a car model. Of course, the model might not really help them reach their goal, but it will motivate them to do better, and who knows, one day, they might have their own baby out on the road.

If there are no kits available, you can see if they have a model that has already been built.


3. A Dash Cam

AD

Why not spend a little more and get your friend something that actually makes the driving experience more interesting and helpful? A dash cam can come in really handy.

While some latest car models come with a front camera, most older cars do not have one, which is why it can be a good gift.

Plus, back cameras are also available that can make it easy to reverse the car, especially when it comes to parking or driving in a crowded area.

These cameras are quite powerful, and some even come with the ability to record video, which can be used in case your friend gets into an accident.

This is easily one of the best gifts for anyone, and if you drive a car and do not already have a camera installed, then think of getting one for your own car as well.


4 . A Key Finder

It is common for people to lose their car keys. While they usually end up finding it eventually, the time wasted is hard to account for, which is why a key tracker can come in handy and makes for a good gift.

The tracker works with Bluetooth technology. It gets attached to the car key and can be traced with the help of a Smartphone. Simple and efficient.

AD


5. Personalized Merchandise

AD

There are few gifts as special as personalized items. You can get anything, from a personalized key chain to personalized seat covers, as a gift for your loved ones.

The benefit of a personalized gift is the fact that it shows effort. It also gives you a huge variety of items to personalize. You can get any item personalized, and the cost is usually fairly low. 

This can be an option for those open to the idea of receiving personalized items. While some might not want a personalized message or gift, others will. Find out your friend’s openness to this idea before purchasing a personalized gift, or they may not really be interested, although they will thank you.


Conclusion

If any of these gift ideas help you obtain a gift for a friend or loved one, then I hope it works out to be one they really enjoy. With some planning and understanding of your friend’s interests, you can buy something they will enjoy for years to come.

Revised 2/20

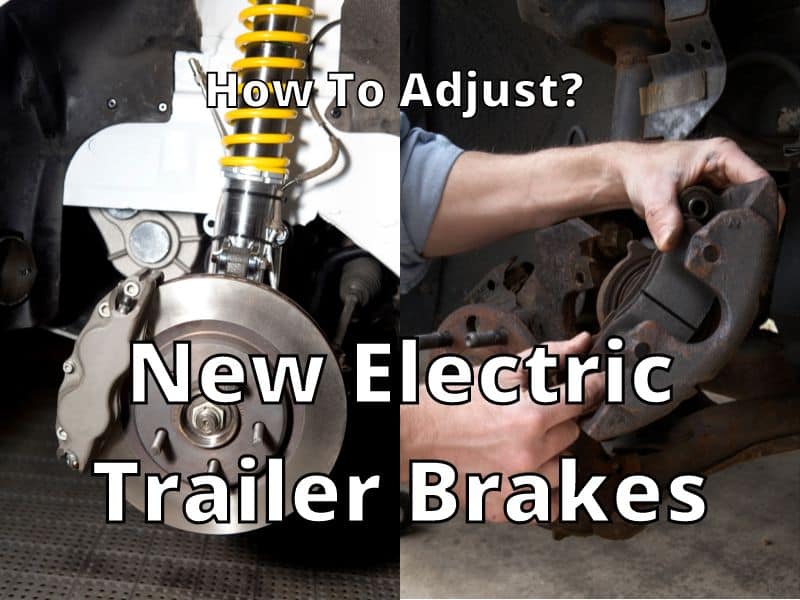
How To Adjust New Electric Trailer Brakes?


New Electric Trailer Brakes

A trailer and other types of recreational vehicles can help us when we need time to relax on a cross-country trip, when moving, or if it’s part of our job. Whatever the situation might be, it critical to maintain your trailer and make sure it is safe. 

New trailer brakes need to be adjusted after a break-in period (about 5,000 miles – see owner’s manual), so they will have the correct tightness. Newly installed brakes should be adjusted right away. Using a screwdriver and a jack, you can adjust them, so the brake pads are just about touching the brake drums.

Depending on the brakes (some say they are self-adjusting), they will need to be adjusted about every 3000 miles after the first adjustment. Newly installed brakes should be adjusted 200 miles after the first adjustment and then about every 3000 miles. Check with the brake manual for specific adjustment miles. 

Maintaining trailer brakes may take some effort and can be different when compared to a standard car because it may need more effort. But when it comes time to pull your trailer, you’ll be glad you have adjusted your trailer brakes in the correct manner. 


What is an Electric Brake, and why do you need Them?

New Electric Trailer Brakes
Photo Credit: https://www.youtube.com/watch?v=SoROzv7fv3E

When a large vehicle such as a utility trailer, camper, or travel trailer is being towed, it will need a supplementary brake system because the brakes on the vehicle towing are not enough to stop both vehicles at once. There are two types of brakes available, which are the forward self-adjusting brakes and the manual brakes.

The forward brakes will adjust themselves once the brakes are applied in the trailer, whereas the manual brakes have to be adjusted by using a star adjuster. Using self-adjusting brakes is recommended since they don’t need to be adjusted again and again once you set them, and they should not need further adjustments.

You won’t need to go to the mechanic to get this job done because most people can do it themselves in the comfort of their driveway. If you do decide to adjust the brakes yourself, you will be saving money and a trip to the mechanic.


What Equipment is Required to Adjust New Electric Brakes?

Here is the list of auto part components or tools which you will need while adjusting new electric brakes.

Electric Brake

  • A standard jack: the brakes are located on the bottom of the trailer, so you need to get a jack to lift up the trailer. Jacks come with the trailer, or you can purchase them from any tools store. 
  • Brake adjustment tool: This tool is required to turn the adjuster assembly/screw. You need to tighten the adjuster with this tool or a screwdriver. You can get this tool easily in any hardware or tool store or click the link. It is thin and should be easy to store, so you can use it again when needed.
  • Screwdriver: If you don’t have a brake adjustment tool, a screwdriver will work. (See Video) This will allow you to pop off the brake adjuster plugs so you can gain access to the adjuster, and then you can tighten the adjuster if needed.
    • Make sure your screwdriver is wide enough, so it has enough leverage. You’ll likely have this tool in your garage or house, and if you don’t, you can get the screwdriver set at any hardware store. If you buy a whole set of screwdrivers, they will have applications for many takes around the house and during your travels.
  • Safety gloves: Whenever working with any vehicle, always use your safety gloves to avoid injury and keep your hands clean. It will also prevent you from coming in direct contact with any parts of the vehicle that can scratch you. 

Step-by-Step Method of Adjusting New Electric Brakes

  1. The first step would be to ensure that the tow vehicle handbrake is applied so that there is no movement with the trailerWith the handbrake applied can then place a block or wheel stopper on the opposite side you’ll be working on.
    • If the trailer is by itself, ensure it can’t move with a wheel stopper or other securing measures and by placing it on level ground. 
  2. After that, you’ll need to lift up your trailer using a standard jack and ensure that the jack can handle the weight and that the jack is placed correctly. Make sure that the wheels on the trailer are able to rotate freely. If you have any problems with turning the wheel after it’s been jacked up, read the trailer’s service manual and see if it has any recommendations.
  3. Now remove the adjusting hole plug, which is located at the bottom of the brake unit and faces inside and under the trailer. You may need to remove two adjuster plugs to find the screw that needs to be turned. A flashlight can come in handy but is not necessary unless it is dark.
    • See the video for an inside look at an electronic trailer brake. 
  4. Look in the hole and place the adjuster tool or screwdriver in the notches of the adjuster. Spin the tire and check that it is spinning freely. Then pull down on the screwdriver handle so the adjuster screw moves, and reposition the screwdriver, so you turn the adjuster repeatedly. Once the brake starts to grab the drum and slow down the wheel, you turn the adjuster back a bit the opposite way until the wheel moves free.
  5. Your brake is adjusted; now you can do the other wheel(s).  Lower the trailer jack and use it on all the brakes that need adjustments. If you’re done use make sure to put the tools, jack, and stoppers away, so your trailer is free to move. 
  6. Now, you hook up your truck and trailer to test out the brakes. John from etrailer.com suggests that “You will want to start around 40 mph and use the manual override only to slow down the truck and trailer. You may need to do this 20 to 30 times without using the truck brakes. This will allow the brake shoes and magnet to seat into the drum.”(Credit Link)
  7. If you have made the correct adjustments, then you will feel the brakes working well. Ensure that all of the brakes are working correctly. If you feel that the brakes are loose, then you need to make adjustments, sometimes after a couple of hundred miles when you have purchased new brakes.

Conclusion

By following the above steps, you can easily adjust the electric brakes, which can help your trailer to come to a halt without any issues. You will have adjusted the brakes to contact the drum almost immediately,  so it will be much easier to stop the trailer as opposed to loose brakes. All you need is a screwdriver, a jack, and a way to secure the trailer.

With a bit of time and patience, you can adjust your brakes, so you won’t have to worry about it for another 3000 miles. Good luck with all your travels with your trailer and keeping it maintained for a safe drive to your next destination. 

Revised – 2/20

Easy Guide to Replace Your Spark Plugs


Replace Your Spark Plugs

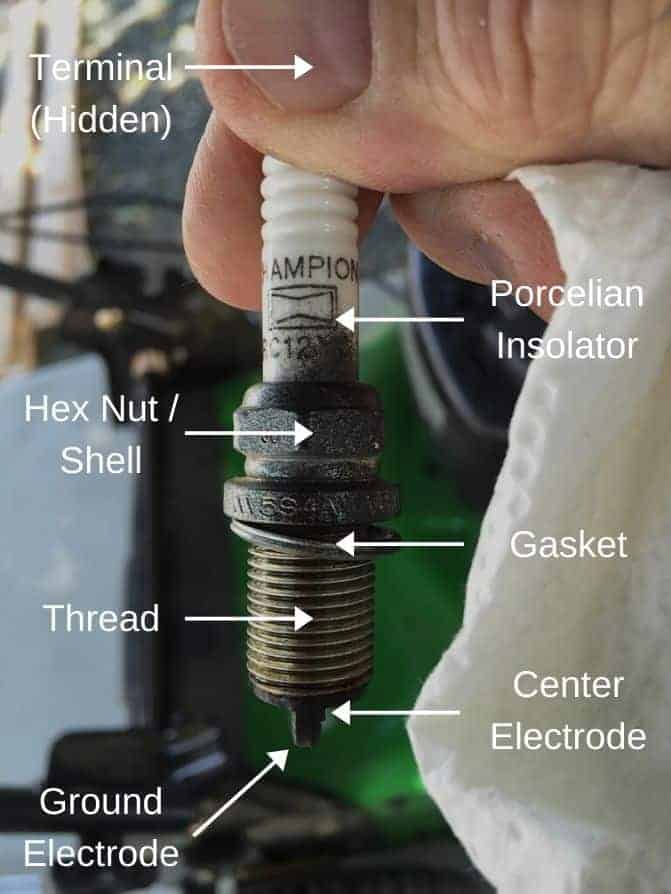
Spark plugs are an essential part of your car engine. They fire a spark that ignites gasoline and drives the car’s pistons. But just like other parts, they wear out. When the spark cannot jump between the electrodes, it can lead to lousy acceleration, poor gas mileage, misfires, and the dreaded `check engine light.

To replace your spark plugs, you need a couple of hours, the correct spark plugs, a few specific tools, and some patience. You will need to take it one step at a time, be organized, and be prepared as you remove the old and install the new spark plugs. 

To ensure your vehicle maintains top performance, it’s prudent that you replace the plugs after 30,000 – 100,000 miles (refer to your car’s manual). I’ve changed the spark plug a couple of times, and it’s usually fairly straightforward unless you hit a hiccup along the way; then, you may need help.


Things You Need

Tools needed: Depending on your car and situation, you may not need all of these tools. The essentials are marked with **.

  • Torque wrench** – ensures the plugs are tightened to the recommended torque.
  • Swivel Socket** – helps get into various angles some cars have.
  • Gap Gauge – helps ensure the spark plugs have the correct gap for the spark.
  • Socket and Ratchet Set – newer car, new the coils removed first.
  • Anti-seize Lubricant – prevents stuck spark plugs.
  • Penetrating Oil – helps loosen stuck spark plugs.
  • Spark Plug Socket Set – makes sure you have the correct size socket.
  • Spark Plug Wire Puller – to help remove wires correctly.

Torque Wrench**

Swivel and Spark Plug Socket**

Gap Gauge

Socket and Ratchet Set

AD

Anti-seize Lubricant

Penetrating Oil

Spark Plug Socket Set

Spark Plug Boot Remover

AD

Step-by-step Guide for Replacing Vehicle Spark Plugs

Before you do the job, be sure to ensure your safety. First, verify the engine is off, and the emergency brake is engaged. And if you have run the vehicle recently, make sure you give it enough time to cool down – overnight is better. If you attempt to remove the spark plugs when the engine is still hot, you may cause damage to the cylinder heads.

Next, open the hood and remove the positive power cable to your battery. Set it aside and make sure it does not come into contact with anything metallic. Keep in mind that all vehicles are not the same. Some use ignition coils instead of spark plug wires. The ignition coils help create enough volts so each of the spark plugs can ignite the fuel.

Maybe cars won’t need spark plugs in the future, but for now, your car’s spark plugs have a service life and need to be changed every so often (around 100,000 miles). So you’ll need to find the exact type of spark plug for your vehicle model before you start. Look online or in your owner’s manual. 


Step 1: Find Your Spark Plugs

Open the hood and look for a bundle of 4-8 wires leading to different engine compartment areas. A 4-cylinder engine will have four wires, while a V-8 engine will have eight wires. A newer car will have ignition coils.

Older cars use a single coil for the entire engine, while modern cars use one coil per cylinder. It’s worth mentioning that some cars have engine covers, so you have to remove this first. Other than that, you have to label the leads to ensure there is no confusion when replacing the plugs. And before you remove the wires, you have to check a few things. Where are the clips secured? Where does the wire bend?

Thankfully, most wires come with a plastic loom to separate each other. It plays the vital role of protecting the wire from the super-heated engine parts. Refer to the manual if you’re still having trouble locating your spark plugs. You may have to remove the inlet ducts in some vehicles to locate the spark plugs. Needless to say, more components may have to be removed to access them. Lastly, it is a good practice to follow the service manual to ensure that you follow any particulars that may be needed for your vehicle.


Step 2: Clean the Area Around the Spark Plugs/Ignition Coils

While most people consider this as an afterthought, the last thing you want to see is foreign particles falling directly into your engine. Make sure the area is free from debris and grease.

Use an air gun to blow debris away, a shop vac, or some cleaner and rag. A small brush may work on some cars as well.

For some, the easiest way to clean the area is to spray an engine cleaner to dissolve grease. Some solvent cleaners can quickly remove the grease and then evaporates quickly, leaving the area much cleaner. And if compressed air is available, use it to blow any foreign debris away before working on the area.


Step 3: Remove the Old Spark Plugs

Pull the wire plug by holding it at the bottom to reveal the spark plug. You can also use a spark plug puller to ensure the plugs don’t get damaged. Then, use a spark plug socket and ratchet to remove the plugs from their housing.

Note: if the socket is not properly seated, it could damage the ceramic section of your plugs. The size of your socket is usually 13/6 or 5/8 inches, and a spark plug socket set will also include other sizes. To loosen the plugs, turn the ratchet counterclockwise.

When you remove the first one, check around the electrode area. It should be dry. A dark-colored electrode is normal after 100,00 miles, but you need to look out for some issues.

First, keep track of which spark plugs look normal or not, and remove one at a time while keeping track of which cylinder it came from. If you find one where the electrode (tip of the spark plug) is covered in soot or is wet with oil, then something may be going on with your engine. If it’s coated with a black substance (soot), the ratio of gasoline to air is too high. But if the electrode is coated with a white substance, the ratio of gasoline to air ratio is too low. Heavy soot suggests you need to change the plugs immediately. A wet, oily spark plug may mean your piston ring is not working properly.

The service manual of your car may have a chart that shows problems with your engine based on the appearance of the plug tip. Apart from that, check to see if the plugs are bent or broken. For those stubborn plugs, try loosening and then tightening (see video). Keep repeating the process until it comes loose. An alternative method is to apply penetrating oil around threads and wait the recommended time to remove the plugs.


Step 4: Measure the Gap

AD

A plug should have a specific measurement between 0.20-0.60 inches. Nowadays, spark plugs come preset according to the model of the car – but it’s wise to double-check. To confirm if the plug is of the correct size, use a gapping gauge.

First, check the gap between the removed plugs and see what it shows. A gauge can check to see if the electrodes are too close or too far apart. You may also want to invest in a gauge for a wider range of applications. While most gap plugs are set at the factory, sometimes they can be wrong. Even the high-end models may require some adjustments. Just insert the gauge between the ground electrodes and the center to see if it fits snugly between the two. If the distance is relatively high, tap the plug on a wooden surface until you get the desired measurement.

When making the adjustment, avoid interfering with the central electrode. Getting the gap right the first time will save you a lot of trouble in the long run. If you’re not sure of the correct measurement, ask the dealer. Note: the plugs you use will have a direct effect on ignition timing.


Step 5: Install the New Plugs

AD

Once the gap is set, you’re now ready to install the new plugs. There are different combinations of plugs out there. A golden rule of thumb is to use the same plugs or ones that are specifically made for your vehicle.

Never downgrade to less-expense plugs, as they could cost you thousands of dollars down the road. The manufacturer installed the plugs for a good reason; to simplify the process and get the right ones. Above all, to make sure the gap is correct.

Before you insert the new plugs, check the threads. After that, use a wire brush to clean around the boot connections if needed. It’s also important that you put some anti-seize lubricant oil before you install them. This will prevent the plug from being stuck in the cylinder while ensuring it comes out easily.

Look to see if there are any particles on the threads where you will insert the spark plug. Remove any contaminants from the threads without letting them fall into the cylinder before installing the new spark plugs.

Now, it’s time to install the new plugs.

1stUse your hand to start the process of screwing them in. If your hand can’t fit, use the spark plug socket to gently twist it so it goes in easily. If there’s resistance, it may be going in the wrong. 

Taking your time will help prevent cross-threading from occurring. Avoid over-tightening the plugs because they easily strip the threads leading to costly repairs and time. For the perfect tune-up, tighten hand-tight only. 

2nd – In today’s engines, proper spark plug torque is critical. Use the service manual to find the torque specification for the plugs. Insufficient torque can cause the plug to blow, taking the threads with it. Use a torque wrench and a spark-plug socket to continue turning the spark plug into place.

If you don’t have a torque wrench to do the job, ask the manufacturer about manual tightening techniques. For best results, check out the spark plug box or web for more information; if it starts to cross thread, the rubber slips, preventing damage to threads. 

During the installation, be sure to take your time, even though you may be tired and want to finish. You want to ensure the plugs are screwed in straight. If they go in crooked, you’ll have a problem. 

As you insert them in, you may wiggle them a tiny bit to ensure they are turning correctly. And if you notice the plug is getting tight at the beginning, take it out and restart the screwing process.

The best way to ensure a correct installation is to turn the spark plug backward if it seems that there is something off and to ensure the plugs are not over-tightened. Poor installation can cause the engine to misfire, making the ride feel shaky.

If you believe the spark plug hole has some damaged threads, you can get a tool to fix it or use a hack, as seen in the video below.

3rd – Once you’re done, replace the spark plug cables. 

It’s very easy to get mixed up during this process, so make sure you mark the plugs or coils that need to be reinstalled and replace them one at a time. Once you’re done with the first coil or plug, move to the next. Inserting the wire into the wrong plug can cause problems.


Step 6: Finishing Up and Testing Out

Reinstall anything you have removed under the hood and reconnect the positive cable of your car battery. And there you have it – you’ve breathed a new life into your car. Your engine may respond with better gas mileage and remarkable ignition timing.

While most modern engines require a change of plugs after 100,000 miles, you may want to do it earlier. The most obvious red flag is visible cracks on the spark plug wires. If you’re still unsure, open your car’s hood at night and check for sparks along the wires. 

The entire process can take approximately one hour, although this will depend on how hard it is to reach the plugs in your vehicle. You might want a friend there to help out and bounce any questions off of while working. In case you run into problems, be sure to consult a mechanic if it’s something you are unprepared to fix.


Conclusion

You can change the spark plugs with time, tools, and some planning. As you work carefully, organize parts, and label where parts go, you’ll be able to change your spark plugs in an hour or two.

Fortunately, changing the plugs in your car is something you can do at your house with a few specific tools needed to help. Following the above steps and using your owner’s manual can help you give your vehicle the one step of an engine tune-up.

How To Restore Car’s Steering Wheel Without Buying a New One


Car’s Steering Wheel

There are many things that can have an impact on the aesthetics of your car. Inside your car, aside from your car’s leather seats, one more thing that you may have noticed needs conditioning is the steering wheel. Often made from soft and supple leather, it can be prone to wear and tear. It can peel and crack, making it look unsightly.

Fortunately, you can save an ugly and damaged steering wheel without spending money on a new one. Here are a few steps you have to follow to restore your Car’s Steering Wheel

  • Remove the steering wheel.
  • Remove the old wrap from the steering wheel.
  • Clean the traces of rubber and dirt.
  • Apply a solution of soap and water to the wheel. 
  • Scrub the steering wheel with a clean cloth.
  • Finally, add a leather cover to the steering wheel.

That being said, if you want to learn how to restore your car’s steering wheel, you’ll find helpful information in this post. Getting back the shine and beauty of your steering wheel at a low cost can be rewarding.


What Will You Need to Follow this Tutorial?

To bring back a new look for your steering wheel, here are some of the materials that you will need:

  • Screwdriver
  • Marker
  • Sharp blade/cutter
  • Soap and water in a spray bottle
  • Clean cloth
  • Ruler (maybe)
  • Leather/vinyl 
  • Nylon thread
  • Needle
  • Glue
  • Socket set
  • Steering Wheel Puller (maybe)
  • Thread Locks

*Items you may need if you are planning on restoring your steering wheel. MOST IMPORTANT ITEMS**

** Steering Wheel Stitch on Wrap

 ** Leather Glue

** Leather Sewing Kit

Phillips and Flathead Screw Drivers

AD

Thread Locker

Steering Wheel Puller

Utility Knife

Socket and Ratchet Set

AD

Step-by-Step Guide on How to Restore Car’s Steering Wheel

This section will provide a detailed list of the restoration steps needed for a steering wheel. This video is a great visual guide to help you learn all the steps below, with many tips for what to do along the way:


Removal of the Steering Wheel

The entire restoration process takes a while and many steps, but with the right equipment, you can do it yourself and feel pride in your accomplishment. It can most often be cheaper than buying a new or used steering wheel, and the finished product will be a matter of pride for years to come. Here are the easy steps to follow, starting with the removal of the steering wheel.

  • Lock the steering wheel. Remove the key from the car to prevent the steering wheel from moving as you work to take it out. Turn the steering wheel until it locks in place.
  • Open the hood and remove the battery connections. This is an important step as this will make sure that the airbag will not be triggered. Wait for at least ten minutes, and then you are ready to take apart the steering wheel.
  • Depending on your vehicle, there are different ways to remove a steering wheel. In most cases, you need to look behind and to the side of the steering wheel and remove a cover to gain access to the bolts. You can use a screwdriver. There should be bolts on each side. Remove these bolts.
  • Now that the bolts are removed take off the airbag from the middle of the steering wheel. You need to proceed cautiously so that you will not accidentally break any wires connecting the airbag to your steering wheel. Detach the wire clips (a screwdriver may help) and separate them, so the airbag can come off.
  • The next wire that you have to remove is the one that connects all control buttons on the side of the steering wheel.
  • After disconnecting the wires, the next thing that you have to remove is the bolt that you can find in the center of the steering wheel, which secures the steering wheel in place.
  • Make a mark to show where the steering wheel should slide on when you return the steering wheel back into position after the restoration.
  • Take off the steering wheel. In some vehicles, you can simply pull it off. However, in the case of other models, you need to have a steering wheel puller set. You may not need to buy a new one. Since you will be using it only one time, consider renting from a mechanic or store in your area.

(Information obtained from – ChrisFix Video)


Cleaning and Restoring your Steering Wheel

After removing the steering wheel, you can now work freely on a table to restore your steering wheel. The steps below cover the main parts of this task:

Restore Car’s Steering Whee
Via: https://www.youtube.com/watch?v=t87Es3L4hS0
  • Remove the old wrap from the steering wheel. Simply run a small sharp blade along the inside edges to cut the thread that holds the leather cover on.
  • Clean the traces of rubber and dirt that you can find on the steering wheel. Put some soap and water in a spray bottle and apply it to the wheel. Use a clean cloth and apply pressure to rub off as much as you can.
  • After some patience and scrubbing, your steering wheel should look clean. You might want to install the steering wheel as is or continue to install a leather cover if you prefer.
  • Once you are done cleaning the steering wheel, proceed to put the new leather cover on. Choose a material that is as close as possible to the color of the rest of the steering wheel and your car interior.
  • Cut the leather if needed, and use the old cover to trace the correct size. Trace a straight line and cut the material as straight as you can. You can always cut wider or longer since you can easily cut more off if needed, but you can’t add more material if the measurements proved are too short or narrow than what you need.
  • Fit the leather around the wheel, so the ends come together at the bottom. Tape the ends together for a snug fit around the wheel.
  • Start sewing on the edges of the material. This is not as easy as it seems. Start by making markings on the leather, especially where the seams will be. Use a nylon thread the same color as your chosen leather or vinyl you’ve chosen. Or use a leather wrap kit that’s already cut.
  • Because you cannot sew on the parts of the steering wheel with spokes, use glue for the materials to hold it on the wheel.
  • After a time, the gluing and sewing will be done. Bring the steering wheel back in the car. For more detailed instructions on how to do this, go back to the video at the beginning of this post.

(Information obtained from – ChrisFix Video)


Pro Tips

More than following the steps mentioned above, you also have to keep these things in mind:

  • The installation of a steering wheel cover is an instant way to restore your steering wheel. Choose a cover that matches your car’s interior and the steering wheel. Find one that feels comfortable when gripped.
  • Sanding the steering wheel is also a good way to clean it beyond just cleaning it with soap and water. However, make sure not to sand too much, as this can minimize the ability to grip.
  • Cracks are also common problems with many steering wheels. You can opt to sand them and use a filler for restoration.
  • If you are going to apply paint, such as spray paint, degrease the surface first so that the paint will cling.

Conclusion

Recovering your steering wheel is possible for most steering wheels. You may need to learn new skills, but that’s half the fun. It requires patience, but if you have the right tools, you can be assured of a good outcome. Learning how to restore a car’s steering wheel can be fun.

This may be a cheap way to get your car looking new again and give it a restored feel. Hopefully, all will go as planned as you get your car looking great. Have you tried restoring any other part of your car? Look for more articles about keeping your car in great condition

Article Revised – 2 / 2020