Home

Recent Posts

Best Tonneau Cover: A Quick Guide to the Top Picks


Best Tonneau Cover

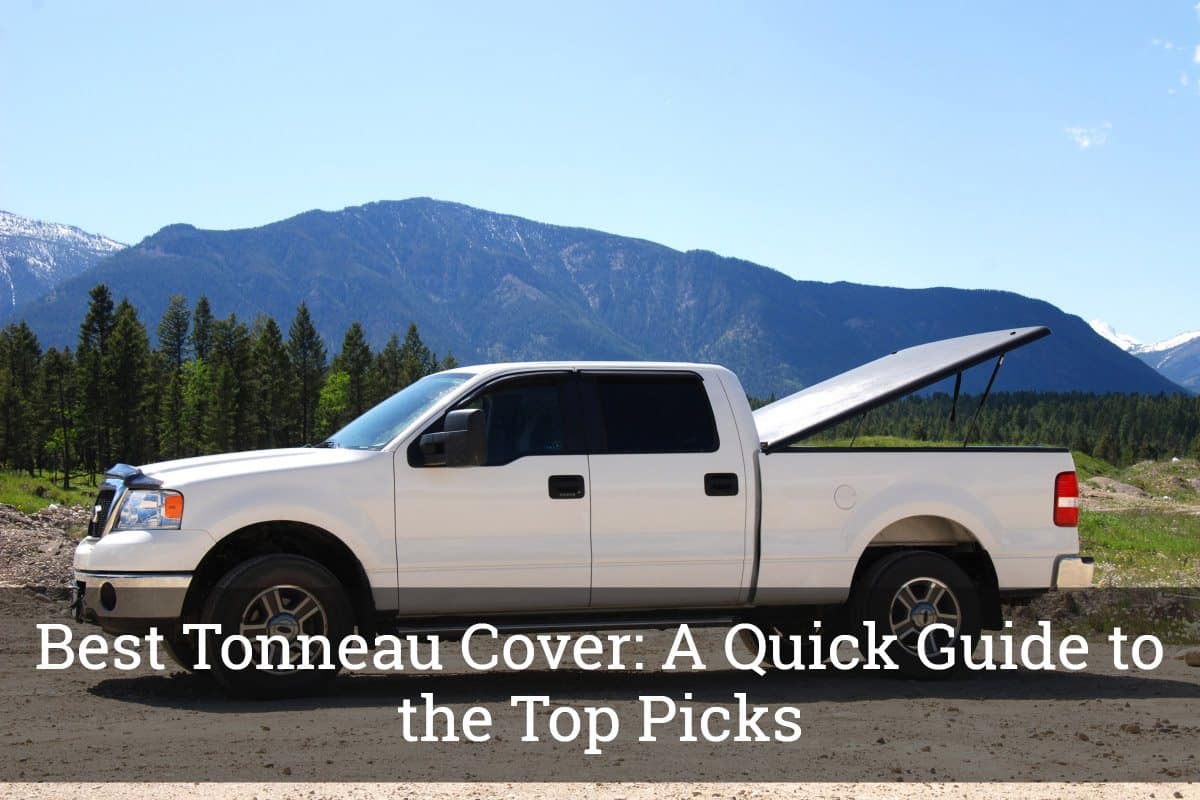
If you have a truck, the best tonneau cover is a must-have. It can serve a variety of purposes, such as the protection of your cargo and the improvement of the aesthetics of the truck bed. It can be made from different materials and can have varying designs. The options will surely be abundant, but this does not mean that any product can provide the best bang for the buck.

In the rest of this post, I will help you choose the tonneau cover that is perfect for your needs. Do not be tempted to choose one product only because it is cheap or it looks good. You have to be responsible enough to scrutinize its overall quality and to look at what other people have to say, providing you an assurance of making the right decision.

Product (Amazon Links)Image (Amazon Links)

Tyger Auto TG-BC3D1015 Tonneau Cover

MaxMate Tri-fold Tonneau Cover

BAK Industries 72309 F1 BakFlip Tonneau Cover

Lund 96893 Genesis Tonneau Cover

Gator Tri-Fold Tonneau Truck Bed Cover


Benefits of Having Tonneau Cover

Many people would most probably have hesitations in investing in a tonneau cover, assuming that this is an unnecessary expense. Nonetheless, as it is shown in the reasons enumerated below, this can be a good thing to have as it can be beneficial in more ways than one:

  • Improved Aesthetics: Looking for a quick way to boost the appeal of your truck? A tonneau cover is one of the simplest solutions that you might want to consider. It will allow you to customize the look of your vehicle.
  • Weather Protection: If you have cargo at the back of your truck and if you want it to be protected from harsh heat, rain, or snow, among other external factors, using a tonneau cover is sure to be a handy solution.
  • Improved Security: Keep your things away from the prying eyes of the public by having them covered. If it is out of sight, it will be less prone to theft, especially when your truck is parked in an open space.
  • Improved Gas Efficiency: This is one benefit that is often overlooked by many people. The tonneau cover comes with an aerodynamic design. This will result in less air drag, and hence, your truck will consume less gas while running.

Types of Tonneau Cover

Before you decide which one is best for your needs, it is important that you are aware of the different styles that are available:

AD

  • Roll-Up Cover: This cover is similar to a mat, which can be rolled all the way through the end. They are easy to install since no drilling will be required, and they are also known for being an affordable option.
  • Retractable Cover: A lot of people love this because it is convenient and user-friendly. It is similar to a roll-up cover, although they utilize a different mechanism for opening and closing.
  • Hinged Cover: Essentially, this is like a lid that covers the truck bed. It should be lifted to open the truck bed and it can be locked if you want it to remain in an open position.
  • Folding Cover: Depending on the design, these covers can be folded once, twice, or even thrice. There are different folding points, making it easy to control how much part of the back of the truck remains open.
  • Snap Cover: As one of the oldest and most affordable types, this cover has snaps that are attached to the rail of the truck to secure its position.

Choosing the Best Tonneau Cover

As you try to narrow down the possibilities on the market, here are some of the most important things that you need to consider:

  • Materials: From the surface to the frame of the snaps, you have to evaluate the cover on the basis of the materials that are used. These materials should be long-lasting. They should also be able to resist external elements that can speed up damage, such as rain and snow.
  • Style: As noted, a tonneau cover will be helpful in improving the aesthetics of your truck. Because of this, consider the style of the product that you will choose and see to it that it has a pleasing design.
  • Installation: Choose a tonneau cover that is as user-friendly as possible. The manufacturer must provide comprehensive instructions so that you can easily complete its assembly. The kit must also be inclusive of everything that you will need to install the cover.
  • Compatibility: It should be noted that not all tonneau covers will be compatible with all trucks. This makes it important to look at the specifications of the product to be sure that the length and width will be suitable for the size of your trunk. Otherwise, you will end up putting your money to waste.
  • Warranty: As much as possible, look for a product that comes with lifetime warranty coverage. This means that at any point, if the cover shows any sign of defect, you can return it to the manufacturer, and they will have it returned or replaced, depending on their terms and conditions.

Top Picks for the Best Tonneau Cover

In this section, you will learn more about some of the best products available on the market, as well as the things that give them an edge over their competitors.

1. Tyger Auto TG-BC3D1015 Tonneau Cover

AD

Among others, one thing that makes this an exceptional product is the material that is used. The cover is made of marine-grade vinyl, which is known for being long-lasting. If you want one that can withstand the test of time, this is a fool-proof choice.

The clamps, on the other hand, are made of stainless steel. Even with such a material, there are some who noted that the durability is questionable. To make it last longer, care and maintenance will be necessary.

When it comes to installation, many are also happy. The manufacturer provides comprehensive instructions so that there will be less room for mistakes. The kit also includes all the things that will be needed for the assembly. There is no drilling required. Even if you are not a pro, the installation is sure to be a snap.

Lastly, and perhaps most importantly, the cover comes with an unbeatable lifetime warranty. This means that the product is covered all throughout its life, which should be more than enough to provide you with peace of mind.

Pros:

  • Comes with everything needed for installation
  • Made from durable materials
  • Drilling is not required

Cons:

  • Some might not like the texture of the material
  • The clamp may break easily

Overall

Despite some complaints, this tonneau cover is a top-rated option, making it provide the best value for money. The material on the cover is long-lasting, and the kit includes the things that will be needed to complete its assembly.


2. MaxMate Tri-fold Tonneau Cover

AD

The use of superior materials is one reason why this is a well-loved product. The cover is made of marine-grade vinyl, although some would love the material to be harder. The frames, on the other hand, are made from powder-coated aluminum. Meanwhile, the clamps are made of stainless steel.

Because of the sleek design of the cover, the manufacturer states that it can lead to up to 12% gas savings. If you have a long-term perspective, you will realize that this will indeed be a big amount, all because you have chosen to use such a cover.

In terms of design, it is also a good thing that it can be folded three times. This makes it offer versatility in how it is used. You can open only a small portion of the trunk when you do not need to open the entire cover.

To demonstrate a belief in the superior quality of their product, the manufacturer is also offering a warranty that lasts for ten years. They will provide free repair of the product if it proves to be defective within the warranty period.

Pros:

  • Comes pre-assembled for easier installation
  • Made of high-quality materials
  • Extensive warranty coverage

Cons:

  • The cover may lack hardness for some
  • Possible sizing issues

Overall

This cover can given the fact that it is made of premium materials and has extensive warranty coverage, it is sure to be worth your money.


3. BAK Industries 72309 F1 BakFlip Tonneau Cover

AD

This tonneau cover is made of fiberglass-reinforced polymer. The top material is known for its exceptional durability, allowing it to withstand wear and tear. It is also scratch-resistant and will not be easily prone to dents. With such, expect that it will deliver impressive performance in all weather conditions, even in snow.

In terms of installation, you also have nothing to worry about this product. It comes with clamps, and all that you have to do is to attach it to your pick-up.

The flush aerodynamic design is also a plus, giving it a low-profile design. It is sleeker compared to many other covers that appear to be too thick.

The manufacturer is offering a three-year warranty on this product. This is shorter compared to the warranty of the two products that have been mentioned above.

Pros:

  • Durable construction
  • Superior customer service
  • Low profile design

Cons:

  • No universal compatibility

Overall

The first thing that you will notice in this tonneau cover is its design. Nonetheless, if you look at its overall quality and functionality, you will see that it may be just the one you are looking for.


4. Lund 96893 Genesis Tonneau Cover

AD

The roll-up design of this product is one of its best features. You can control how much of the space at the back of the truck will be opened or closed. There are latch and Velcro hooks that are included in the kit.

More so, it is also worth noting that it is made with the use of high-quality materials. The twill weave fabric makes it last long. It has a black finish, which is great in terms of aesthetics.

Aside from being good-looking, the weather-resistant construction of this product is one more thing that should be noted. It can resist external elements, including UV rays, mold, and mildew, among other factors that can damage the surface.

The pre-assembled design of the tonneau cover is also a plus. This means that assembly will be a lot easier right out of the box.

Lastly, if you are still finding it hard to be convinced that this is a great choice, you might have a change of mind after knowing that the manufacturer is offering a limited lifetime warranty.

Pros:

  • Comes fully assembled
  • Has an extensive warranty coverage
  • Low-profile design

Cons:

  • May not be able to handle much snow weight
  • Has a plastic clip that can easily break

Overall

Given its impressive warranty coverage and functional rolling design, this is another tonneau cover that should make your list of top choices.


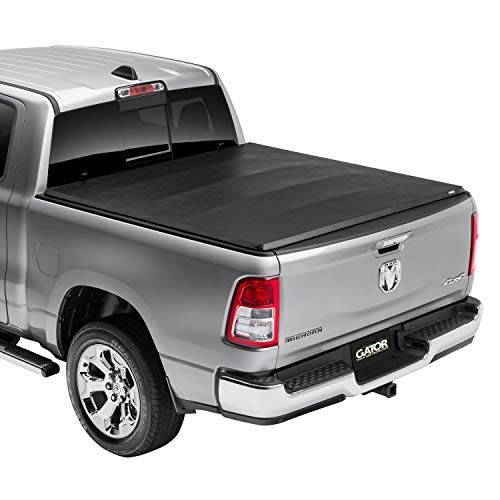
5. Gator Tri-Fold Tonneau Truck Bed Cover

AD

Simplicity and ease of use– these are two of the reasons why this is an option that deserves your attention. It has a simple design, yet the quality is not compromised in any way.

When it comes to the materials, the tarp cover is made of high-quality vinyl that can resist tear, which is indicative of its durability. There are also anodized aluminum frames, which are also great in terms of longevity.

Lastly, you will also love the fact that the manufacturer is offering a lifetime warranty on the product.

Pros:

  • Installation is easy to accomplish
  • Fits a lot of trucks
  • Has a great cover material

Cons:

  • Plastic connectors can be fragile
  • The latch design can be improved

Overall

This may not be as popular as the four other products that have been mentioned above, but it is also a great pick, especially given the fact that it is user-friendly.


Conclusion

In sum, the best tonneau cover will be a great investment if you own a truck. It does not only improve aesthetics, but it is also a functional accessory. Nonetheless, to be happy with your purchase, you need to be careful in choosing which one to buy. From the materials to the design to the warranty, there are several factors that should come into play.

A Starter’s Guide on How to Replace Sway Bar Bushings and End Links


How to Replace Sway Bar Bushings and End Links

Also known as a stabilizer bar or roll bar, the sway bar is one of the most important components of the suspension system of a vehicle. It uses a torsion spring to connect the right wheel to the left wheel. Over time, its main parts, including the bushings and the end links, can be prone to wear, which can loosen your steering control and make a clunking sound.

In the rest of this post, I will teach you the basics of how to replace the sway bar bushings and end links like a pro. The bushings are cheaper to replace compared to the end links. To enjoy the best outcomes, it is important that you follow the right steps. Fortunately, there is no need for in-depth knowledge to complete the task successfully.


What You Will Need to Follow this Tutorial

Before anything else, be sure that the following materials are ready:

  • Sway bar bushings and end links
  • Penetrating oil
  • Breaker bar
  • Ratchet
  • Jack lift

Step-by-Step Guide on How to Replace Sway Bar Bushings and End Links

In this section, we will go through the steps that are involved in the replacement of the sway bar bushings and the end links. It is as easy as removing the old ones and putting in your replacement. However, things can go wrong and the performance of the vehicle can be compromised if you end up following the wrong steps.

Before I discuss the next steps, watch the short video below:

1. Check if the Sway Bar is Indeed the Problem

Nothing can be worse than wasting your time, effort, and money on repairing one thing that is not broken in the first place or that is not the cause of the problem that you are experiencing. With this, perform a quick diagnostic so that you can be sure that the sway bar bushings and end links are indeed asking for a replacement.

Having a loose steering wheel and poor handling are also common indications that there are problems with the sway bar bushings and the end links. You will notice that the steering wheel seems to be looser, and you are having difficulty in controlling the direction of the car.


2. Park your Car on an Even Surface

For your safety and your convenience, before you start with the replacement of the sway bar bushings and end links, see to it that the car is in a stable position. Use the jack to lift the car. At this point, you can now remove the wheels of the car.


3. Unbolt the Bushing

At this point, you are now ready to remove the sway bar bushings. Use a breaker bar and a wrench so that you will be able to easily loosen the nut from its original position. As you do this, be sure to have a firm grip on the shaft so that it will not turn. The end links are now unbolted and they will be free to move.


4. Take off the Sway Bar

By now, you can remove the sway bar from the car and place it in an open area where you can work freely. You can remove the end links. You might need a penetrating oil so that it will lubricate the surface, making it easier to remove.


5. Replace the Bushings

Before you replace the bushings, take a look at the old one and compare it with the replacement that you have on hand. The two should be the same so that they will be compatible with the sway bar that you have.

If you intend to replace the sway bar bushings, after the removal, you can proceed directly to the installation of the new one. Begin with the lower part and follow it up with the upper part. See to it that its installation will be the same as the position of the one that has been removed earlier. Use silicone when installing the bushings, which will prevent squeaking.

Tighten the nuts, put back the wheels, and now, you have successfully completed the task!


Pro Tips

Here are some tips that you might find useful when it comes to the replacement of the sway bar bushings and end links:

Replace Sway Bar Bushings and End Links

Via:https://www.youtube.com/watch?v=PFkZps_7FDA

  • Before you work under the car, open the hood. This will allow light to pass through, and hence, make things a lot easier for you.
  • If you are having difficulty in removing nuts and bolts from the sway bar, WD-40 can help to loosen and lubricate the metal components, making the removal a lot easier on your end.
  • Use vise grips or needle nose pliers to stabilize the sway bar while you are removing the nuts and bolts. This will prevent the sway bar from turning.

If you are experiencing a clunking sound in your transmission or engine, do not immediately make the assumption that there is a need to replace sway bar bushings and end links. There are other reasons and methods to address the situation.

  • One of the reasons for the clunking noise would be having low transmission fluid. Like other oils, it has the function of providing the lubrication that is needed so that you will be able to shift smoothly. If it seems like the fluid is already discolored or if there is already gunk, this is an obvious indication that it is asking for a replacement.
  • The computerized sensors can also be the problem why there is annoying noise. This is especially true if you are driving a vehicle with an automatic transmission. If the sensor sends out wrong information, there could be problems with the shifting gears, which can produce noise.
  • At the end of the day, the most important is to have a routine inspection of the car to make sure that all parts are working at their best. The sooner you are able to spot a problem, the less likely it will be a burden on your end.

Conclusion

Every car owner must know how to replace sway bar bushings and end links. Once you notice a clunking noise that is unusual for you, it is time to inspect the sway bar and determine if there is a problem. It can be corroded or it is evident of other signs of wear. It can compromise both safety and performance, which is why it needs to be fixed as soon as possible.

Have you tried fixing your sway bar before? Are there useful tips that you would like to share? Let us know by leaving a comment below.

How Does The Windshield Protect The Structure Of Your Vehicle?


How Does The Windshield Protect The Structure Of Your Vehicle

The windshield is one of the most important parts of a car. It not only keeps you and any passengers in your car safe, it also helps to maintain the structure of the vehicle. Windshields were first developed to protect drivers from dirt and any form of debris, but they now provide crucial support in protecting the structural integrity of the car.


Built-In Strength

Automotive glass used for windshields is specially designed and manufactured to ensure the safety of both the driver and passengers. Windshields are made with laminated glass created by inserting a thin layer of polyvinyl butyral (PVB) between two sheets of glass and then sealing it through a process of pressure and heat. The combination of heat and pressure works to bond the adhesive qualities of PVB to the glass.

This layer of PVB allows the glass to better absorb energy in a collision and will also provide vital resistance from contact with damaging objects. Although a windshield can crack or break, the glass should stay intact.

Built-In Strength

Via: https://www.bankrate.com/auto/how-much-does-it-cost-to-replace-a-windshield/


Support During An Accident

Windshields provide the necessary strength and rigidity to secure the structure of the car in case of an accident.

  • Collisions: When your car collides with something head-on, the windshield will contribute about 45% of the vehicle’s structural integrity. Without the windshield, the car could be completely crushed by the force of impact.
  • Air Bag Support: Most know that airbags will be deployed in an accident to keep passengers safe. However, most do not know that the windshield is what actually allows for an airbag to function properly. The strength of a windshield supports the force and speed of a deployed airbag allowing the bag to first bounce off it and then towards the passenger. The windshield absorbs the impact of the airbags preventing injury to those in the vehicle.
  • Rollovers: In rollover situations, the windshield plays a key role in upholding the structure of the car and preventing the roof from collapsing. Given that some of the biggest injuries suffered by passengers in rollover accidents are due to ejections and head injuries, having a strong windshield prevents more serious and traumatic injuries.

Tips For Maintaining Your Windshield

Because a windshield is such an important component for the structure of any vehicle, not to mention for the safety of the passengers, it is recommended to take proper care in maintaining and repairing it.. A few tips to consider include:

Maintaining Your Windshield

Via: https://calgarybusinesses.ca/listings/calgary-windshield-service/

  • Be sure that windshield wipers are clean, free of dirt and debris, and that they are working efficiently to avoid scratches.
  • Use the proper cleaning agents for a tinted windshield. Ammonia-based glass cleaners can damage the tint on your windshield, while products such as vinegar, alcohol, or special automotive glass cleaners can provide a better, safer clean.
  • Whenever possible, avoid parking your vehicle in direct sunlight. Lengthy exposure to direct sunlight allows the heat and UV rays from the sun to gradually weaken the tint and structural integrity of your windshield, making it more susceptible to cracking when in a collision. Existing chips or cracks can also become worse when the temperature inside and outside of the vehicle is drastically different.
  • Many people have a habit of slamming their car doors or shutting them too hard. Slamming a car door can create vibrations inside the car. If this is done continuously enough, it can cause the windshield to become dislodged. Slamming car doors can also cause chips and cracks to grow.
  • Small rocks and other similar objects can come into contact with your windshield at any given moment resulting in a small chip on the surface. Chips or cracks should never be overlooked because they will surely grow and lead to more costly repairs. Be sure that you are proactive in repairing any size chip or crack in your windshield. If you are in an accident with a windshield in poor condition, your car will be at a greater risk of damage, while you and your passengers will be at a greater risk of injury.

Las Vegas Windshield Service And Windshield Repair

Secured Auto Glass offers superior Windshield Service for the Las Vegas area. With free estimates, Secured Auto Glass provides expert Windshield Replacement, Windshield Repair, and Auto Glass Repair at affordable prices. Contact us online or call today at (702) 643-8511 for more information.

How to Fix a Loose Column Shifter: A Short Guide to Doing it Right


How to Fix a Loose Column Shifter

A gear shifter is one of the critical parts of any car. As the name says, this will allow you to shift from one gear to another. Therefore, if it is damaged, your safety can be compromised. You will have a hard time controlling the movement of your car. That being said, any problem needs to be addressed as soon as possible so that it will not escalate.

Among others, one of the most common problems with the column shifter is that it is loose. This is one thing that is common, especially if your car is already old. Because of too much pressure and movement, the column shifter loosens through time. More often than not, a quick tightening of the bolts will be enough to address the problem.

If you want to know how to fix a loose column shifter, I get you covered in the rest of this post. To add, I will also provide you with some tips to maintain the peak condition and performance of the column shifter so that you can have peace of mind when you are driving.


What You Will Need to Follow this Tutorial

Before you start, see to it that you have already prepared the following materials:

  • Torque screwdriver
  • Thread locker

Step-by-Step Guide on How to Fix a Loose Column Shifter

Below are the easy steps that you have to follow to fix a loose column shifter.

1. Diagnose the Source of the Problem

Fix a Loose Column Shifter

Via: https://www.youtube.com/watch?v=DycAAYxn3bM

At this point, you already know that the column shifter is loose. It is no longer as responsive to your controls and it may even produce a weird sound. You may know the problem, but you are not yet aware of the source of the issue. The first thing that you have to do is to check the source and from here, you can plan on how to have it resolved.

First, you have to open the hood. To make things easier, ask for help from someone to move the column shifter while you are observing the engine. Look for the part that is moving. If it is perfectly fine, which means that no part seems to be loose, move on to the next place that you have to check.

Look under the steering wheel. In most cases, this is where you can find the problem. You do not have to take out any part. You just have to inspect to be sure that this is where the problem comes from. Look for the brake pedal and follow it all the way up, which will land your hand on the steering column. Move the steering wheel and you can see that this part will move along.

Look at the part that touches the gear lever, specifically the bolts. They are probably loose. If they are, at this point, you know that this is the source of the problem, and all that you have to do is to have it tightened for a quick and easy fix.


2. Remove the Bolts

If they are loose and wiggling, all that you have to do is to remove the bolts in place. To do this, you will need a torque screwdriver, the size of which will depend on the vehicle that you have. Remove the bolts one at a time and proceed to the next step so that they will be aligned.


3. Apply Thread Locker

Now that you have removed the bolts, apply the thread locker. This will keep the bolt tight and secured despite the vibrations that can be experienced. Without this, the bolts will end up being loose again.


4. Put the Bolts Back

Now, tighten the bolt in place. Secure it with the use of the torque screwdriver. Test the column shifter, and at this point, it should no longer be wobbly. Make sure that the bolts are tight enough so that there will be no more wiggle.

For a visual guide of the steps that have been mentioned above, take the time to watch this short video:


Pro Tips

In this section, we will tackle some tips concerning your column shifter. Here are some of the most important things that you have to keep in mind:

  • Be gentle when you are shifting gears. A lot of us are most probably guilty of using too much pressure when shifting as if we are always mad. If you do this often, there is a higher likelihood that you will end up with a loose column shifter.
  • Do not ignore the problem the first time that it shows up. The longer it takes for you to act, the looser it becomes. At its worst, this will have a negative impact on the safety and performance of your vehicle.
  • Avoid overtightening the bolts. You should see to it that it is tight enough so that it will not be wobbly. On the other hand, if it is too tight, it will no longer move and it will be harder for you to shift from one gear to another.
  • When removing the bolt, if you are having a hard time because it is too tight, you can spray oil or lubricant so that it will be easier to turn it.
  • In some instances, it is not enough that you tighten the bolt. This is especially true if the problem is no longer just above the brake pads. The problem could be the column shifter itself. In this case, you might need to purchase a new column shifter. The installation can be quite tricky, so it will be best if you ask for help from a professional.
  • There are also situations wherein it is the shift tube that you have to fix. The tube can be cracked or broken, which is because of the poor quality of the materials that are used. Some materials may be unable to withstand harsh use. See to it that the tube, along with other components of the shifter, is in good condition.

Conclusion

From the discussions above about how to fix a loose column shifter, there is one thing that is apparent – it is a pretty easy and straightforward task. You need only a few materials and a little patience. You will be able to save a lot since there is no more need to pay a mechanic to do the job for you.

Do you have experience in fixing a loose column shifter? How did you do it? Are there tips that you would like to share? Feel free to write in the comment section below.

Tips and Tricks on How to Fix a Car with No Heat


How to Fix a Car with No Heat

If you live in an area with snow or in a place where the temperature is always low, you are probably no longer a stranger to being uncomfortable when you are driving. You will end up shivering if your heater is not working. This is a miserable situation that you would not want to experience, but the reality is that it can happen to anyone.

In the rest of this post, I will let you know how to fix a car with no heat. The first step is the diagnosis of the problem. Once you are able to pinpoint the exact reason for the issue, this is the only time that you can proceed. Fortunately, even without the help of a mechanic, this is one problem that will be easy for you to fix.


What You Will Need to Follow this Tutorial

The required materials will be different depending on the source of the problem. Generally speaking, however, these are the materials that you will need:

  • Coolant/antifreeze
  • Water
  • Thermostat
  • Non-contact infrared thermometer
  • Blend door actuator

Step-by-Step Guide on How to Fix a Car with No Heat

As shown in the short video below, some of the most common reasons why there is no heat in the car would be not having enough antifreeze and coolant, problem with the thermostat, defective blower motor resistor, broken heater core, damaged heater control valve, and a bad actuator blend door, among other things.


Check Coolant and Antifreeze

This is the simplest way to deal with your car if it is not blowing hot air. If there is no coolant or antifreeze, the heater will not function at all. You might also want to inspect for leaks. The coolant that is circulating from the engine is basically the one that is responsible for the production of heat.

Turn off the engine and allow it to cool for a while. Open the hood and look for the header tank. You can check the manual of your car to see exactly where the coolant is. If it is empty, you have to fill it with water or coolant. If it is full, this means that the coolant/antifreeze is not the problem, after which, you can proceed to the next step.


Make Sure the Thermostat is Working

If the thermostat is broken, this is one more thing that could limit the functions of the heater. To be specific, you might have a stuck thermostat. In other instances, it can just be too old and it might already be asking for a replacement. The thermostat opens and closes the circuits in the cooling system of the engine as it produces heat. If it is in a position that is locked, hot air will not pass through.

To replace the thermostat, all that you need to do is remove the lower radiator hose and install a new thermostat.


Inspect the Heater Core and Heater Core Valve

If the thermostat seems to be working fine or if you have already replaced it but the heat produced is still not enough, you have to check the heater core and the heater core valve. The heater core is a small radiator that heats the car. This is done through an integrated fan that blows hot air.

You will need to check the temperature of the heater core and make sure that there is enough hot air passing through the hoses. A non-contact infrared thermometer will prove to be a handy tool to complete the diagnosis. Flushing the heater core is the best thing that you can do to remedy the situation if the thermometer shows that it does not get hot at all.


Bad Condition of the Blend Door

If at this point, your heater is still not working, the next component that you need to check is the blend door. If you change the thermostat from hot to cold, there must be a noticeable sound, which will give you an indication that the blend door is working perfectly fine. If the blend door does not open, heat will not be able to pass through.

There are times when the blend door actuator may need to be changed. In other cases, meanwhile, the problem could be with the linkage or the wires.


Pro Tips

To make sure that you will have enough heat when driving, here are other tips to keep in mind:

Fix a Car with No Heat

Via: https://www.youtube.com/watch?v=7Sjqvai14ts

  • As an alternative to the things that have been mentioned above, you might want to buy heated seats for your car. They are available in a variety of designs and most of them can be controlled individually based on the temperature that you prefer. This can be a more expensive option, but this can indeed prove to be a quick fix.
  • A space heater or a portable heater will also be a good temporary solution. Nonetheless, keep in mind that it will not be able to deliver long-term comfort as the amount of heat that it can produce is limited. This only works if you are still waiting for the main problem to be fixed.
  • Make sure that the radiator is not completely covered. There should be enough airflow. You can cover it with cardboard, which will stop the airflow and will heat the coolant quicker. In turn, this will also make it quick to produce the hot air that can be enjoyed in the car.
  • The worst problem can be associated with a leaking head gasket. Unfortunately, this is no longer a simple DIY task. You will need to consult with a trained mechanic. This can also be a costly repair.
  • Inspect the doors and the windows. See to it that they are working perfectly and there are no gaps or anything else that could let cold air in and hot air escape. You can also consider insulation so that you will be able to trap warm air.

Conclusion

At this point, I hope that you already know how to fix a car with no heater. It is quite a simple task, but it can be quite tedious since there are multiple components that you have to check. The coolant can be the most basic problem, but in worse instances, there are parts that are not working properly, and hence, they might require extensive repair or replacement if they can no longer be spared.

Have you tried fixing your car’s heater before? Are there other tips that you would like to share? Do not hesitate to leave a comment below.

How to Replace an Outer Tie Rod End: Steps and Tips to Do It Right


How to Replace an Outer Tie Rod End

The tie rod ends are critical components of the steering mechanism of your vehicle. It serves as the connection between the wheels and the steering rack, with one on each side. It has two main parts – the inner and the outer end. Through time, they can be subjected to wear and tear, which can lessen functionality and compromise performance.

In the rest of this post, I will teach you how to replace an outer tie rod end. If you have the basic tools and a little knowledge, the job will be fairly easy, even if you are a beginner. You can always go to a mechanic within the neighborhood, but it can be costly. Why would you even bother if you can do it on your own? Read on and learn how to successfully accomplish this task.


What You Will Need to Follow this Tutorial

Before anything else, here are the materials that you have to gather:

  • Breaker bar
  • Hammer/mallet
  • Needle nose pliers
  • Wrench
  • Torque wrench
  • Ratchet
  • Socket
  • New outer tie rod

Step-by-Step Guide on How to Replace an Outer Tie Rod End

Now that you are ready to get started, here are the steps that you have to follow:

Replace an Outer Tie Rod End

Via: https://www.youtube.com/watch?v=6zcoK9etIOE

1. Park the Car on an Even Surface

For your safety, make sure that the car is parked on an even and open surface. This will provide you with the freedom to move and to work easily. If you have a car ramp in the garage, consider yourself lucky as you will be able to work easily. Otherwise, use a floor jack so that you will be able to lift the front end of the car.


2. Remove the Wheel

Now that your car is in a safe and stable position, you can start to take out the wheels. Take out the lug nuts and, at this point, the wheel. By now, you will be able to access the steering system of your car. To make it easier to do the repair, turn the steering wheel to the left so that you can push the tie rod outside.


3. Remove the Tie Rod End

With the use of a wrench, loosen the pinch nut. This is the one that holds the outer tie rod end in place and is responsible for preventing it from moving to a position where it should not be. Once it is loosened, it will be easier to have it twisted.


4. Take out the Cotter Pin

The next part that you have to remove is the cotter pin. You can find this on the part where the steering knuckle meets the rod. Use a needle nose pliers to straighten the cotter pin and pull it out. After pulling the cotter pin, use a socket and a wrench to completely pull off the castle nut. This is necessary so that you can completely remove the outer tie rod end.


5. Remove the Outer Tie Rod End

There is a special tool to make this easier, but most of you won’t have it at home. As an alternative, screw the castle nut on the bottom. Use a hammer or a mallet to push the rod out. Take off the castle nut and pull the rod.


6. Replace the Outer Tie Rod End

Now that you have it completely removed, the next step is to have it replaced. First, have an inspection of the replacement to be sure that it is similar to the old one. Their length should also be the same so that the alignment will be straight.

Put the tie rod on the end. Keep turning until it is completely secured in its position. Put the tie rod in the knuckle. Replace the castle nut simply by having it hand-tightened. See to it that the cotter pin hole is aligned and have it secured. Tighten the nut toward the tie rod end, which will make it secured in its place.


7.Put the Tires Back

Make sure that everything is in place. The connections should be secured for your safety. After checking, return the tires, and just like that, you are done with the job!

Watch the short video below to learn more about the steps mentioned above:

Pro Tips

It is not enough that you follow the steps that have been mentioned above. For the best outcomes of this DIY repair job, here are some of the most important tips you must keep in mind:

  • Tie rod ends do not come with a universal design. This means that if it fits in one car, it does not mean that it will fit in yours. Before you buy a replacement, check the old one and make sure it is compatible for your needs.
  • Pay attention to the signs that you have to replace the outer tie rod end. Most of the signs will be physical in nature, which will provide you with the warning that it has already worn out.
  • Apply oil or WD40 on the nuts and the other parts of the tie rod end. This will provide the lubrication to minimize friction, which will make your task a lot easier.
  • In the case of some models, there is a grease fitting on the tie rod end. Apply grease until you can see it on the opening. Be sure to wipe off any remaining grease on the surface, as it can have a negative impact on the brakes and rotors, among other components of the steering mechanism.
  • Replacing the outer tie rod end is not the only thing that you should be concerned about. A front-end alignment will also be necessary. This time, it needs to be handled by a professional as it is a complicated task. This is necessary to prevent uneven wear.
  • Before you start with the replacement, consult the repair manual from the manufacturer of the vehicle. This will let you know the proper torque values, which will help in making sure that your vehicle will stay safe. The wrong torque will mean that some parts will end up being loose.

Conclusion

From the things that have been mentioned above about how to replace an outer tie rod end, it is apparent that it is an easy task if you have the right tools and knowledge of the right steps. However, be sure to observe caution, as if it is done wrong, the performance of your steering system can be possibly compromised.

Have you tried replacing outer tie rod ends before? Are there other tips that you would like to share? Do not hesitate to write in the comment section below.