
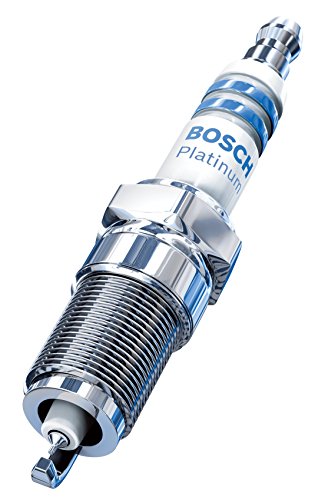
Spark plugs are an essential part of your car engine. They fire a spark that ignites gasoline and drives the car’s pistons. But just like other parts, they wear out. When the spark cannot jump between the electrodes, it can lead to lousy acceleration, poor gas mileage, misfires, and the dreaded `check engine light.
To replace your spark plugs, you need a couple of hours, the correct spark plugs, a few specific tools, and some patience. You will need to take it one step at a time, be organized, and be prepared as you remove the old and install the new spark plugs.
To ensure your vehicle maintains top performance, it’s prudent that you replace the plugs after 30,000 – 100,000 miles (refer to your car’s manual). I’ve changed the spark plug a couple of times, and it’s usually fairly straightforward unless you hit a hiccup along the way; then, you may need help.
Things You Need
Tools needed: Depending on your car and situation, you may not need all of these tools. The essentials are marked with **.
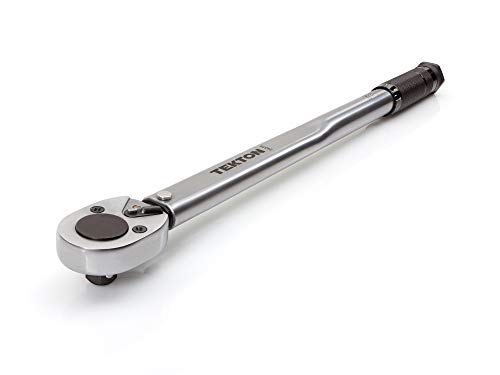
- Torque wrench** – ensures the plugs are tightened to the recommended torque.
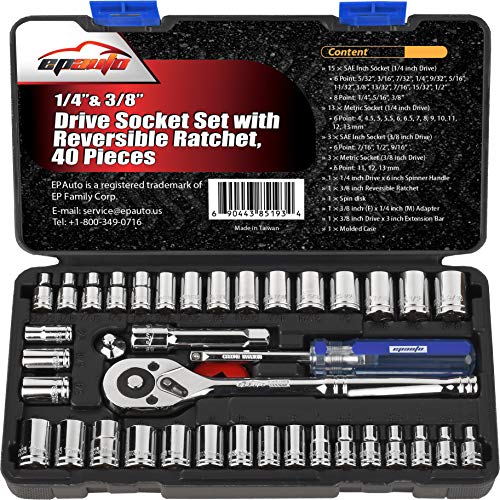
- Swivel Socket** – helps get into various angles some cars have.
- Gap Gauge – helps ensure the spark plugs have the correct gap for the spark.
- Socket and Ratchet Set – newer car, new the coils removed first.
- Anti-seize Lubricant – prevents stuck spark plugs.
- Penetrating Oil – helps loosen stuck spark plugs.
- Spark Plug Socket Set – makes sure you have the correct size socket.
- Spark Plug Wire Puller – to help remove wires correctly.
|
Torque Wrench** |
Swivel and Spark Plug Socket** |
Gap Gauge |
Socket and Ratchet Set |
|---|---|---|---|
 |  |  |  |
|
Anti-seize Lubricant |
Penetrating Oil |
Spark Plug Socket Set |
Spark Plug Boot Remover |
|---|---|---|---|
 |  |  |  |
Step-by-step Guide for Replacing Vehicle Spark Plugs
Before you do the job, be sure to ensure your safety. First, verify the engine is off, and the emergency brake is engaged. And if you have run the vehicle recently, make sure you give it enough time to cool down – overnight is better. If you attempt to remove the spark plugs when the engine is still hot, you may cause damage to the cylinder heads.
Next, open the hood and remove the positive power cable to your battery. Set it aside and make sure it does not come into contact with anything metallic. Keep in mind that all vehicles are not the same. Some use ignition coils instead of spark plug wires. The ignition coils help create enough volts so each of the spark plugs can ignite the fuel.
Maybe cars won’t need spark plugs in the future, but for now, your car’s spark plugs have a service life and need to be changed every so often (around 100,000 miles). So you’ll need to find the exact type of spark plug for your vehicle model before you start. Look online or in your owner’s manual.
Step 1: Find Your Spark Plugs

Open the hood and look for a bundle of 4-8 wires leading to different engine compartment areas. A 4-cylinder engine will have four wires, while a V-8 engine will have eight wires. A newer car will have ignition coils.
Older cars use a single coil for the entire engine, while modern cars use one coil per cylinder. It’s worth mentioning that some cars have engine covers, so you have to remove this first. Other than that, you have to label the leads to ensure there is no confusion when replacing the plugs. And before you remove the wires, you have to check a few things. Where are the clips secured? Where does the wire bend?
Thankfully, most wires come with a plastic loom to separate each other. It plays the vital role of protecting the wire from the super-heated engine parts. Refer to the manual if you’re still having trouble locating your spark plugs. You may have to remove the inlet ducts in some vehicles to locate the spark plugs. Needless to say, more components may have to be removed to access them. Lastly, it is a good practice to follow the service manual to ensure that you follow any particulars that may be needed for your vehicle.

Step 2: Clean the Area Around the Spark Plugs/Ignition Coils
While most people consider this as an afterthought, the last thing you want to see is foreign particles falling directly into your engine. Make sure the area is free from debris and grease.

Use an air gun to blow debris away, a shop vac, or some cleaner and rag. A small brush may work on some cars as well.
For some, the easiest way to clean the area is to spray an engine cleaner to dissolve grease. Some solvent cleaners can quickly remove the grease and then evaporates quickly, leaving the area much cleaner. And if compressed air is available, use it to blow any foreign debris away before working on the area.
Step 3: Remove the Old Spark Plugs

Pull the wire plug by holding it at the bottom to reveal the spark plug. You can also use a spark plug puller to ensure the plugs don’t get damaged. Then, use a spark plug socket and ratchet to remove the plugs from their housing.
Note: if the socket is not properly seated, it could damage the ceramic section of your plugs. The size of your socket is usually 13/6 or 5/8 inches, and a spark plug socket set will also include other sizes. To loosen the plugs, turn the ratchet counterclockwise.
When you remove the first one, check around the electrode area. It should be dry. A dark-colored electrode is normal after 100,00 miles, but you need to look out for some issues.
First, keep track of which spark plugs look normal or not, and remove one at a time while keeping track of which cylinder it came from. If you find one where the electrode (tip of the spark plug) is covered in soot or is wet with oil, then something may be going on with your engine. If it’s coated with a black substance (soot), the ratio of gasoline to air is too high. But if the electrode is coated with a white substance, the ratio of gasoline to air ratio is too low. Heavy soot suggests you need to change the plugs immediately. A wet, oily spark plug may mean your piston ring is not working properly.
The service manual of your car may have a chart that shows problems with your engine based on the appearance of the plug tip. Apart from that, check to see if the plugs are bent or broken. For those stubborn plugs, try loosening and then tightening (see video). Keep repeating the process until it comes loose. An alternative method is to apply penetrating oil around threads and wait the recommended time to remove the plugs.
Step 4: Measure the Gap
A plug should have a specific measurement between 0.20-0.60 inches. Nowadays, spark plugs come preset according to the model of the car – but it’s wise to double-check. To confirm if the plug is of the correct size, use a gapping gauge.
First, check the gap between the removed plugs and see what it shows. A gauge can check to see if the electrodes are too close or too far apart. You may also want to invest in a gauge for a wider range of applications. While most gap plugs are set at the factory, sometimes they can be wrong. Even the high-end models may require some adjustments. Just insert the gauge between the ground electrodes and the center to see if it fits snugly between the two. If the distance is relatively high, tap the plug on a wooden surface until you get the desired measurement.
When making the adjustment, avoid interfering with the central electrode. Getting the gap right the first time will save you a lot of trouble in the long run. If you’re not sure of the correct measurement, ask the dealer. Note: the plugs you use will have a direct effect on ignition timing.
Step 5: Install the New Plugs
Once the gap is set, you’re now ready to install the new plugs. There are different combinations of plugs out there. A golden rule of thumb is to use the same plugs or ones that are specifically made for your vehicle.
Never downgrade to less-expense plugs, as they could cost you thousands of dollars down the road. The manufacturer installed the plugs for a good reason; to simplify the process and get the right ones. Above all, to make sure the gap is correct.
Before you insert the new plugs, check the threads. After that, use a wire brush to clean around the boot connections if needed. It’s also important that you put some anti-seize lubricant oil before you install them. This will prevent the plug from being stuck in the cylinder while ensuring it comes out easily.
Look to see if there are any particles on the threads where you will insert the spark plug. Remove any contaminants from the threads without letting them fall into the cylinder before installing the new spark plugs.
Now, it’s time to install the new plugs.
1st – Use your hand to start the process of screwing them in. If your hand can’t fit, use the spark plug socket to gently twist it so it goes in easily. If there’s resistance, it may be going in the wrong.
Taking your time will help prevent cross-threading from occurring. Avoid over-tightening the plugs because they easily strip the threads leading to costly repairs and time. For the perfect tune-up, tighten hand-tight only.
2nd – In today’s engines, proper spark plug torque is critical. Use the service manual to find the torque specification for the plugs. Insufficient torque can cause the plug to blow, taking the threads with it. Use a torque wrench and a spark-plug socket to continue turning the spark plug into place.
If you don’t have a torque wrench to do the job, ask the manufacturer about manual tightening techniques. For best results, check out the spark plug box or web for more information; if it starts to cross thread, the rubber slips, preventing damage to threads.

During the installation, be sure to take your time, even though you may be tired and want to finish. You want to ensure the plugs are screwed in straight. If they go in crooked, you’ll have a problem.
As you insert them in, you may wiggle them a tiny bit to ensure they are turning correctly. And if you notice the plug is getting tight at the beginning, take it out and restart the screwing process.
The best way to ensure a correct installation is to turn the spark plug backward if it seems that there is something off and to ensure the plugs are not over-tightened. Poor installation can cause the engine to misfire, making the ride feel shaky.
If you believe the spark plug hole has some damaged threads, you can get a tool to fix it or use a hack, as seen in the video below.
3rd – Once you’re done, replace the spark plug cables.
It’s very easy to get mixed up during this process, so make sure you mark the plugs or coils that need to be reinstalled and replace them one at a time. Once you’re done with the first coil or plug, move to the next. Inserting the wire into the wrong plug can cause problems.
Step 6: Finishing Up and Testing Out

Reinstall anything you have removed under the hood and reconnect the positive cable of your car battery. And there you have it – you’ve breathed a new life into your car. Your engine may respond with better gas mileage and remarkable ignition timing.
While most modern engines require a change of plugs after 100,000 miles, you may want to do it earlier. The most obvious red flag is visible cracks on the spark plug wires. If you’re still unsure, open your car’s hood at night and check for sparks along the wires.
The entire process can take approximately one hour, although this will depend on how hard it is to reach the plugs in your vehicle. You might want a friend there to help out and bounce any questions off of while working. In case you run into problems, be sure to consult a mechanic if it’s something you are unprepared to fix.
Conclusion
You can change the spark plugs with time, tools, and some planning. As you work carefully, organize parts, and label where parts go, you’ll be able to change your spark plugs in an hour or two.
Fortunately, changing the plugs in your car is something you can do at your house with a few specific tools needed to help. Following the above steps and using your owner’s manual can help you give your vehicle the one step of an engine tune-up.