Home

Recent Posts

Diagnosing A Brake Pedal That Gets Hard: A 6-Step Guide


Diagnose Hard Brake Pedals

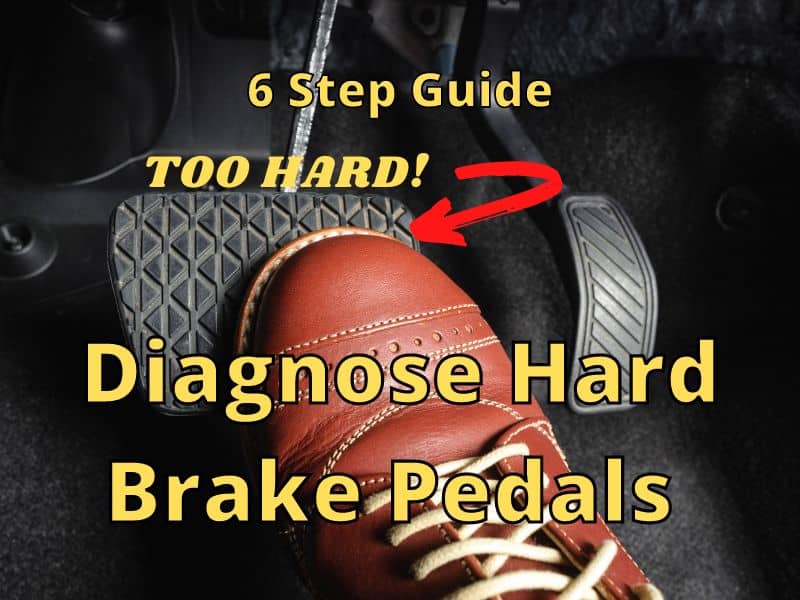
Typically, when you go to press down on the brake of a car whose engine isn’t running, they are extremely hard to move. Once the engine starts, the brakes are much easier to press down on, though they should feel firm. If your brakes are so hard that you feel like you have to stand on them to stop, there’s most likely an issue, and something isn’t working correctly.

To diagnose a brake pedal that gets hard, you should first inspect the most apparent areas from which the issue could arise. Most commonly, hard brakes indicate that the power brake booster has failed due to an improper vacuum level. Some additional potential causes for hard brakes are:

  • Bad/faulty brake valve
  • Contaminated brake fluid
  • Bad/wrong booster hose
  • Vacuum Pressure Loss
  • Off pedal ratio

It’s one thing to know the top causes of a hard break, but there is so much more to diagnosing your brakes. We’re going to sum it up in 6 easy steps.


How Should Brake Pedals Normally Feel?

When it comes to describing how brake pedals should usually feel, the keyword is “firm,” not too hard or too soft. It’s not always obvious to many drivers how firm brake pedals should feel, but there are a few scenarios by which you can judge the touch sensitivity of your brake pedals.

There are too many classic movie scenes to choose from in which some character on a heist or desperate getaway is speeding down some road when suddenly they spot an obstacle or the end of a cliff quickly approaching. 

Typically, this never ends well, and the character is left zooming toward the obstacle while aggressively pumping the brakes to no avail. This would be the perfect example of soft brakes, having to press down harder than normal on the brake pedal to slow down or stop completely. 

When you apply pressure on a soft brake pedal, there’s no struggle whatsoever to press it down at all. As with hard brakes, the worst-case scenario is that the brake pedal doesn’t function at all. With hard brakes, it may feel almost impossible to press down on the brake pedal, even by applying a lot of pressure. 

You could practically be standing on the brake pedal with all of your weight, and it may give a little or not at all. 

To show comparison, when you apply pressure to a normally functioning brake pedal, it should slow the car down as you press down firmly. The harder you press down on the brake pedal, the firmer it should feel without having to apply too much or too little pressure. And once again, this is how the brake pedal should feel when the engine is running.

If your brake pedal immediately goes to the floor or just barely moves when you press down on it, there’s definitely a problem that needs to be diagnosed and resolved. 


Check for A Failed Power Brake Booster

Car brake booster

A bad or failed brake power booster is easily one of the most common causes of a hard brake pedal, and generally, it’s also one of the first considerations in diagnosing a hard brake pedal. 

If you look even deeper, a lack of vacuum pressure in the brake booster itself could also be the cause, but we’ll further explore vacuum pressure as its own entity later on.

In terms of a brake booster, a vacuum source is required in order for it to operate properly. The power brake booster contains many parts on both the front and backside of it, meaning even the slightest operational mishap within its many moving parts can hinder its proper functioning. 

The recommended means of properly diagnosing a bad booster as the cause of a hard brake pedal is through the help of a certified or experienced mechanic or technician, as looking inside a brake booster is not an easy task. There are, however, ways in which you can check out the functioning of the brake booster on your own without having to look inside it.

  1. In order to get rid of any vacuum pressure inside of the booster, quickly press and release the brake pedal a few times in a row while the engine isn’t running.
  2. After pressing and releasing the brake, maintain slight pressure on the brake pedal as you would if you were to stop at a stop sign or red light. 
  3. While still applying pressure on the brake pedal, start up the engine. When you do this, pay careful attention to what happens to the brake pedal once the engine turns on. This will tell you what the most probable case is with the power brake booster. 

In the case that the booster diaphragms are properly working, with your foot still applying pressure, the pedal will slightly drop once the engine starts running. When the engine starts to run, it creates enough vacuum pressure to physically hold the diaphragm in place.

In the case that the power brake booster isn’t working properly, the pedal will not move once the engine has started. This could mean that there isn’t enough vacuum pressure to hold the diaphragm in place within the booster. It could also indicate an issue with the two-way valve. 

This diagnosis would most likely require the replacement of the power brake booster. For information on how to replace a brake booster, click here.


Check for A Bad/Faulty Brake Valve

AD

A defective brake valve is not often the first assumption when it comes to diagnosing a hard brake pedal, as it is often overlooked compared to a broken power brake booster. When it comes to the braking system, there is also more than one type of brake valve, and each one performs a different function.

Some common valves that make up the braking system are:

  • Combination valve—also sometimes referred to as a “check valve,” the combination valve does exactly what its name suggests, a combination of things. Basically, in combination with its components, the combination valve helps to maintain the balance of the brake system. 

Within the combination valve, there are three additional valves:

  • Metering valve—located at the front of the combination valves, the purpose of the metering valve is to reduce the pressure coming from the front wheels so that the rear brakes apply first when engaged. 
  • Proportioning valve—located at the back of the combination valve, the purpose of the proportioning valve is to regulate the rear brake pressure and to reduce it in order to prevent rear-wheel lockup.
  • Residual valve—the purpose of the residual valve is to maintain the pressure on the brake system and to prevent the backflow of brake fluid into the master cylinder.

For more information on brake valves, click here.

The combination brake valve is an essentially moving part of the brake booster and is vital to its proper function. The combination valve is located within the body of the power brake booster and connects to the vacuum hose, which runs from the engine. 

If you have noticed so far, the power brake booster is essentially the hub of the braking system. For this reason, a lot of issues stem from the components within the power brake booster, if not directly from it. 

The combination valve’s essential function is to hold the vacuum pressure within the brake booster when the engine starts and allows it to pull only against the brake booster.

If the combination valve is properly working, you should be able to blow air into the side of the valve connecting to the hose without it coming out on the side of the valve that connects to the brake booster. You can do this only after first disconnecting the valve from the booster and the vacuum hose, of course. Air should be able to go through but not come out the other side.

An indication that the brake valve is not properly functioning is if the air you blow continues to travel through the valve and out through the side, where it connects to the brake booster. In this case, the combination valve should be replaced or at least further examined by a professional. 


Examine the Brake Fluid

check brake fluid for sludge

Aside from actual mechanical parts, fluid could also be the cause of hard brake pedals. Brake fluid, to be exact, can cause sludge to build up over time and create the false sense that the power brake booster or one of the valves of the braking system isn’t properly functioning. 

“Brake fluid is a hygroscopic fluid—a fluid that absorbs water. Over time, this causes sludge to build up in the brake system, and this sludge can make it seem like the brake booster has failed.”

Source: Why Is My Brake Pedal So Hard To Push and How Do I Fix It?

When it hasn’t absorbed so much water that it becomes sludge, brake fluid should appear clear with just a slight brownish tint to it. If you suspect that grimy brake fluid is to blame for why your brake pedal is hard, simply check the reservoir where the fluid is located. 

Gently scrape some of the fluid from the surface of the reservoir with a stick or flat screwdriver and check the contents afterward. If the contents are clear or similar to how brake fluid should look, then it is not contaminated and, therefore, not the cause of a hard brake pedal. 

If the contents appear to be thick, dark sludge, then the brake fluid needs to be replaced. For steps on how to replace old brake fluid, visit here.

I had a tire repair kit and used the tool and a rag I carried in my truck to check the brake fluid reservoir.


Verify the Quality and Size of the Vacuum Hose

Look for lose of vacuum

As mentioned before, a lot of the causes behind a hard brake pedal stem from the power brake booster itself or at least from within it. Much like how the brake valve is connected to the brake booster, the vacuum hose is connected to it as well. 

Just as a faulty brake valve can disrupt the whole braking system, so can having the wrong type of hose.

The vacuum hose runs from the engine to the booster. It is responsible for transporting the vacuum pressure from the engine to the booster. In some cases, the hose has become worn down and is of bad quality, and no longer serves a functioning purpose. In other cases, the wrong type or size of vacuum hose is attached and needs to be replaced

Contrary to popular belief, not all vacuum hoses are the same size or, better yet, created equally. Most of all, the hoses created are made of black rubber. However, they are not all equally sized. Generally, a hose will contain a certain ID in the middle of its surface. This ID often refers to a particular size.

On average, a vacuum hose connected to a power brake booster has a size ID of 11/32”. This ID is not to be confused with a car’s fuel line, which people tend to assume is roughly the sizing guide for a vacuum hose. The size ID of a fuel line differs, however, because it is roughly 3/8”. 

To serve as a better example, unlike fuel lines, all vacuum hoses, regardless of size, go by a size ID of any number over 32 or x/32”. That means that all typical sizes could be 9/32”, 7/32”, etc. There is no particular way of diagnosing a bad vacuum hose except by visually checking the hose or its size ID.


Consider Vacuum Pressure Loss

AD

If there is too much or too little vacuum, the brake pedal could become too hard or, in this scenario, too hard. First, let’s further explore the purpose of a vacuum in the braking system.

Once the engine starts running, it acts as an air pump that sucks vacuum or vacuum pressure from the vacuum hose that is connected to the power brake booster. 

“This vacuum is sourced through the intake manifold by simply tapping into an intake runner and can sometimes be ported through the baseplate on the carburetor. From the intake manifold to the brake booster will be a vacuum hose that is used to provide this vacuum.”

Source: Master Power Brakes

As mentioned in the brake booster diagnosis section, the brake booster contains a diaphragm that has a two-way valve that connects to the engine. A brake booster at rest causes the engine to pull vacuum pressure from both sides of the diaphragm within the booster and thus creates a balance from within the two parts.

The vacuum hose acts as a path or transporter for the vacuum pressure coming from the engine and flowing into the booster. Once the vacuum is pulled from the engine, it remains stationary within the brake booster.

When you go to press down on the brake pedal, this causes the two-way valve of the diaphragm to move. 

As a result, the valve located towards the back of the diaphragm cuts off the pull of the vacuum from the engine, which then causes the engine to pull vacuum pressure from the front of the diaphragm.

This, in turn, creates atmospheric pressure that is then released into the back of the brake booster. 

This release of pressure and the forward pull of vacuum from the engine is what activates the braking mechanism to function properly as you firmly press down on the brake pedal.

If the pull of the vacuum from the engine doesn’t create enough pressure, the diaphragm will not move, and consequently, the brake pedal will rely on the pressure applied by your foot to move the diaphragm.

This is why the brake pedal feels hard or doesn’t move at all when you go to press it down.


Double Check the Brake Pedal Ratio

brake pedal ratio

If all potential causes don’t seem to lead to a proper diagnosis behind your hard brake pedal, you could also consider an off or uneven pedal ratio as the issue.

The petal ratio refers to the balance between the length of the brake pedal and the axle or the area where it pivots.

The pedal ratio is not as much to blame for a hard pedal as some of the other causes listed, but it can become a major problem when it is off. For this reason, it is still considered a potential cause even though it is less commonly a cause for a hard brake pedal.

The brake pedal acts as a lever with different pivot points, and when pressed down, it causes motion within the booster, as previously explained.

If the pedal ratio is off so much that it’s not enough to allow the brake pedal to reach the booster when pressure is applied, it can prevent the motion needed for the booster.

The brake booster relies on the proper function of the brake pedal to move the diaphragm. If it can’t do this, this will result in the same hard brake pedal caused by vacuum loss.

Diagnosing a bad pedal ratio as the cause of a hard brake can be difficult if it requires repositioning the brake pedal ratio. 

Sometimes the pivot points need to be relocated as well. Generally, a brake pedal has a ratio of 4:1. 

How to Prevent Car Battery Corrosion: 11 Easy Tips That Work


Car Battery Corrosion

As you look under the hood of your car, you notice some build-up around the car’s battery terminals. It is no mystery that what you are seeing is battery corrosion. Car battery corrosion is common and will happen at some point. The corrosion crystals that form can appear white, greenish, or bluish in color. What is going on, you may wonder?

The corrosion on your car battery’s terminals is caused by hydrogen gas that is released from the sulfuric acid contained inside the battery. Here are some basic tips to help you prevent car battery corrosion:

  1. Apply Petroleum Jelly
  2. Use Commercial Products
  3. Battery Charging
  4. Proper Maintenance
  5. Use Battery Terminal Protectors
  6. Copper Compression Terminals
  7. Limit Battery Usage
  8. Regularly Check Your Battery
  9. Keep the Posts And Connectors Clean
  10. Check Your Battery Cables and Connectors
  11. Make Sure You Are Using the Correct Battery

There are many circumstances in which a car battery may corrode. A car does not have to have been sitting up, not being driven for a long time, for a battery to start corroding. In return, just because the car is driven and maintained regularly does not mean the battery will not show signs of corrosion. We’re here to talk more about why corrosion happens and how to prevent it.


What Causes A Car Battery to Corrode?

car battery corrosion

What is causing the battery corrosion? What does corrosion mean? Is it something to be concerned about? Well, depending on which terminal and the tint of the corrosion, there are many different answers to those questions. Let’s get into the different reasons for car battery corrosion, what to be concerned about, and what you can do to prevent the corrosion.

Car batteries may show signs of corrosion slowly over time, or they can build up fairly quickly. Corrosion does typically get more common and prevalent as the battery gets closer to the end of its product life.

Most often, the corrosion that you see on your car battery is from hydrogen gas that is released from the sulfuric acid contained inside the battery, leaking out, then combining and crystallizing with other gases in the atmosphere. 


Other Types of Car Battery Corrosion

The reason hydrogen gas is formed inside the battery is due to the sulfuric acid cooling and heating up. Other types of corrosion can be due to the types of battery connectors being used. Copper and aluminum connectors react with sulfuric acid to cause corrosion as well.

Also, if your battery is leaking battery acid, this causes corrosion as well.


How to Determine the Cause of Your Car Battery’s Corrosion?

determine reason for battery corrosion (1)

Certain signs will give you an idea of what the cause of the corrosion is. Is the corrosion on the positive, negative, or both terminals? Also, what is the color of the corrosion crystals? The answer to those two questions will give you a clue of what exactly is going on and what needs to be done to correct and prevent continued corrosion.


Negative Terminals

negative terminal

This is the most common place you will see car battery corrosion. If the corrosion is on the negative terminal, that is typically a sign that your battery is not recharging properly. The crystals will typically be white, and this is common as batteries get older and can be a sign that you will need to soon replace your battery. 

You can have your battery at most auto parts stores for free to see if that is the reason. It is possible your battery needs to be completely recharged. Here are some reasons that might be behind why your battery isn’t charging properly:

  • If the battery is not old and you see corrosion on the negative terminals, it might be an alternator problem. Alternators work to help keep your battery charged as it is being used. If the alternator is not working properly, it may not be sending a strong enough charge back to the battery. An auto parts store, when they test your battery, should be able to tell you if the alternator is working properly as well.
  • There is too much power being consumed by the electrical components of your car. This could be from a malfunction that is causing a component, such as your air conditioner, to drain the battery constantly. An auto parts store’s scan may or may not discover this issue. You may need to take your vehicle to a mechanic to find out if this is the issue and to get it corrected.
  • Your battery isn’t powerful enough for something that may have been installed. Your new toy may pull too much charge from your battery. The aftermarket amp you purchased or the extra television screens to play movies in the back seat might be causing the corrosion on the negative terminal. If so, you will want to either remove those items or upgrade your battery. Consult with a professional before upgrading your battery, though.

Positive Terminal

positive terminal

If the corrosion is on the positive terminal, this could be due to overcharging. How could this happen?

  • Your alternator may be overcharging the battery instead of undercharging.
  • The battery was overcharged while being hooked up to a battery charger – this is the most common cause of overcharging. 

Although there are many battery chargers on the market, if you are giving your battery a complete recharge, I would recommend taking it to a professional. If you insist on doing it yourself, be careful not to overcharge.


Both Terminals

If the corrosion is on both terminals, it is probably due to the type of terminal. 

  • Copper will not corrode by itself, but when sulfuric gases are present and with the help of the electrical current flowing through the copper clamps, bluish or greenish corrosion crystals will form. 
  • If the connectors are made of aluminum, the same thing will happen, except the color of the crystals will be white. This is usually a sign that there is a leak of some kind that is allowing the sulfuric gases to escape.

A Word About Electrolyte Leakage

Also, if you see corrosion on both terminals, it may be due to electrolyte leakage. This is rare on a sealed, maintenance-free battery but can happen on a battery where you are required to top the electrolytes with water at regular intervals.

If those batteries aren’t maintained properly, or there is damage that allows the electrolytes to leak out, it will cause corrosion to form. Also, there is a chance of some of the electrolytes spilling onto the terminals while refilling the battery, and that will lead to corrosion forming as well. 


Problems Caused by Car Battery Corrosion

not charging car battery

Car battery corrosion is not anything to be too worried about itself. Mostly battery corrosion is a sign of other problems going on, and addressing those issues, will stop most future corrosion. The good thing is that in most cars, the battery is located in a location that is easily accessible, so it is not hard to keep a check on the corrosion.

The only problem with the corrosion itself is those corrosion crystals are not very conductive and work to slow or limit the charge going from or into the car battery. 

Over time it can get to the point that your car may have difficulty starting or keeping a good charge. This may cause you to need to get your car jumped off. This is common and can be easily fixed by cleaning the corrosion from the battery. Once clean, the corrosion is gone, and without that resistance, your battery should start back performing as expected.


How To Clean Car Battery Corrosion?

Car battery corrosion can be cleaned from the car battery using some common household goods. If you have made it this far, you already know where your car battery is located, but if not, now is the time to find your battery. Refer to your car manual if the location isn’t immediately obvious.

AD

It is recommended to use safety glasses and work gloves to help avoid any accidental injuries while cleaning off the corrosion from the car battery. Also, avoid touching the corrosion with bare skin, and be sure you are doing the cleaning in a well-ventilated area.

  1. First, remove the terminal covers and disconnect the connectors from the battery posts. Loosen the bolt using a wrench and remove the connectors from the battery posts. Start with the negative terminal, then the positive terminal. Red is the positive terminal, and black is the negative terminal. Avoid touching the two connectors together while disconnected. 
  2. Inspect your cables and connectors. This might not aid in cleaning the corrosion off, but the reason to clean corrosion is to keep your battery in good working order, so it makes sense to do other types of maintenance as well. When inspecting the connectors, make sure the cables are secured properly to the connector. 

See if the insulation, which is the rubber or plastic casing around the wires, has become dried, peeling, or cracked in areas. If the copper wiring is exposed to the elements, this will cause the copper to become brittle. This will limit the current flow and cause problems with your car starting and undercharging, so change the cable as needed.

  1. Use your cleaning agent of choice and an old toothbrush or wire brush to clean the corrosion off the battery terminals and connectors. A solution of 3 parts baking soda and 1-part water works well. You can also use lemon juice or vinegar mixed with a little water or any type of carbonated soft drink. FYI: Most carbonated drinks contain carbonic acid, which helps to clean off corrosion and can aid in removing rust deposits. 

Here’s how I cleaned my nut and bolt for the car battery connector. I soaked them in white vinegar and added salt to help speed up the process. It turned out pretty good after I let them sit overnight.

It all depends on how much corrosion has developed on the part you are cleaning when determining how long you should soak it in liquid or with a paper towel. Some people might prefer to use a Dremel to scrub off tough problems, but it won’t work on the thread of nuts and bolts.  

Corrosion remover from nut and bolt

If the corrosion is difficult to remove, do not try using force. Instead, either place the connectors in a cup of the cleaning solution and allow them to soak or if it is the battery terminals themselves, either soak a soft towel or tissue paper in the cleaning solution and cover the battery terminals where the corrosion is for about 20 minutes. The corrosion should come off easily, then. If not, just repeat the soaking step again until all corrosion is removed.

  1. Rinse, then dry all areas you just cleaned. Hopefully, you know water and electricity are not a human-friendly combination, but if not, here is a reminder of that fact. Thoroughly rinse all parts with water to remove any remaining solution or corrosion. Then dry with a soft towel or paper towel. Make sure all parts are dry before proceeding to the next step.
  2. Reconnect the battery. Now that all the pieces are clean and dry, reconnect the battery, and that should solve any starting problems that the corrosion may have been causing. Attach the positive terminal and then the negative terminal. Also, there are several things that can be done during this step to help prevent future corrosion. I have several tips below that aid in preventing corrosion.

Tips to Prevent Corrosion

Now that you understand what car battery corrosion is and how to clean it let’s look at ways to prevent it from happening.


1. Apply Petroleum Jelly

AD

Petroleum jelly can be applied to the connectors and terminals after cleaning. After cleaning the corrosion off and reconnecting the battery, apply a generous amount of petroleum jelly to that area.

The petroleum jelly will keep any future corrosion from forming and can be easily reapplied as needed whenever the coat of jelly starts to wear thin.


2. Use Commercial Products

There are many different battery corrosion preventative sprays and brush-on compounds available for purchase on the market. These work very similar to petroleum jelly in that you clean and reconnect the battery first and then apply the product as directed. 

I used dielectric grease (AD)to help prevent corrosion on the terminals and the connectors. 


3. Battery Charging

car mechanic use voltmeter to check car battery voltage level

If the battery is either undercharging or overcharging, take your car to a professional to find out what the cause is and have that corrected. If the problem is undercharging due to heavy usage from certain items, consider disconnecting those. 

If you want to keep using those items, talk to a professional about possibly upgrading the battery because you need to be sure your car’s alternator will be able to work adequately with a different battery. Also, the battery’s physical size may be too big for the area of a battery in your car.


4. Proper Maintenance

AD

Some batteries need regular maintenance. If so, keep your battery properly maintained. Regular car maintenance is also important in keeping all aspects of your car running properly, so do not forget any other types of services your car may require regularly. 

Other issues can cause other problems that create car battery corrosion as a by-product of those issues. The alternator may need replacing after 100K miles.

Keep in mind many things may cause your car to undercharge, which can lead to corrosion, as you know by now.


5. Use Battery Terminal Protectors

AD

Battery terminal protectors are small pads that fit between the connector and the battery. They are usually made from some type of material that prevents corrosion from forming, such as felt. They are relatively cheap and are an easy way to prevent corrosion from happening. 

To install battery terminal protectors, disconnect the connectors from the terminal and simply slide the battery terminal protectors over the terminal and reconnect the battery. Do not forget to disconnect the negative terminal first and reconnect the positive terminal first.


6. Copper Compression Terminals

AD

Copper compression terminals are made from tinned copper and are specially made so that the clamp fits snugly onto the terminal. This works to limit corrosion from forming in places that would limit the current going from the battery to connectors and onto the rest of the car. These are also some of the best terminals available on the market to purchase.


7. Limit Battery Usage

Happy family sitting in car

Another way to help prevent car battery corrosion is to limit battery use when the car is not running. When you are sitting in the car without it running but still listening to the radio or charging your phone, your alternator is not working, so your battery is undercharging. 

Nobody wants to waste gas, as I was told by my parents growing up repeatedly, but I guess this means that keeping the car running to listen to the radio while parked in the front was not wasting gas. I was helping to save their battery. I still do not believe they would look at it that way now, though.


8. Regularly Check Your Battery

Man looking under the hood on broken car

Routinely check your battery to look for any signs of corrosion. If you start to see some forming, then take the necessary steps to clean the corrosion away. Also, consider why it was forming and take the correct measures to fix what the cause is or apply one of the many products that help prevent corrosion.


9. Keep the Posts And Connectors Clean

keep battery posts clean

Dirty posts and connectors can lead to a loss of conductivity between the two. This can lead to undercharging of the battery, which will cause corrosion. If the posts and connectors are dirty, disconnect them and give them a good cleaning. Be sure everything is dry, though, before reconnecting them.


10. Check Your Battery Cables and Connectors

terminal connection corroded

Check the insulation of your battery cables for areas that are dried, cracked, or peeling. Exposed copper wires do not hold well to the elements and will become brittle, and this will limit current flow, causing undercharging, which will lead to corrosion. 

Also, make sure the cables are attached to the connectors properly. If there is not a good connection there, this will also cause corrosion. If needed, replace cables or reattach them to connectors if loose. If the connectors look damaged, replace them.


11. Make Sure You Are Using the Correct Battery

automotive spare parts store

If you bought your car used, there is a chance the battery in the car may not be the correct battery for that particular make and model. Also, if you have added aftermarket speakers and amps, the old battery may not be strong enough for that added burden.

Talk to a professional mechanic or visit an auto parts store, and they will be able to tell you if you have the correct battery for your needs.


How to Deal With a Leaking Battery?

leaking battery

If your battery has a leak that is causing the sulfuric acid to escape, you will need to replace your car battery. You will also clean the battery compartment itself before installing the new battery in that area to prevent further corrosion. 

Don’t forget to use safety glasses and work gloves to help avoid any accidental injuries while cleaning off the car battery compartment. Also, avoid touching the corrosion with bare skin, and be sure you are doing the cleaning in a well-ventilated area. Here are the steps to clean the car’s battery compartment.

  1. Remove the leaking battery. Remember to disconnect the negative terminal first, then the positive terminal, when removing the leaking battery. Place the leaking battery in a plastic bag and dispose of it properly. Many auto parts stores will do this for you.
  2. Clean out any leaked sulfuric acid. Get some paper towels to clean up any sulfuric acid that may have leaked out. Dispose of those paper towels properly and avoid contact with your skin.
  3. Wipe away any corrosion. Use a wet soft cloth or wire brush with a cleaning solution to remove any remaining corrosion in the car battery compartment. You can use a solution of 3 parts baking soda and 1 part water or just regular white vinegar. 
  4. Clean the connectors. Use the same solution and a soft cloth, wire brush, or cotton swab, and ensure the connectors are clean and free of corrosion. If the corrosion is difficult to remove, do not use “elbow grease.” Place the connectors in a cup of the cleaning solution and allow them to soak for about 20 minutes. The corrosion should come off easily, then. If not, repeat the soaking step again until all corrosion is removed.
  5. Dry the battery compartment and connectors. Using a clean, dry cloth, ensure the battery compartment and connectors are free of any moisture left behind from the cleaning before installing a new battery.

Battery Care and Maintenance

AD

Battery care and maintenance have been touched on briefly throughout, but for those who have skimmed over the article, let me sum everything up here for you. Keeping your battery well-maintained will extend the life of the battery and keep your car starting correctly. This will also, in turn, keep corrosion down to a minimum. It will also keep from putting too much strain on the alternator.

  • Test your battery regularly. As batteries get older and closer to the end of their service life, they get weaker and do not recharge correctly. Eventually, your car will fail to start. Replace your battery sooner rather than later once you see the battery is getting weaker. That last bit of use isn’t worth the aggravation of being stranded somewhere with a car needing a jump.
  • Plan your replacement. Most batteries have a life of 3 to 5 years. When you purchase one, ask about the warranty and expected life. Make that a consideration when selecting a battery, then plan to replace it at the end of the warranty. You can return to the same auto parts store where you bought the battery to have it tested regularly. 
  • Install battery terminal protectors. Battery terminal protectors cost just a few dollars. They are small felt pads and will prevent corrosion and improves the electrical connection between the battery and cables. They are quick and easy to install.
  • Secure your battery. Over time hold-down brackets and battery base clamps may loosen or wear down. This will start your battery moving and vibrating, which shortens the battery’s life. Inspect these parts regularly and replace these parts as needed. If needed, there are kits to give added security or support. These parts are relatively inexpensive and are quick and easy to install.
  • Inspect cables and connectors. Make sure the cables are secured properly to the connector. Inspect the cables’ insulation to see if areas have become dried, peeling, or cracked. Tighten connections and replace connectors and wires as needed.
  • Install a car battery maintainer. A car battery maintainer is for you if you have a car that sits for extended periods or takes short, limited trips. Unlike a traditional car battery trickle charger that never shuts down, a car battery maintainer tests the battery at regular intervals. If the battery needs a charge, it will charge the battery up and then sit idle until it is time for the battery to again. 

Taking care of your car’s battery is fairly easy and will prevent problems from happening in the long run. The sight of corrosion is no reason to get scared, but it is something you need to take care of. Clean it off, apply something to prevent it from happening, and have your battery tested to see what is causing the corrosion. If needed, replace your battery. Here’s to happy, corrosion-free driving!

How to Paint a Steering Wheel: 3 Things You’ll Need


Paint a Steering Wheel

Do you want to paint your steering wheel but are unsure what you will need or where to start? Painting your steering wheel can be a complex project, especially if this is your first time. You want to do it right and make no mistakes.

You only need sandpaper, an adhesion promoter, and one can of vinyl/plastic spray paint to paint your steering wheel. To paint your steering wheel, follow these five simple steps.

  1. Gather the Materials you need.
  2. Remove the Steering Wheel.
  3. Prep the Area.
  4. Apply the Promoter.
  5. Paint the Wheel.

These three things will help your steering wheel look new and have long-lasting results.

Just as there are only a few items needed to paint a steering wheel, there are only a few steps as well. From prepping your area to painting the wheel, these steps simplify the process. 


How To Paint a Steering Wheel?

While you are able to pay someone else to paint your steering wheel, you can save plenty of money by doing it yourself and following these steps.  


1st Step: Gather Materials

At your local hardware store, from Amazon, or in your garage, grab the following materials:

Abrasive Wet Sandpaper Sheets

AD

Adhesion Promoter

AD

SEM Paints Satin Black Color Coat

AD

While these are our recommended products, you can pick different colors or a particular brand adhesive that you prefer. 


2nd Step: Remove the Steering Wheel

remove steering wheel

Depending on the model of your car, there are different ways to remove the steering wheel from your car, which you can reference here

Before you paint, you will have to take apart your steering wheel. Check your owner’s manual to see if it has an airbag or not. If so, the steering wheel can be removed after the car battery has been disconnected for 30 minutes.

Then, disconnect the horn wire from the steering wheel. After this removing the parts becomes easy. For a more detailed process, this should help, or watch the video below.


3rd Step: Prep the Area

Prep the Steering Wheel

When you are ready to start painting your area, you will need to use the 500-grit sandpaper to prep your space. Remove all cracks and dirt, making the steering wheel surface even. Then, the paint can coat the steering wheel evenly as well. 

Be careful not to sand it down too much to where the grip shape of the steering wheel is lost. If your steering wheel happens to have some deep cracks, epoxy foam can help fill in those spaces. Just fill it in according to the package directions and wait for it to dry. 

When dry, sand it down to match the surface of the steering wheel. You want to make sure that during this step, you take your time. The better the prep, the better the result.


4th Step: Apply the Promoter

apply the promoter to steering wheel

When your steering wheel is clean and sanded down, you will want to add your adhesion promoter. This is used so the paint can stick to the wheel. Without it, the paint will slide off. It provides a bond between the steering wheel and the paint for the product to last longer. 

There are two ways you can use the promoter: sponge or spray. The spray promoter is typically used on plastic/vinyl steering wheels, and the sponges generally are used on leather steering wheels. Whichever you decide, liberally apply the promoter and let it dry until there is no sticky residue. You can apply multiple coats if needed.


5th Step: Paint the Wheel

apply paint to steering wheel

This is the easiest part, choose your vinyl/plastic spray paint and paint. Do this outside to protect yourself from the fumes. 

When you paint your steering wheel, make sure to apply it liberally and evenly to make it look uniform. When done, let dry until the paint has hardened and does not have a sticky film. This can take anywhere from 4 to 24 hours to completely dry. If needed, apply additional coats.


Options 6th Step: Apply a Clear Coat

You are done with painting your steering wheel and want to know if there is anything that can make it look better. In some cases, a clear coat of paint can be applied to the steering wheel after it is completely dry. It makes it shiner, and some say that it makes the paint last longer. If you decide to do this extra step, the clear coat can take another 4 hours or more to dry. 


Is Painting My Wheel Worth it?

Painting a steering wheel yourself can save a few dollars, but it can be a bit of a hassle for the beginner. If you want to take it to a professional, a typical price starts at just 500 dollars, without any restoration they deem fit. 

They will charge extra for crack fill-ins, shipping, if necessary, and insurance. Listed below are the highest-rated items needed to paint a steering wheel and the price. As you can see, painting a steering wheel on your own is about 45 dollars compared to a starting price of 500 dollars. All you need is some patience.


How Long Will It Last?

If done correctly, your steering wheel should not have to be repainted for the duration of the car’s life

But if the steering wheel is not properly dried between each step, wear will happen almost immediately. When this happens, the steering wheel will have to be repainted in a matter of months. To achieve not only the best results but long-lasting results, take your time with each step.

During the summer months, when a hot car can get up to 100 degrees or higher, the paint may begin to come off. It is recommended you use the optional step and apply a clear coat. It will harden the outer surface even more and keep the paint from fading away.

If you take care of your car’s plastic and vinyl parts, you can go a long way toward keeping everything looking like new. 

Like any paint job, it will need some care to last for a long time. Make sure to apply your clear coat according to the directions of the product that you are using. 


Visual Aid

Some people have to see it done to perfect the process. Here is a great video to guide you as well.


Other Ways to Paint Your Steering Wheel

Seeing how easy painting a steering wheel can be, you can be more creative more often. Whether you decide to paint your steering wheel a different color every month or every season, these three items are a necessity for it to look great every single time.

One alternative is to hydro-dip your steering wheel. The hydro dip is a new and creative way to paint by using multiple spray colors at once. 

Instead of just spraying the color on the wheel, you can get a bucket, fill it with water and spray your desired colors into the water.

The paint will then sit on top of the water, ready for you to dip the steering wheel. After it is dipped, the steering wheel will come out having a tye-dye aesthetic. Here is a video that shows you. 

Just as it is important for you to dry a regularly painted steering wheel, it is even more important with this technique. The dry time on steering wheel can take from days to weeks to completely dry without a sticky residue.

It is also strongly recommended that a clear coat is added for long-lasting results. This alternative still has the three things you will need; it is just more creative and requires patience.

Depending on the weather, your paint job might take longer to dry. 


Paint Your Steering Wheel With Confidence

By using these three items, there are multiple ways to get the results you want from painting your steering wheel. Whether it is a one-time project or you are looking into changing the color multiple times, these items will be crucial to your success. 

The Reasons Steering Wheels are Round


Steering Wheels are Round

Cars have steering wheels, but bikes have handlebars.  Why is that?  And why wheels? There’s so much variety in cars, so why do car manufacturers not spice things up with a square or triangle-shaped steering “wheel?”

The round shape of a steering wheel provides comfort, safety, and ease of steering. The circular design of the steering wheel gives you control over the entire vehicle and time to react to sudden movements on the road.

To make things even simpler, the steering wheel is perfectly balanced for operation, meaning that it takes the same amount of force to move the wheel from any point on the wheel compared to any other shape.

We’ll also explain each of these in more detail and steer you towards other options that have been tried to turn a car in the direction we want it to take us. 


Symmetry of Movement

Symmetry of Movement

The symmetry of movement alone is one of the biggest reasons that steering wheels are round. Not to mention the comfort and how easy it is to steer with a round steering wheel. 

But to make things even simpler, the steering wheel is perfectly balanced for operation, meaning that it takes the same amount of force to move the wheel from any point on the wheel compared to any other shape.  

Any other shape for a control arm would lead to an unbalance in the steering controls’ weight distribution. A square device would be awkward to control and would limit hand placement on the steering controls.  A triangle shape would always lead to an uncomfortable driving position.

With a circle, you can place your hands wherever you want and still have room to move around. 

The circle shape makes parking easy and possible. Any other configuration would cause parking and driving in reverse to be tricky. Imagine trying to parallel park with a square “wheel.” Many of us would never have passed a driving test.

In this video, you can see how the driver can easily turn the wheel and make corrections with relative ease.


The Physics Behind the Steering Wheel

Engineers use the circle to get the most torque from a single point of rotation. Torque from the steering wheel comes where the angle is between the point of force and the axis to the line of energy.  

The only way to maximize the torque at all optimal points is to use a circle.  With a circle, a vehicle can have consistent torque at all angles of movement.   Amardip Ghodichor,  Senior Engineer at Hella India Automotive, explains this theory here

Two types of steering systems allow a vehicle to turn appropriately, including those nice U-Turns that everybody checks when purchasing a new car: The rack and pinion system and the gearbox system.  Both systems use levers and angles to turn the wheels in the proper place for the intended destination. 


The Rack and Pinion System

The rack and pinion system work by having a steering column connected to a universal joint.  The universal joint makes it so that the steering wheel can remain in one place without having to move it from side to side to steer. 

A pinon at the bottom of the steering column connections is connected to a rack.  When the wheel is turned, the pinion turns the rack, which pushes or pulls the wheels in the direction they need to go to make the turn.


The Steering Box System 

The steering box system works by placing the steering column inside a gearbox, which holds a rod with a spiral cut into it, and a pin that turns with the steering wheel. As you turn the wheel, the mechanism rotates the peg, which turns the wheel.   

At the beginning of this video, you can see the basic operation of how the power steering box works.


Safety

The circular design of a steering wheel gives the operator control over the entire vehicle and time to react to sudden movements on the road. Because of the circular design of the steering wheel, you can grab the wheel at any position, and it takes the same amount of force as well as the same rotational distance to turn the vehicle. 

If a driver needs to move over a lane suddenly, they can accomplish this task with minimal effort, and the movement is the same every time. 

In the event of a crash, no sharp angles can cause a puncture to the abdominal area of the operator. With a square, triangle, or octagon, the possibility of abdominal lacerations or punctures is present during a crash. 

It would also become rather difficult to steer and maintain a constant forward motion with any other shape. 


Comfort

Steering Wheel and comfort

The circle allows for movement to occur concerning the shape of the human body in a sitting position. No matter what size or shape of the operator that gets behind the wheel, the motion, movement, and sensitivity are always the same. 

If someone’s weight hasn’t caught up to their height yet, the wheel is still comfortable enough to adjust for driving. 

Hand placement is crucial when trying to find the perfect spot to drive. Whether it’s 10 and 2 o’clock (or the currently recommended 9 and 3) or even 8 and 4, all these combinations are possible with a round steering wheel. 

Imagine trying to find the 9 and 3 on a triangular steering “wheel.”  


Other Types of Steering

Round steering wheels are not the only way to turn a car.  Here are some other ways that have been tried.


Tiller Steering

Hand on Tiller Steering

Early automobiles used a Tiller-style steering lever like a shipping form of steering a rudder. The lever would need to be pushed in the opposite direction of the intended travel. The lever is pushed to the right, the wheels would pivot, and the vehicle turns to the left. 

With a steering wheel, the operator turns the wheel in the direction that they wish to go. 

Some manufacturers used the tiller steering design in the early 1900s in England. Rauch and Lang Carriage company was one of the last companies to abandon the tiller steering in favor of using the steering wheel. 

Ladder trucks use tiller steering to control the trailer where the ladder is connected to the trailer. Some recumbent bicycles also use the tiller steering system with a person seated almost lying inside the Bicycle with the lever positioned between the legs rising to the rider’s chest.  

The little red wagon also uses tiller steering as well as mobility scooters. 

Trikes and 4-wheelers use tiller steering to control the vehicle. Other vehicles still use the tiller to effectively steer the vessel. These are mostly slow-moving vehicles or remote-controlled vehicles. 


Handlebars

handle-bars.

Since we are used to handlebars on bikes and motorcycles, why not use them for cars?  

Motorcycles and other lightweight vehicles use handlebars instead of steering wheels as there is not much involved in turning the bike, which can easily be controlled by the handlebars.  

With a large four-wheeled vehicle, the handlebars would become too difficult to control the car at higher speeds; therefore, you need leverage or a rack and pinion system, which requires a wheel.   

Also, if a car had handlebars, then you could only turn the handles as far as the dash would allow you to. There’s no way you could ever make a 90-degree turn with a dashboard in the way.

However, it doesn’t mean somebody hasn’t tried building a car with handlebars.  Check out this image.  


Square Steering Wheels

Every now and then, a manufacturer tries something different.  Chrysler used a squarish “wheel” in its 1960-1964 Plymouth Fury.  The British car manufacturer tried something they called “quartic” for their Austin Allegro 1978-1982 models.  That didn’t work out, either.  To see pictures of those and a few other odd variations, follow this link.


Bottom Line 

Even if one-day cars could be steered by some other mechanism, we’ve been so used to calling them steering “wheels” we think they will always be called that.  

Do Car Horns Ever Run out of Honk?


Horns Run out of Honk

We have all heard the joke (especially professional drivers and their families) about someone running out of blinker fluid when they fail to use their blinkers when they turn. That led me to wonder if those people that are constantly honking their horns could run out of that too. So after a little research, I did come up with an answer. 

Car horns can run out of honks not due to running out of any type of fluid but due to electrical issues. Whether it is the wiring harness or the connectors are corroded, usually, the issue is electrical in nature. 

I would like to go over what types of issues can cause a car horn to stop working in more depth and also examine why having a horn in your car can be so vital. Since there are actually a pretty limited number of reasons why a horn would stop working, many people who are not mechanically inclined may even be able to troubleshoot the issue themselves and save money. 


Causes of a Quiet or Silent Horn

silent car horn

While some of these issues may come up with the long-term ownership of a vehicle, others you may only expect to experience when purchasing a new vehicle. Regardless of your situation, a horn that has lost its honk will need to be repaired or replaced.


1. Electrical Short or Wire Damaged

This type of issue can come up at any time during vehicle ownership and can be caused by either just normal wear and tear on your car or through damage such as rodents chewing on things under the hood. 

Although rodents are not the only cause, they can be the most common, depending on where you live in the country and how your car is stored, especially if your car sets for weeks or months at a time. Other causes can include things like: 

  • Car fire
  • Wear and tear
  • Accident
  • Backyard mechanic foul-up

This is a situation that may require an actual mechanic to follow the electrical lines from the battery to the horn to determine if there is damage to the wires and what caused the damage.


 2. Wire Damaged Corrosion on Connections

Corrosion on electrical components can prevent the relay of electrical signals, which prevents certain components, like your horn, from working properly. Whether the corrosion is on your battery connections or somewhere along the lines, this should be cleaned. However, the most commonplace is on the battery terminals due to the acid in the battery. 

If the issue is the battery, then it is a simple case of disconnecting your battery, cleaning both the battery posts and the cables that connect to the battery of any corrosive build-up to ensure that you have the proper connection required for the electrical charge to be transmitted both into and out of the battery. 


3. Blown Fuse

blown car fuse

Somewhere in your vehicle’s electrical system for the horn, sometimes inside the steering wheel, there will be a fuse. This may be a tube-like fuse rather than the flat ones used in your fuse box.

If you have a short or a power surge, you may find that this fuse is blown and will require replacement. Typically, if you can find the fuse, you can easily replace it, not requiring a professional. 

Inside my truck, there is a fuse box under the hood and one inside the cabin on the driver’s side, under the dashboard. As seen in this video, the horn fuse is on the one inside the truck.    

If the issue is a blown fuse and you can get to it, it is probably one of the cheapest fuses since a fuse will usually only run you a couple of bucks to replace.

AD

Often sold in quantity, you may have to pay up to $10 for a set of fuses, which includes a couple of fuses of different amperage. So not only will you get the fuse you need, but also a spare or three. 


4. Horn was Removed or Disconnected

horn disconnected

While this situation may only happen when you buy a car, it is something that does need to be considered when trying to determine why a horn isn’t working. This can be an especially important thing to check off of your list when trying to determine why your horn isn’t working on a newly purchased used vehicle. 

This is more common when someone considers themselves a backyard mechanic and may have replaced the steering wheel or was trying to fix any type of electrical issues within the steering column. Whether by accident or on purpose that it can get disconnected, and it is important that it is reconnected. 

If removed, you will need to have a new one installed, or if you have the existing one, have it replaced. While this is not always caused by a do-it-yourself mechanic, that is the most common cause. It could also be caused by someone who knows what they are doing but decides to sell the vehicle halfway through restoration or repair. 

So, when determining the reason why your car horn is not working, decide to work on a few steps that you feel comfortable doing yourself, and then get help if you feel it is beyond your capability. 

As seen in this video, you can follow the steps from easy to hard, checking the fuse, then the wires and connectors, and lastly, taking apart the horn on the steering wheel.


5. Too Cold

A car horn can stop working if the weather is very cold. In a situation like this, one of the best ways to solve your problems is to let your car warm up and keep it in the garage so it can stay warm.


Why is a Car Horn Important?

Most people tend to take the horn on their cars for granted and may never really use it. It is there for more than just letting your friend know you are out front of their home and you’re ready to go.

It isn’t just for letting your kids know they need to hurry up or they are going to be late. There actually is an important reason for having a horn on a car, and it could save your life. 


1. Distance Alerts

horn to alert traffic

Horns are used to alert someone at a distance, and this can include if someone is driving toward your car and could potentially hit you.

You need the horn in your car to be able to warn others that you are there and that they could hit you. This happens quite a bit in parking lots when someone isn’t paying full attention when backing out of a parking spot. 


 2. State Mandated

register car horn must work

Depending on the state you live in, it may be mandated by your state to have a working horn in your car before you can get your car registered or get your plates renewed.

Some states, like my state of Texas, require a state inspection at an authorized inspection location that checks, among other things, that you have a working horn in your vehicle. 

If your horn has run out of honk and you are trying to register a newly purchased vehicle, one of the things that can actually prevent you from being able to register the vehicle is not having a working horn. 

You may not necessarily need to have one inside the steering wheel, but you would need to have one in your vehicle just to pass inspection. 

Texas is not the only state that requires this either. Most states that do require some type of inspection before registration or renewal will also require a working horn


3. An Expression of Free Speech?

Angry Woman Driver Shouts and honks horn

While this may seem a little off the rails here, I did want to include this simply due to the initial silliness of the situation and the serious turn it has taken.

In June 2018, in the state of California, there was actually a lawsuit filed stating that getting a ticket for using a car horn violated the plaintiff’s first amendment rights.  

While we may not see a horn as being an expression of free speech, we do often use it to express how we feel. As I mentioned above, you may use it to convey that you are in a hurry, whether in front of a friend’s house or sitting at a red light. 

Oftentimes, though, you may honk to support a strike or protest, and this could be considered free speech as well. 


Conclusion

When you are having problems with your horn, make sure to check the electrical system for corroded wires, good connections, and your fuses. The horn is an important part of keeping you and others safe while driving. 

I use my horn with a short burst to let people know the light has changed or polite ways to notify drivers of what’s going on around them. I only push down for a longer period if an accident may occur. What do you do? Hope you can stay safe and solve any horn issues that you may have.

How to Keep a Car from Overheating: 10 Tips that Work!


Keep Car from Overheating

Your vehicle overheating is a serious indication that something is wrong. Every car is prone to overheating at some point in its life, especially those in warmer climates with little vegetation and shade available. Many factors contribute to overheating, and many remedies are available for immediate and long-term avoidance of overheating.

Each type of car is vulnerable to overheating, including typical combustion-run vehicles (powered by fuel) and Electric Vehicles. Coolant and fans are required to keep the central engine cool in any car. However, here are 10 tips that work to prevent a car from overheating:

  1. Find shade when possible
  2. Use window shades
  3. Professionally tint your windows
  4. When parked – Keep windows cracked slightly
  5. Always monitor the temperature gauge
  6. Keep Coolant in your car
  7. If driving – Turn on the heater
  8. When cleaning – Use proper products & Methods
  9. Wax your car often
  10. Take it in for regular maintenance

If you see the temperature gauge reaching a dangerous level more frequently than you would like, use this guide to understand the ins and out of your vehicle’s coolant needs. We’ll walk you step-by-step through troubleshooting and preventative tips for the future. By the end, you’ll know if a mechanic is needed, but you’ll likely be able to handle this on your own.


Introduction to Your Car Overheating

Overheated car engine -

All cars are susceptible to overheating at some point. There is an optimal temperature range where your car is protected for:

  • The safest functionality
  • Prevention from interior fading
  • And the most extended longevity for your vehicle 

Please note beforehand – Do not continue to drive if your car is overheating. If you cannot individually repair it, always call roadside assistance. 


How to Keep Your Car from Overheating? 10 Tips that Work!

Your typical combustion-run car (powered by fuel), as well as Electric Vehicles – each type of car is vulnerable to overheating. 

Any type of vehicle will require Coolant and fans to keep the central engine cool. The temperature gauge will measure these fans and translates this data back to the ECU (Engine Control Unit). The ECU uses the information processed through the vehicle to communicate with the engine. This keeps the engine running.  

Keep everything communicating clearly with the ECU and follow these 10 tips that help prevent future vehicle overheating. You can prevent overheating and keep your car cool by following ways:


#1 Find Shade When Possible

park in shade

This is a top-ranking solution for all car owners to take advantage of. Especially in warmer climates or during the Summer months, this must be taken seriously as not only can the engine of your car overheat, but also the interior.

Researchers at the University of California San Diego found that:

“If a car is parked in the sun on a Summer day, the interior temperature can reach 116-degrees Fahrenheit, and the dashboard can exceed 165-degrees Fahrenheit in approximately one hour – The time it can take for a young child trapped in a car to suffer fatal injuries.” 

Parking your car in the shade whenever possible, will prevent:

  • Cracking of the interior and dash
  • Lowered stress on your interior functions, radiator, and fans
  • Engine overheating

While also extending the life span and functionality of your vehicle. 

Habitual parking in a shady or sheltered location can extend the lifespan of your vehicle because you are keeping all fluids and oils stable. This leads to a more well-functioning vehicle.

Always park in a garage if available because this degree of shade protection will:

  • Prevent fading from UV rays on the interior.
  • Oxidation from weathering and moisture on your paint job.
  • Rust and corrosion into the interior mechanisms.

#2 Use Window Shades

AD

Purchasing a Car Sunshade (AD) is an excellent way to reflect powerful UV rays back outwards, away from your car. Without a light refractor to redistribute those light rays, a greenhouse effect will cause the extreme temperatures to rapidly raise. 

If you have children or a full car, also consider Side Sunshades (4px) (AD) for your backseat riders as well. Consider purchasing custom shades that are suited to your car’s model. These can often be purchased at the dealership where your model sold.


#3 Professionally Tint Your Windows

window tint

An upgrade above window shades, you can also have them professionally done. 

A professional window tint adds a layer of film to the glass, which makes it darker and tinted. When you can’t see inside of someone’s vehicle, this means they’ve had the windows tinted. This film will keep the interior much cooler and protect the family from UVB and UVA rays that lead to sunburn and skin damage. 

(Be careful not to tint too far, as this can be illegal. Police need to be able to see your vehicle slightly, but the professional tinting expert will be aware of this). In Texas, for example:

“Vehicle windows in Texas are allowed to have tint, but the amount of tint depends on the window. No tint is allowed on the front windshield below the AS-1 line (or the top five inches), and tinting on the front side windows must allow 25 percent or more of light in.”

This will vary from state to state but communicate with your tinting professional to find a tinting degree that works for you and remains legal. 

A basic window tint on Angie’s List is only $99, but this could range upwards to the thousands depending on your vehicle and the quality of your window tint preference.

The benefits of a window tint (as compared to a more-temporary solution of a window shade) include the following:

  • Lowers the temperature inside your vehicle
  • Increased privacy
  • Prevents UV rays from weakening the car aesthetically and mechanically)
  • Prevents the risk of shattered glass
  • Protects the:
    • Dashboard
    • Carpeting
    • Leather
    • And all upholstery – Protects Against
  • Fading
  • Cracking
  • and Overall damage 

#4 When Parked – Keep Windows Cracked Slightly

window cracked open

To follow up on any vehicle’s propensity for greenhouse gas effects. Jonathan Strickland on How it Works compares the atmosphere to the inside heat of your car:

“The heat radiated by the seats is a different wavelength than the light of the sun that made it through the windows in the first place. So a certain amount of energy is going in, and less energy is going out. The result is a gradual increase in the temperature inside your car.”

The only real release for this heat is ventilation and airflow. Do this by cracking your windows slightly when you plan to leave them in a hot parking lot or driveway for extended periods. You can also crack your sunroof slightly and combine this with your tinted windows or less-permanent window shades. 


#5 Always Monitor the Temperature Gauge

Car Water Temperature Gauge

Near the speedometer, you will clearly see a gauge that states F-C (Fahrenheit to Celsius) or H-C (Hot to Cold). Keep an eye on this with the same regularity and normalcy as you watch the gas tank gauge. 

Use the temperature gauge throughout hot Summer days to determine if you’re pushing your vehicle too hard. 

If the car is reading as too hot, you shouldn’t ignore this. It doesn’t have to be smoking and steaming for your car to communicate something important. If the radar seems too high or close to hot (at around 80-100% hot, rather than being neutral or approximately 60% hot), the steps you can take to cool it off are:

  • Slow down.
  • Turn off the air conditioning.
  • Don’t pedal or brake so hard.
  • Brake less frequently or firmly.
  • Park for a while if necessary.

#6 Keep Coolant in Your Car

check and fill coolant

The internal functions are left cool enough to operate through the combination of fans and antifreeze coolant.

Antifreeze is an ingredient used within Coolant (with Coolant often being 50% antifreeze, 50% water). 

Tip for safety – Never fill up Coolant while your car is hot. It can just evaporate and be rendered useless, also with the potential to burn yourself. Wait for the engine to cool before ever adding any coolant or water. 

The steps to check this and fill your coolant mixture if needed are as follows:

  1. Find the plastic tank of Coolant by the radiator.
  2. If the tank is not translucent, you may need to remove the screw top to see how filled the Coolant is inside. Twist the cap counterclockwise to remove it from and view the coolant tank. 
  3. Read the markings that indicate the proper amount of antifreeze. 
  4. If it is low, fill it with your spare bottle of Coolant (AD).

#7 Turn on the Heater When Driving

turn on car heater

This may sound counterintuitive, but the air-conditioning is connected to the engine, while the heater is not. 

Turing on the air-conditioner will worsen the problem and make your engine even hotter.

Conversely, turning on the heater will pull air away from the engine. This will pull air out of the engine and immediately cool down your interior functions.

This technique will be ideal if you’re stuck in traffic and can’t pull over immediately. 


#8 Use Proper Products & Methods When Cleaning

protect car with uv product

Utilize soap specifically made for Cars, and don’t wash the car in the sun. The powerful UV rays will damage your paint coat, increasing the risk of your interior overheating. This also goes for waxing because the sunlight will beat down on your freshly-waxed car and undo any good you’ve done.

Tips for properly cleaning your car to protect against heat are:

  • Avoid washing in direct sunlight.
  • Use a gloss product for the dashboard, which will reduce glare (reducing greenhouse effects)
  • Use a dashboard protector or windshield sun protector such as TriNova UV Protectant Spray (AD) to strengthen your car’s internal chance against overheating. 
  • Use soap for distinguished proper purposes (if it is rust-remover, only uses on rust, etc.)
  • After washing, dry thoroughly with a lint-free cloth. Any water can drip into the engine and cause moisture damage, such as
    • Rust
    • Corrosion
    • and Mildew
    • Warping
    • Malfunction

#9 Wax Your Car

wax car

While waxing your car, just as with washing it, avoid direct sunlight, this adds an additional barrier of protection to your car against UV rays.

Purchase a wax that mentions being ‘UV Ray Protectant & Warp Safe Hybrid Wax.’ (AD)


#10 Take Your Car In for Regular Maintenance

take car in for maintenance

Yes, sometimes the best thing to do is what is normally expected of a car owner. The best protection for your vehicle is to keep it running at 100% 

Be sure that you are doing the bare minimum of:

  • Regular annual inspections
  • Oil changes every 3,000 to 5,000 miles (AAA describes that “It used to be normal to change the oil every 3,000 miles, but with modern lubricants, most engines today have recommended oil change intervals of 5,000 to 7,500 miles. Moreover, if your car’s engine requires full-synthetic motor oil, it might go as far as 15,000 miles between services.”
  • Battery replacement (required every 3 to 4 years, potentially more frequently in warmer environments and for those that drive less gently). 
  • Radiator flushes to clean out the Coolant (about every 40,000 miles but regarding your vehicle’s manufacturer’s recommendation). 

If you want to try to do it yourself (DIY), then you can try some tricks to fix it yourself. In this video, there are some common ways a mechanic might try to find out what is wrong with your car. 


The Short- and Long-Term Impact of Your Car Overheating

The ideal temperature for your engine should be between 195 to 220 degrees Fahrenheit. Your car is impacted by conditions that are too hot and extreme temperatures that are too cold.

Overheating can cause:

  • Engine damage (costly repair)
  • Cylinder heads will warp (costly repair) 
  • Blown head gasket (costly repair)
  • Melt holes in the piston
  • Conflicts with combustion functionality
  • Increased risk of an engine fire or potential explosion
  • Heat functions get warped inside, possibly to the extent of being irreparable 
  • Expensive repairs that compound and accumulate 
  • Risk of fatality

These hazards are dangerous and can lead to an accident or, quite frankly, death if not taken seriously. What you’ll gain from this article is the ability to troubleshoot and repair the most common overheating issues on your own. 


Common Causes for a Vehicle Overheating

The main reasons that you will experience a car overheating are due to the following circumstances:

  • Blocked coolant flow by a closed or broken thermostat (often a budget one in economic models)
  • Not enough Coolant (keeping the fans, engine, and transmission cooled)
  • Blown gasket (can be a cause or effect of temperature-related concerns) 
  • Coolant hose leak causing not enough Coolant
  • Plugged heater core
  • Malfunction causing too much Coolant to flow
  • A damaged water pump that isn’t circulating Coolant
  • The clamps on the hose are too loose.
  • Cracked radiator (allowing antifreeze to leak) 
  • Clogged radiator (not allowing antifreeze to flow properly)
  • Broken fans
  • Not enough motor oil
  • There is another problem causing major malfunction, enough to cease your car from being operational due to visible signs of heat distress.

The simple explanations are:

  • Hot weather – The main reason your vehicle overheats is direct sunlight. 
  • UV ray exposure
  • Often combined with greenhouse gas effects in a car with no cracked windows, ventilation, or air circulation (which greatly increases the temperature and UV impact). 

It could be something wrong, or it could simply be too hot out for your vehicle to run as it should. 


Indications That Your Car is Overheating

indications car is overheating

It should be quite evident if something is wrong, but your car usually offers some warning signs.

The indications to signal to you that your vehicle is overheating are:

  • The temperature gauge begins in the middle but steadily moves up toward the peak setting. It may also fluctuate back and forth quickly and seem to be rapidly crashing or breaking.
  • A warning light appears on your dash (the check engine light or maintenance required lights).
  • You smell a burnt fragrance like:
    • Burnt rubber.
    • Melting plastic.
    • Charred metal. 
    • It simply smells ‘hot.’
  • You hear a ticking noise when you are at a stoplight or stop sign. This could be:
    • A coolant leak hitting the ground.
    • Or the engine is ticking because there is insufficient lubrication to propel each part sufficiently.
  • You visibly see smoke or steam coming from the hood – This likely won’t happen unless you’ve pushed your car to the brink. You should pay attention to the subsequent warning signs before allowing it to get this bad. If you see smoke, you can immediately presume you’ll be paying for some level of repairs. 
  • You see Coolant leaking – This will be brightly colored (neon pink, green, purple, or blue) and should leak directly under your engine. Park in one spot and roll your car forward to see if any leaks are obvious. It will be easily distinguishable from gasoline’s fragrance and rainbow-translucent appearance. 
  • Your engine takes significantly longer to start.
  • The car is offering less power than usual.
  • Your car won’t start.

If Your Vehicle Overheats – Here’s What to Do!

If you’re driving and the vehicle overheats, action must be taken immediately. The steps to take when action is required are: 

  1. Immediately pull over.
  2. Turn off the car and pop the hood.
  3. Check the coolant and fill up if low.
  4. If you have no coolant, use warm water.

The breakdown of these steps for further clarification are:


#1 Immediately Pull Over

car pulled over

If you see the temperature gauge steadily rise – Your ECU is communicating for you to stop putting pressure on the engine. Do this by pulling over and avoiding further damage to your engine.

If You Can’t Pull Over Immediately:

  • Try to stay off the brakes, as this friction increases the internal temperatures of your vehicle.
  • Use the heater and avoid the air-conditioning. 
  • Turn on the floor vents, which will redirect the hot air that rises. Send the hot air outwards by using the heater and the floor vents combined to cool the car. 
  • Rev the engine – Again, this may seem counterintuitive, but by putting the car in neutral and revving the engine, you actually send water flowing through the radiator, which cools down the engine.

None of these measures will fix the problem, but they will help you drive a short distance to pull over safely or call roadside assistance. 


#2 Turn Off the Car and Pop the Hood

open the hood of car

Once you’ve safely pulled over, you’ll need to pop the hood to increase airflow and investigate. This should be done whether there is smoke coming from the hood or not because it allows the steam to disperse more quickly.

Allow your vehicle to cool for at least thirty minutes; some recommend up to an hour before even attempting to touch it. Turn off your car and all air-conditioning that makes the engine run harder. 

The steps to pop your hood are as follows:

  1. Search inside your vehicle for the (press, push, or pull) lever. It will often be on the driver’s seat for easy accessibility, nearby where you would pop the trunk or gas valve (near the electricity charging port if on an electric vehicle). 
  2. Pull until you hear it pop. 
  3. Release the safety lever to pop the hood fully.
  4. Be careful not to touch anything too rapidly as it could be scorching hot/could burn you.
  5. Use the hood rod to prop your hood open. Be sure this is stable and securely keeping your hood open so that nothing falls on your head or fingers. 

#3 Check Coolant and Fill Up If Low

Car coolant checking

After your vehicle has cooled down for half an hour, look for the translucent tank that is located near the radiator. These are the coolant reserves that keep the engine and transmission cooling.

(Steps to fill your tank with Coolant are listed above in the ‘How to Keep a Car from Overheating,’ section, under #7).


#4 If You Have No Coolant, Use Warm Water

use water for coolant

As mentioned, the coolant mixture is substantially made of water. Keep in mind that adding more water is thinning the antifreeze in further solvent (lowering its potency and effectiveness). 

This is not a long-term fix; however, it is the ideal step to take in this instance. Adding a bit of water (when you don’t have Coolant) will at least allow you to drive to your local autobody shop. 

Important note – Always use warm water and avoid cool water. Cold water against the overheated engine that is nearly 200 degrees Fahrenheit or more can cause engine cracking. 

After filling the tank with your Coolant or water: 

  1. Try to turn on your car if things are not smoking or if they seem cooled off. 
  2. Read the temperature gauge at this point.
  3. Determine if the coolant/water is working as it’s supposed to.

At this point – Get your vehicle inspected as soon as possible. If this does not work, call a tow or roadside assistance. 


Costs to Repair an Overheated Car

cost to repair car

If your car has overheated, you should always take it in for inspection as soon as possible. You do not want to risk driving a dangerous car that’s overheating, flammable oils, and combustible chemicals. For your safety and those around you, get a professional inspection on a recently overheated vehicle.

The cost is difficult to determine based on the many possible reasons we’ve covered. Since there are so many possibilities, this warrants a wide range of prices. 

To offer you some potential examples, you could look at paying:

  • A cracked radiator can cost between $292 and $1193 
  • A water pump replacement can be between $500 and $1,500
  • Replacing a radiator hose will be between $35 to $65 

Please note – Your repairs will tend to be cheaper when addressed more immediately. The longer you leave a problem, the worse it will get and the costliest the repair will be. 

Something that could be a $50 fix may compound into a $500 replacement to be necessary. 

Take action before it gets this bad, and always heed your vehicle’s warning signs. If you try to DIY do it yourself, you may be able to save some money, but you should take the time to make sure you study how to do the procedures correctly. 


Final Tips on Vehicle Maintenance

call a tow truck

A few final tips to be aware of in maintaining your car against risks such as overheating are:

  • Check if It’s Just Running Hot – Many cars ‘run hot,’ as they call it, but this is not overheating. It could be something such as owning an outdated model. Even if the car does not smoke and steam, be wary about pushing an easily ‘hot’ vehicle to its brink.  
  • Call a Tow – Don’t attempt to drive your vehicle if it’s overheated, as you could be risking your life. Call AAA or your roadside assistance provider to transport your ride to a reputable mechanic.
  • Carry an Emergency Kit – With items such as:
    • Coolant
    • Water (distilled is best)
    • Flashlight
    • Roadside assistance emergency card (with account and customer service # on it) 
    • Rope
    • Oil
    • Spare tire
  • Don’t Discount Exceptions to these rules – We covered many possibilities, but it could be something like:
    • A plastic bag that is stuck in your exhaust and causes a burning odor. 
    • Plastic components attached to your car overheat and emit an oil film.
    • A brake caliper impacting your brakes
    • Or something seemingly unrelated.

These exceptions are why you must get an inspection if you see any warning signs. 

Do not assume Coolant or water has fixed your problem or that your vehicle is safe to drive on these remedies alone. Only drive your car following the advice of your trusted mechanic.