
Some car problems can be avoided, while others are inevitable; a dead battery, for example, is an issue that all vehicle owners will face at one time or another, usually at times when they are not near a convenient auto parts store to get the battery immediately replaced or charged. And the worst-case scenario, you might not have access to jumper cables to get your car going again with the help of another vehicle. However, fortunately, there are a couple of solutions to overcome this.
How do you jumpstart a car without another car? If you have a dead battery and do not have access to jumper cables, there are two main ways to jumpstart the car without another car: using jumpstart kits or taking the manual transmission approach.
A sudden dead battery can lead to a lot of stress. However, the best way to prevent getting stuck in a situation where you can’t jump your car with another car is to be prepared before it happens. The remainder of this article will discuss the two ways you can jumpstart a dead car battery, in addition to how to recognize the signs of a dying battery, maintenance tips to help it last longer, and more.
Understanding Car Batteries
A car battery is a charged, black rectangular box, designed to help support the electronic functions of a vehicle. It is usually found under the hood of most vehicles, although it can be assigned to different locations, depending on the car model.
The battery is designed with two terminals, through which it releases and takes in charges. The primary function of the battery is to charge the starter. The starter, as its name suggests, is responsible for allowing the car to start. Another aspect of a vehicle that works with the battery is the alternator. While the battery charges the starter, the car alternator charges the battery. This complete circuit must be intact for a car to start properly.
Qualities of a Good Car Battery
Because of their importance, it is easy to see how batteries can provide many benefits for vehicles to continue to run well. However, if they are not in good condition, to begin with, they can fail faster. The following are six qualities of a good, long-lasting car battery:
1. Optimum Power Rate
According to Auto Batteries, the maximum voltage of a standard car battery is 12.6. Only a good battery can deliver the best power supply in a car’s system. A bad battery will tend to emit low voltages after a high-performance rate.
2. Minimum Maintenance
Good batteries do not develop issues easily and therefore require less routine maintenance compared to older batteries.
3. Fast-Charging
An excellent battery charges faster and stays charged for longer periods. A poor battery, on the other hand, may demand more than infrequent charging and will take much longer to reach a complete charge.
4. Desirable Weight
A good battery has a standard and bearable weight. Although car batteries are naturally heavy, poor ones have excess weight due to wear-out and dead components that build up in the battery’s compartment.
5. Minimum Discharge
Discharging is a common symptom of a bad battery; no matter the level of charging, it discharges easily. On the other hand, a good battery tends to stay charged longer, even at a low voltage.
6. Longevity
Finally, due to its performance and high efficiency, a good battery stays effective longer compared to average ones. Its parts do not wear out easily, even with high usage.
How to Make a Good Battery Last
According to Your Mechanic, the minimum lifespan of a car battery is two years, but it can last as long as five years—even six years—with the right maintenance. Many environmental factors can also influence the lifetime of your battery, including your geographic location, temperature, humidity, and more. A battery can perform at its best in the right temperature and humidity.
It is recommended that you replace your battery every two to three years—or around when your warranty is set to expire—to avoid unwanted battery troubles; do not wait until it malfunctions before you decide to change it. You will save yourself lots of time and stress that way.
Two Ways to Jumpstart a Car Without Another Car
Even with a good battery, car owners will eventually reach a point where it will exceed its warranty and start to go bad or lose its power. In these cases, you will likely need a jumpstart to get the battery going one more time to reach a destination where you can get it replaced or fully charged.
Commonly, jumpstarts are performed using another vehicle; a set of jumper cables are connected to the appropriate battery terminals between each car—the goal being that the running vehicle’s battery will be able to provide enough of a charge to the dead battery to allow the car to start once again.
However, there are two other ways you can jumpstart a car, without needing to rely on a secondary vehicle. Both are described below, each with its own series of steps:
Jumpstart Kits
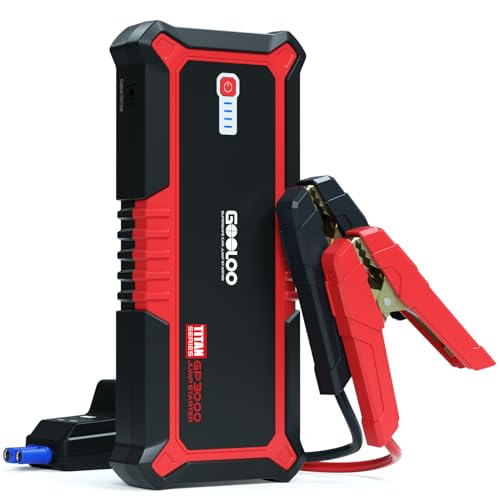
The first way to jumpstart a car without another car is by using a jumpstart kit. A jumpstart kit is a portable power supply, equipped with a movable battery. The battery has the same voltage of 12.6 as a typical car battery. The only difference is the design.
A jumpstart kit’s features include a portable bag and cables. The bag is used to carry the kit, designed to prevent electric shock. The cables are used to connect the kit’s battery to a vehicle.
A major benefit of having a jumpstart kit is that it can be left in the car in case your battery goes bad or loses power.
How to Identify & Test for a Good Jumpstart Battery
Of course, a jumpstart kit is only as good as the battery it contains. Make sure you test a newly purchased kit to make sure it is operational. There are four steps to do this:
- Remove the jumpstart cables from the bag: The cables are the first thing to be conscious of because they are part of the kit. A bad cable might lead to sparks or fire. Note: the terminals are usually in (-) and (+). Most of the time, they are selected by color: the red cable denotes the (+) terminal, and the black cable denotes the (-) terminal.
- Remove the car cables: Although the cables are made from the same materials, the car cables are different from the jumpstart. The car cables are connected to the car battery, while the jumpstart cable is the new cable removed from the kit’s pack. Make sure your car is off first. Now, remove the car cables connected to the battery, and place them on the safe side.
- Connect the jumpstart’s cables: You have to connect the jumpstart’s cables similarly to the battery cables you removed. Usually in the form of (+) terminal of the battery to (+) cable or (+) terminal to the red cable. Also, the (-) terminal of the battery to (-) cable or (-) terminal of the battery to the black cable.
- Turn the ignition key: When the connections are correctly made, then turn the ignition key and perform the normal car check-up, like switching on the headlight, the air conditioner, and others. If the jumpstart kit’s battery can help perform those actions, then it is a good battery. Otherwise, the battery is not fit to charge another battery.
This testing process is important; the efficiency and how well the jumpstart kit’s battery performs will determine if it is capable of charging a dead car battery.
10 Steps to Jumpstart a Car with a Jumpstart Kit
Using a jumpstart kit to get a car going again is the easiest and most straightforward way to jumpstart without needing another person or vehicle; all you need is caution. However, it is beneficial to also have gloves on hand while you work between the kit and the car battery.
1. Turn the ignition key to turn off the car.
This is the first and most crucial safety measure. With any process that involves an electrical source or power, it is highly recommended to switch off any circuit that can make a “complete circuit.” By switching the car off, the battery is safe to touch, in addition to some other parts, without the risk of electric shock. If possible, you can remove the key from the socket and put it in a safe place.
2. Open the hood.
Most car hoods are on the front side of the car, although there might be some modifications depending on the specific model. Release the lever to open up the hood, which will either be located near the hood on the outside of the car or within the vehicle underneath the steering wheel. Some hoods require a holder to stay open, while others do not. If your hood needs to be held up, make sure you put a holder in place.
Safety Tip: Due to the metal construction of the hood, make sure that while you work with the battery, you avoid touching the hood with the cables to prevent electric shock.
3. Position the jumpstart kit in a safe place.
Because the goal is to use the jumpstart kit, it is highly recommended that you place it near the car battery, safe from falling or touching nearby metallic objects around the vehicle, such as the hood. Make sure that you do not touch the terminals with your bare hands while moving the kit, and avoid making contact with other objects with the kit.
4. Connect the jumper cable.
The cables of a jumpstart kit usually have alligator clips already attached to their ends. In the event the clips are not pre-attached, you will need to fix them to the cable. You can do this by peeling back the cable covering and connecting the naked wire through the clip’s hole.
When the cables are ready, connect the clips to the battery terminal by pressing the insulative head of the cable; then, the mouth will open wide. Carefully place it on the battery terminal in the connections of the (+) battery terminal to the (+) cable or red color. Likewise, the (-) battery terminal should go to the (-) cable or black color.
Make sure the connections are tight and correctly placed. Once you have successfully connected the jumpstart kit’s cable to the car battery’s terminal, you may notice a small spark; this is normal.
Safety Tips: It is recommended that you wear gloves before you attempt to connect the clips to the cables or attach the clips to the battery. Do not touch the battery terminals with a wet hand or object besides the clips.
5. Switch the jumper kit’s battery on.
At this point, you should be able to charge the battery. The jumper battery kit has a power switch; press it to switch it on. Be careful when dealing with the power source. The car battery will receive electrical charges to power it up after pressing the power button.
You must charge the car battery for at least 5 minutes; whether you need to charge it for longer will depend on the condition of the dead battery. If it is totally dead, it might require more than the average charge time before it is up and running again.
6. Turn the ignition key to start the car.
Once the car has charged and the appropriate amount of time has passed, do not remove the connections before you switch on the car; this is very important as it might discharge the battery, and you will have to start from the beginning.
After at least five minutes have passed, turn the ignition key; if the battery has charged enough, the car will start. You have to wait for the car to start; if it does not start, you will have to continue charging the battery with the kit for longer.
You can only proceed to the next step if the car has started running. Make sure you do not turn the car off once you have got it going.
7. Turn off and disconnect the jumpstart kit.
As mentioned in the previous step, you can only perform this step if the car has started. Do not remove the jumpstart battery’s cable if the car is still not running. You will also need to leave the car running during this process.
First, switch off the jumper kit before disconnecting the cables. To remove the jumpstart cables, press the insulated ends of the clips together and raise them, so as to remove them from the battery. Gently remove the positive cable, then remove the negative cable. If you can remove the two together, you can go for it.
Safety Tips: As mentioned before, do not touch the terminals with your bare hands. When you grab the alligator clips of the cables, only handle them at their insulated ends, not the visible metal portion.
8. Keep the car engine running.
This step remains to be very important as it determines if you will need to start all over again, or not. If you switch off the engine immediately after you have removed the jumper, you will have to start from the beginning because the battery is not necessarily charged all the way after five minutes of being connected to the kit.
The main purpose of keeping the car running is to allow time for the alternator to pick up. Once the battery has picked up a little charge from the jumpstart’s kit, the signal will circulate through the car system, making the alternator functional.
When the assisting battery from the kit is removed, the alternator will begin to charge the car battery on its own. You’ll have to keep the car running or drive it about after disconnecting the kit to ensure enough power stays within the circuit.
9. Close the hood.
This is the last step. Make sure you remove any lingering tools or cables from underneath the hood before you latch it back in place.
After this, you can then drive your car about and keep it running for about 30 minutes or as long as you need to get it to the right place for full battery charging or replacement.
Manual Transmission Approach
Charging a car battery with the application of the clutch, gear, and brake is essentially the definition of a manual transmission. This method is also known as clutch starting since the clutch determines most of the starting processes.
Note: The manual transmission method of jumpstarting a car, as the name suggests, will only work with a manual gear car system, or, in other words, manual cars. While this method could potentially be used to jumpstart an automatic car, it comes with a high risk of damaging the car in the process. Only use this approach with manual transmissions.
There are not many tools required for this process; it only requires the help of an additional set of hands.
1. Check the ground level.
The manual transmission method requires a high level of speed, at least beyond average. The speed is the propelling factor that stimulates the battery to receive charges, and thus, kickstarts the alternator to charge it.
A car cannot reach a significant speed if it cannot start, so the trick to achieving it is to start off on a path with a little bit of an incline so that it can manage to roll down. The path or road should be about 300 meters long to give the car enough time to reach a decent speed coming down the incline.
It is important to note that a car will not have full control while using this approach; only steering and braking will be available, so it is important to only use this method in an area where there are few to no cars or on the side of the road so as not to impede traffic or become a road safety hazard.
2. Make a clear path.
As the process involves motion even at high speed, there is a need to know the specific road you choose to do this on. A road free from obstacles and potholes that may cause the car to lose control due to high momentum should be avoided.
3. Turn the ignition on to start the car.
The battery may be dead, but the steering and other components must be released. Turning the ignition key opens up the steering so the car can be directed.
4. Change the gearbox to the second gear.
The ideal gear for the manual transmission jumpstart is the second gear because it has less torque, resulting in less jerking during the process.
The first and third gears can be used, but the first gear has more torque than the second, and thus jerks more during the process. The jerking is not safe; it may lead to complications if mishandled. On the other hand, the third gear creates more speed than the second gear. The speed, if it is out of hand, might lead to an accident, especially if the car does not gain control of its operating system.
5. Locate the hand brake.
The location of the hand brake varies in many cars; most vehicles have it beside the driver, irrespective of the driving side.
If you do not know where to find the hand brake, check the car manual or on the vehicle’s manufacturer’s site.
6. Release the hand brake.
If the car is about to be set in motion, you will need to make sure the hand brake is released. Have a second person stand behind the car, ready to push the vehicle forward.
7. Press and hold the foot brake and the clutch.
This is the preparatory mode of getting the car ready for a clutch start. The clutch and the brake should both be pressed all the way down.
8. Release the brake when the car is in motion.
Slowly release the brake as the other person behind the car begins to push it forward. You will both need to work together to get the vehicle at a good speed as quickly as possible. The higher the speed, the quicker the car can respond to this process. Guide the car using the steering down the road or path.
9. Release the clutch at 5mph (8km/h).
Once the car is in motion, at about 5mph or higher, the clutch should be released. At this point, the car should start. If not, you will have to repeat the previous steps and achieve a higher speed than before.
10. Hold the steering wheel with a tight grip.
There is a high chance that the car will jerk as the car attempts to start up; make sure you have full control of the vehicle at all times. Avoid making unnecessary turns and continue on a straight path.
11. Press and hold the clutch.
This step is very important, and can only be performed when the car is in motion after the clutch has been released initially and the car has started.
12. Change the gear to neutral and hold the brake.
After all the previous steps, find a spot where you will not create traffic. Change the gear to neutral and hold the brake. Essentially, you are temporarily parking the car.
13. Leave the car running.
Sit in place and allow the car to run for at least 15 minutes. Do not turn off the car immediately after it has been parked; this could discharge the battery and force you to start the process all over again from the beginning!
In Summary
The two main processes described above allow cars to be jumpstarted without the use of another car. The jumpstart kit is one method that can be used across all types of vehicle make and models. However, as mentioned before, the manual transmission method is only suited for manual cars; an attempt to use it on an automatic car can cause serious damage to the vehicle.
The jumpstart kit can be left in the car, so it is ready to use whenever you need it the most. Although it can be an investment, it is well worth having on hand in case your car battery dies when you least expect it to. The manual transmission method does not require any equipment besides a buddy, but it can be more dangerous to perform, especially if you are on a busy street.
With either method, make sure you keep safety in mind. Use insulated gloves and be mindful of where you place your hands or cables when using a jumpstart kit. Stay aware of ongoing traffic when pursuing the manual transmission jumpstart method.
References:
mycarpick.com – Update: website unavailable